
How to Cover a 12" x 12" Cake Board with Scrapbook Paper!
How to Cover a Square Cake Drum – (12” or smaller)
Materials Needed:
- Cake drum (I always use ½” thick)
- 12” x 12” sheet scrapbook paper
- Roll of contact paper
- Scissors
STEP 1
Trim your craft paper to the size of your cake board. If you’re using a 12” inch square cake board and a 12” x 12” inch scrapbook sheet (like I’m using today), you don’t have to do any trimming! Awesome!
STEP 2
Cut your contact paper about 6 inches bigger than your cake board. 12” square board? Cut your square about 18 inches. Contact paper has pre-marked lines for easy measuring and cutting. You can just “eyeball” it on this step, you don’t have to be exact. Just make sure you have at least 2 or 3 inches on all 4 sides (otherwise you won’t have enough sticky paper to adequately adhere to the back of the cake board).
STEP 3
Peel the back off the contact paper and lay it on your work surface sticky side up. Be very careful you don’t wrinkle the paper as you’re pulling off the back and don’t allow any creases or folds, etc. You can’t always iron them away and wrinkles are totally forbidden! Unless they’re hidden under the cake later, of course. ;)
STEP 4
Make certain that your sticky paper and your pretty scrapbook paper are free of any lint, icing, or debris. Once you have confirmed that, carefully lay your craft paper “pattern side down” in the middle of the contact paper, so the pattern adheres to the sticky bit. Smooth it out nice. Turn it over and examine the covered paper. No debris, correct? There! Perfect!
(If you do see any debris, gently roll the contact paper back off of the scrapbook paper, taking care not to pull the pattern off the paper, and use tweezers to remove said debris.) Re-examine. There! Perfect!
STEP 5
Now lay the paper, pretty side down towards the work surface and sticky side up – and place your cake board on it (silver side down). Line up the cake board with the edge of the paper underneath. A little edge showing is fine, but only a little. You can just barely see my tiny yellow edge showing here along the bottom edge of my cake board (see the section highlighted in blue).
STEP 6
Cut out the 4 corners.
STEP 7
Using 2 hands, (ok, I had to use 1 of my hands to take the photo, but you should be using 2!) pull one of the edges of contact paper up and over the edge of the cake board, being careful to keep the edge of the colored paper lined up with the bottom edge of the cake board. Run your hand over the contact paper to adhere it to the cake board. I like to do opposite sides first, to keep the paper from moving “out of position.” Continue on with the three remaining sides, pulling TIGHTLY to avoid wrinkles and gaps, until all 4 edges are adhered to the cake board and perfectly smooth.
STEP 8
TA DA! Can you tell this board is covered with contact paper? If you’ve done it “right” – there are no wrinkles, no folds, no bends, no air bubbles, no lint or icing or grit between the pretty scrapbook paper and the contact paper, and it should be extremely difficult to tell the paper is covered with anything.
STEP 9
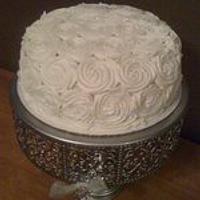
You’re almost finished except for the ribbon. (Before you finish, remember to always place your cake on its own “to size” cake board, NOT directly on this contact paper-covered board.) Once the cake is fully decorated, cover the silver ½” side of the cake board with colorful ½” inch ribbon (I use a thin line of hot glue which works PERFECT). Don’t skip this step, as it can really play up your design! See the cake below without ribbon and the one below that WITH with ribbon?

Note: Did you notice the awesome price tag on this baby? I only buy scrapbook paper when it goes on sale for 50% off (monthly, at Hobby Lobby), which means I paid a whopping 18¢ for this. Ok, no wait, you got me! 19¢ once you add in tax. When they go on sale, I go CRAZY and buy stacks and stacks of these in all colors, themes, and patterns. I do the same thing with the ½” ribbon. Later I can mix and match to coordinate with the design of the cake.
**If you want to cover a cake drum bigger than 12”, obviously you can’t use the 12” x 12” scrapbook paper sheets “as is,” but you can use more than one and cut them and piece them (if the design allows), and you can always use other papers or materials like gift wrap, shelf liner, fabric, etc., and the same steps will work.
Good luck! If you try this, I’d love to see your work! Please link me and share at one of the following:
Here at CakesDecor
Blog: www.peggydoescake.com
Facebook: https://www.facebook.com/PeggyDoesCake?ref=tn_tnmn
email: peggydoescake@gmail.com
11 Comments

Thank you so much for posting this tutorial Peggy! I’ve been using this methond since you posted this tutorial on your facebook page, and I LOVE it! You can get such a nice custom finish for your cakes. Thank you, Thank you, Thank you!!!
Toni, Pennsylvania, https://www.facebook.com/WhiteCraftyCakes

Ty Peggy! Love it!
Jessica, Kodiak Alaska http://www.facebook.com/ConceptualConfections

Awsome, I will have to do this!
Dayna R, North Carolina, http://www.CarolinaCakeArtistry.com

I have to say that this really does make a huge difference in the final outcome! I will always cover my boards from now on. Thanks for always sharing Peggy! <3
Tiff - MA www.facebook.com/sweetbeecakery

I tried this once and the cake slid off the board!! x
Heather x
Thanks for posting, Peggy! Can’t wait to try this method!
You really can have your cake and eat it too!
Heather, always attach your cake with a dot of glue from your glue gun or some royal icing. The glue gun is just faster and simpler! Bottom of the cakeboard to the covered drums. Won’t budge! Ta da!
This is a great tutorial thanks!

Thanks for sharing, that is a great idea and I cant wait to try it!
This is the best tutorial I’ve found in a while. Thank you so much for sharing! I can’t believe I’ve been making my life so difficult for so long. This was super easy and looks great