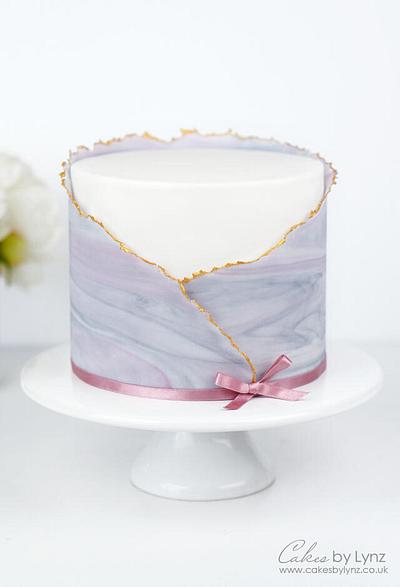
Ripped Marbled Fondant Wrap Cake Tutorial
This week I’m showing you step by step how to add a marbled fondant panel around your cake with a ripped or torn edge, finished off with gold edible paint. These fondant / sugarpaste...


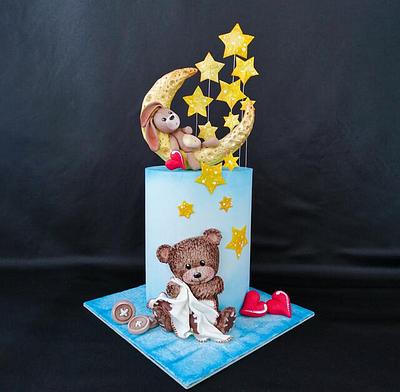
CREATE A CAKE TUTORIALS #12: Sleepy Teddies Cake Tutorial By Cakes by Mischell <3
🥳 FREE TUTORIAL 🥳
Download for free here: https://bit.ly/2SsmS0v
Learn how to make this stunning cake following step by step tutorial by very talented Michaela Rences aka Cakes by Mischell ...
Wafer Paper #28: Bas relief and Wafer Paper Flower Wedding Cake Design | Cake Trends 2021 | Anna Astashkina

In this tutorial, I’m teaching you how to make layered fondant look, shape, and create bas-relief so it is looking delicate, stamp (yep!) fondant, and add wafer paper flowers for a very expensive...
Bakery Boxes Design Ideas #2: Fondant cake Recipe
Large numbers of my YouTube channel supporters and cake class understudies have mentioned me to share fondant formula and how to make it at home. Allow me to impart to you this simple fondant...
Wafer Paper #27: How to create modern ruffles using wafer paper | Anna Astashkina
In this tutorial, I’m going to show you how to create modern architectural ruffles for wedding cake designs, using wafer paper – my favorite cake decorating material.
All you need is your wafer...
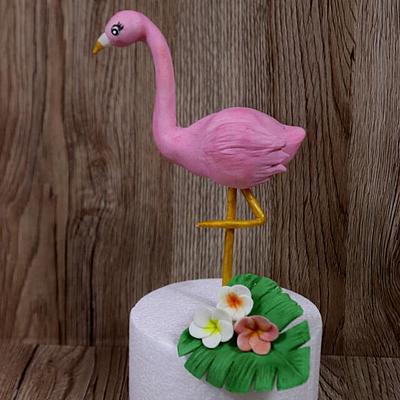
Elegant Flamingo
In summer is always nice to have a cake with a beautiful Flamingo.
For the whole tutorials with the easy flowers to make, you can go on my Youtube channel.
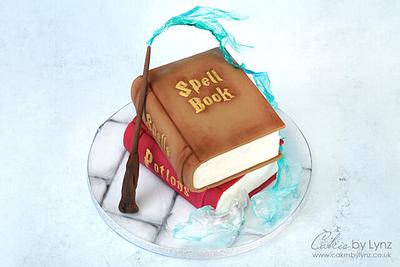
Magical Stacked Spell Books Cake Tutorial - with wizards wand and Rice Paper Sail Spell
Hi and welcome back to my kitchen. I am so excited to share with you step by step how to make this magical spell book cake. In the tutorial I show you how to make your cake look...
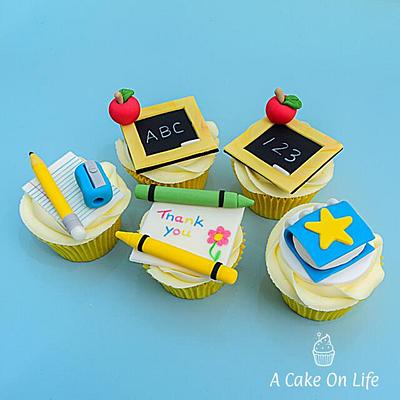
Cupcake Toppers #8: Thank YouTeacher Themed Cupcake Toppers

Hi everyone! Sharing my latest tutorial which shows how to make these thank you teacher themed cupcake toppers. Hope you like them. Link to the tutorial below. Happy modelling!...
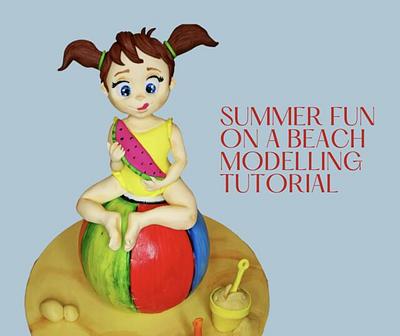
MODELLING TUTORIALS #74: Summer Fun On A Beach - Modelling Tutorial by Biljana Donevska
🥳 FREE TUTORIAL 🥳
Struggle with modelling? Check out this brilliant tutorial by Biljana Donevska ❤
Download tutorial for free here: https://bit.ly/3vb06s1
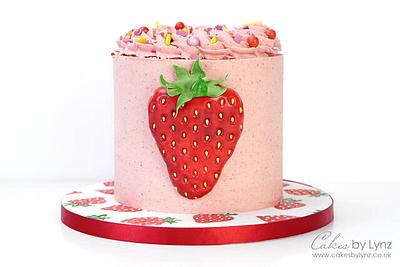
Ultimate Strawberry Cake Decorating tutorial with Strawberry Cake Recipe
Hi and welcome back to my kitchen. This week I have the ultimate strawberry cake tutorial to share with you. If you’re looking for a summery, fruity themed cake, this cake has it...