
Billowing Tutorial
The first time I saw a cake with fondant billowing I wanted to try it on a cake one day!
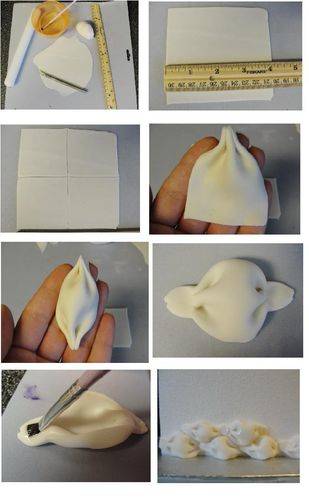
What you will need.
Fondant, a ruler, exacto knife, rolling pin, water and a brush
- Roll fondant out about 1/8-1/16’ thick then trim down to 4×4
- Then divide into 4 sections of 2×2. I only cut 4 squares at a time. Too many more and they will start to dry out before you can get to them
- Gather one end like you would if you were making a bow.
- Then the other side.
- Now this is the “Billow”. I smash the ends flat.
- Slightly fold the edges in toward the inside of the billow. Brush water onto the ends.
- Stick the first row along the botom of the cake slightly over lapping the ends. The next row should fit into the spaces from the row under. When you put them into the space you may have to work them in so that no cake shows through. This is why you need them to still be soft. Making these ahead of time will not work.
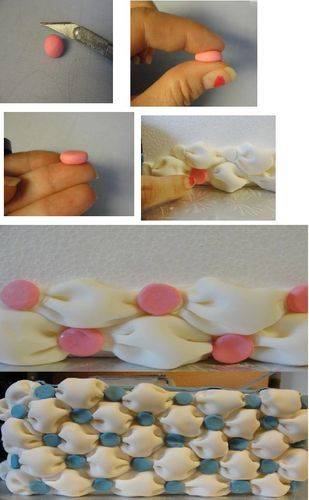
Now for the dots.
Thats pretty simple. Just roll up some fondant into a ball and flatten in slightly between your fingers. Wet the dot and place it in between each billow until you are completely finsh!! Great job!! Now you can billow anything!!!
23 Comments

Thanks for posting ;)
-- Michal, http://cakesdecor.com | My Facebook: http://www.facebook.com/michal.bulla

Thanks so much! I’ve always loved the look of this technique but had no idea how it was done. Thanks again :)
Raewyn, Sydney, Australia https://www.facebook.com/cakesbyraewyn

Did you add tylose to your fondant to make it hold the poof better? I heard Fondant can sag and most use gumpaste but I don’t like the idea of covering a whole cake in gumpsate.. blech!
I have do do this technique soon… I am soo nervous. Thanks for the tutorial!
@PrimaCakes.. I just used plain fondant. The peices are small enough that they will hold the poof. And it will dry hard enough to stay. I wouldn’t want to cover the whole cake in gumpaste anyway. But I guess if you wanted to add Tyclose to it it wouldn’t hurt. I’ve never used Tyclose so I’m not sure how it works. But this is super easy, a bit time consuming though. The finish look is great so its worth it!! Good Luck!! You can do it!!
Glad I could help all of you!!

Thank you so much for posting this tutorial. You explained it perfectly. I wanted to do this on my grandbaby’s baptism cake, and now I think I will give it a try.
Toni, Pennsylvania, https://www.facebook.com/WhiteCraftyCakes
You’re very welcome Toni!!! I’m glad I could help and I can’t wait to see it when you do it!!!

great tutorial! If I may add something….I found it easier to use a square cutter when I did this technique. I can’t cut a straight line to save my life! LOL! :)
customcakecompany
Congratulations! Great job. Thanks for sharing.
@CustomCake~ Yeah, I guess a square cutter would be a lot easier!! Awesome :)
I won the random draw!!!! How cool is that?!?! I’ve never won anything in my life!! Thank you to everyone for checking out this tutorial, commenting and favoriting!! You guys rock!!

Congratulations and thank you for a fantastic tutorial x
Jayne, Cakes by Occasion, www.cakesbyoccasion.com