Tutorial - Stained Glass Effect Cake
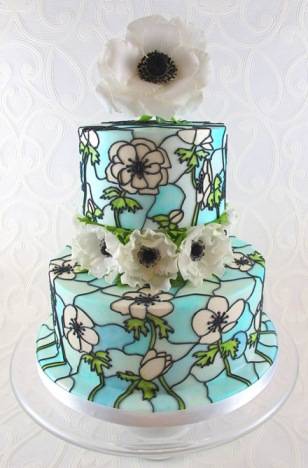
After seeing the amazing stained glass effect cakes by people like Queen of Hearts Couture Cakes, Way Beyond Cakes by Mayen and Vinism Sugar Art, I decided I wanted to have a go and put my own spin on it. Hopefully it will inspire you to do your own. Just warning you all now, I like to explain things in great detail so skip over anything you know.
Background-Tips to help you Start This Project
- Decide on your cake theme based on your inspirations and the occasion if any, mine was a stained glass effect wedding cake with flowers, but it could be anything (shapes, birds, butterflies, people e.t.c.) Inspiration can come from anywhere; for example nature, fashion (in particular wedding dress designs), architecture and art. Your inspiration should help you decide on the pattern/subject and colour scheme/s for the cake. Some of the input is likely to come from your customer if this is an order, but, as this is a potential wedding cake I wanted to have white flowers with a pale blue background to keep the colours soft against the dark outline. I use Google image search to find pictures that inspire/help to design the cake. I also just found this site which I didn’t use while doing the cake but it looks very helpful for finding templates/making stained glass templates: http://www.stained-glass-patterns.org/
- So flowers, which one to choose? It would need to be one with a fairly simple shape that would be recognisable by its outline from a distance. Flowers with lots of petals or small intricate detail may not translate well to this type of design. Poppies, blossoms, tulips, primroses, roses, lilies, orchids and anemones would all work well having a distinctive recognisable shape and not an excessive number of petals (that’s if you don’t go crazy with the number of rose petals!). I chose anemones as I was completely obsessed by this flower last year and wanted to do them as a decorative theme. The same idea applies to translating anything to a stained glass effect cake, keep it fairly simple so the shape is recognisable from a distance when the outline is on, otherwise it will lose its visual impact.
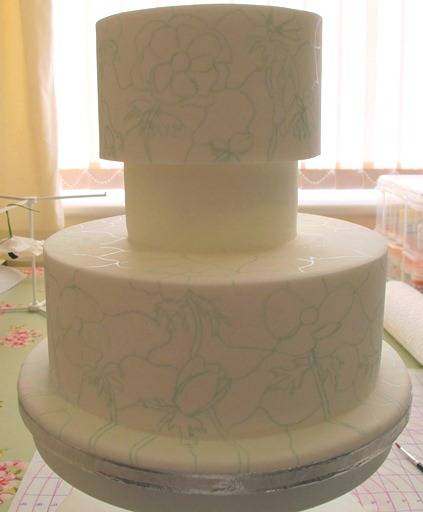
- Decide what size and shape you want the cakes to be, the possibilities are endless! I chose two round tiers with a 3 inch difference and a separator in between so I could add some anemone sugar flowers round the middle. I also decided to place a focal flower on the top. Of course you don’t have to do this, the stained glass cake looks just as lovely without any extra embellishments, this was my way of putting a fresh spin on the stained glass effect cake.
- At this point it was time to cover the cake dummies (made from polystyrene) in sugarpaste/fondant. I stick the sugarpaste to the dummy with a mixture of piping jelly and royal icing (about equal quantities), using piping jelly on its own just didn’t give me good results. I do this, then cover the cake dummy in cling film (saran wrap) while I deal with rolling the paste out so it doesn’t crust over. You can also use white vegetable fat/shortening to stick the sugarpaste on, but do what works for you. When covering a dummy to get a nice finish you need to roll the sugarpaste out thin (like if you were covering a ganached cake), about 3mm works well for me. My tips for covering the dummy in sugarpaste, make sure the paste is well kneaded, use icing sugar for dusting and weigh it out the right amount to cover it so you are not rolling out unnecessarily. If it does not feel stretchy enough or is a little dry, per 500g, add about 10-15ml (1 tablespoon) = a small dollop of glucose/corn syrup and about 2.5ml (1/2 teaspoon) = a few drops of glycerine to the sugarpaste and mix it in. This works wonders. The glucose syrup is what makes sugarpaste stretchy and the glycerine helps keep moisture in, hence extends the amount of time you have to work on the paste before it crusts over. Lindy Smith has some great tips on her blog about working with sugarpaste http://www.lindyscakes.co.uk/2009/03/08/rolling-out-sugarpaste-%e2%80%93-top-tips/. If you want razor sharp edges I recommend the ‘upside down’ method for achieving this – there’s a tutorial for this on this site that will help get you started, but search on Google and you will find more help – http://cakesdecor.com/tortacouture/blog/21 (thanks to Torta Couture cakes). Cake dummies can be stuck together with royal icing, no doweling is required. Let the sugarpaste dry at least overnight so you can draw/paint on it without causing damage.
Transfer the Image to your Cake
- So you have decided what you want to put on the cake, now it’s time to decide how the flower/design pattern should be laid out on the cake so it looks pleasing to the eye. If you are using a specific pattern already you can skip this bit as it’s already been done! I also just found this site which I didn’t use while doing the cake but it looks very helpful for this stage too: http://www.stained-glass-patterns.org/
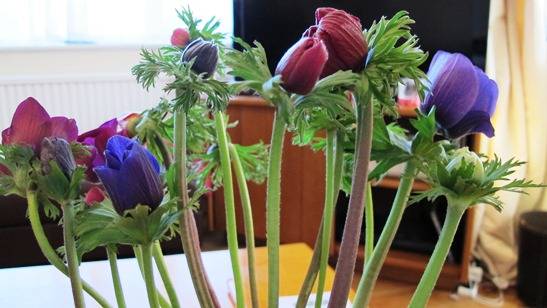
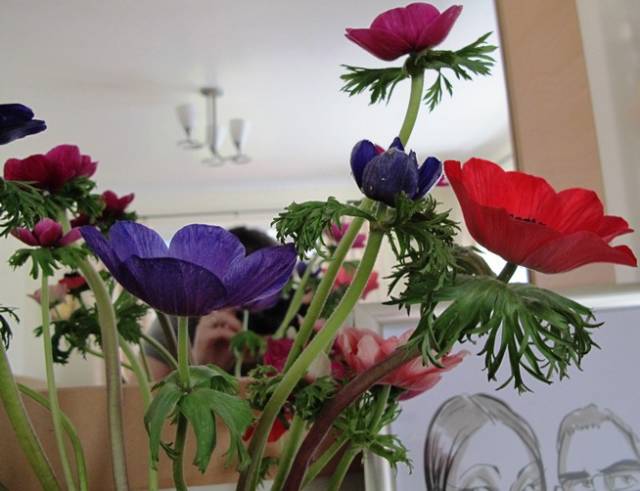
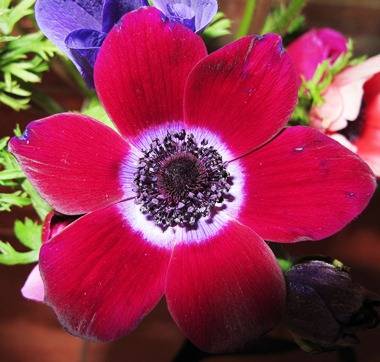
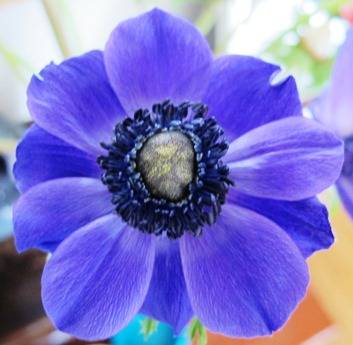
- This is where I go back to my inspirational pictures for guidance. I brought myself some anemones and Googled lots of pictures so I could study my subject. Below are some of the pictures I took for reference.
the centre
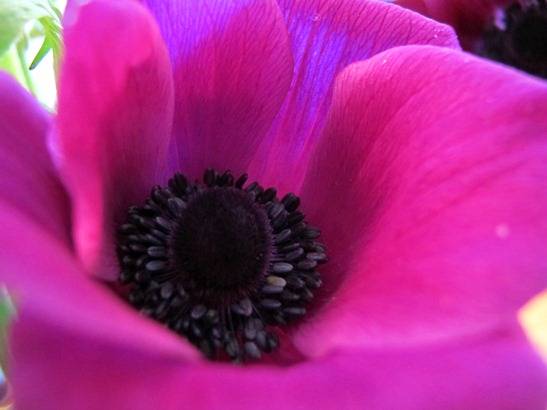
pretty much symmetrical 6 petal flower, petals in layers of 3
lots of petals, different sizes, non symmetrical
- I decided to have the anemones look like they were ‘growing’ up the cake (like they would be growing in nature with the sky above them) so I could have them at all different angles of view and stages of development from bud to fully open flower. Having the stalks and calyx’s also add interest to the design and an additional colour. Anemones are mostly not a symmetrical flower, the number of petals can be anything from about 6-15 and they also vary in size, shape and colour.
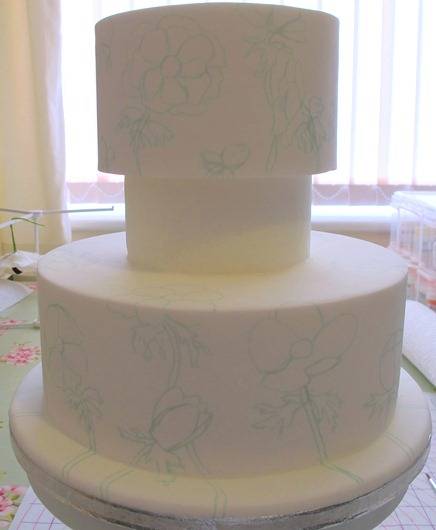
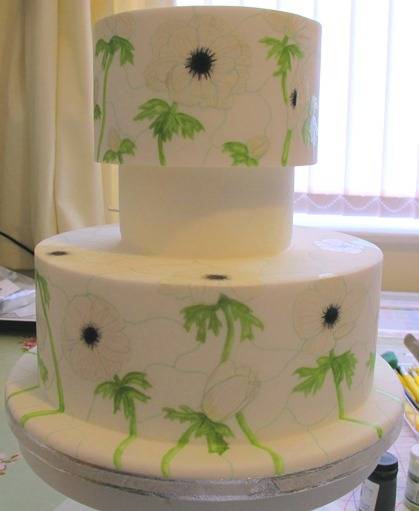
- Using the images above plus others from the internet I drew the flowers on the cake free-hand using an edible ink pen that is pale in colour (Rainbow Dust silver-grey). The flowers were about 1 inch to 2 inches in size so they would be easily identifiable from a distance and there would be plenty of room for outlining the shapes in black. Buds were at the bottom of each tear and fully open flowers at the top like they would grow up in nature. I drew the flowers around the middle first, spaced out more or less evenly, then the buds to fill in large spaces at the bottom and finally the tallest flowers to fill in large spaces at the top, some of them going round the edge of the cake and onto the top. Keep taking a step back as you progress and stop when it looks pleasing to the eye and not too busy, there should be gaps between the flowers to draw in the stained glass effect background of joining lines. The edible pen can easily be erased of the cake with some water on a cotton wool bud at this stage if you make a mistake or want to alter.
- Don’t be put off if the thought of drawing free-hand is not for you. Here are some alternatives you can try;
-use for example patchwork cutters or any plastic or metal flower shape cutter (blossom, hydrangea etc.) to lightly emboss flower image/s on the cake NOTE: if you choose this method do it after you have covered the cake as you want the paste to be soft so an impression is left behind. For round cakes you will need to gently rock the cutter from one side to the other to make an impression of the entire shape. Poppies, roses, poinsettia and probably many more are available from the patchwork cutter range. It will also be a bit of a time saver.
-print out the flower image/s at the size you want to have it on the cake; this is your template. At this point you now have a choice of what to do - Trace the image onto tracing paper or parchment paper with a graphite pencil and transfer it to the cake using a sterilised scribe/pin (this is quite time consuming). In the UK our food safety regs are very strict, so don’t reverse the image and transfer the graphite image into the cake. Graphite is non-toxic but should only be used in the UK on items that would be removed before consumption like a plaque. Rule of thumb, don’t put anything on the cake for consumption that is not classed as 100% edible and safe to eat, it should have an E number and a best before date. I have to protect myself by saying this so please don’t be offended of you are from another country where it’s ok.
- Cut the flower out and draw round the image onto the cake with an edible food pen, make some cuts down the petals so you have a guide to finish the flower to the centre when the template is removed
- Trace the image with and edible pen on parchment paper (it will bead, don’t worry), reverse it and smooth onto the cake with your hand gently, it should transfer NOTE; works best on freshly covered cake. I have not had the chance to try this, but it is in Lindy Smith’s book ‘The Contemporary Cake Decorating Bible’ which I recommend highly for your collection, it is a good all round book, covering most techniques.
- Project the image onto your cake and draw on it to transfer the image (for those who have a Kopykake or similar).
Fill in the Background
- I drew random slightly wavy lines (with the food pen) which came out from points of the flowers and went across to either another flower or a junction of 3 or 4 lines all meeting in an empty space. I tried to keep the size of the patchwork type background a reasonable. If I thought one of the background spaces still looked too empty another line was added. Again, stand back and look at what you have drawn regularly, does it look pleasing to the eye or too busy/small compared to the flower design? If you are using a template which already has a set background pattern then get that drawn on free-hand or by one of the methods I mentioned above. Use you inspiration pictures for help on drawing background lines and http://www.stained-glass-patterns.org/ if still a little unsure.
Painting the Cake
- My method of choice is to use edible dusts and gels/paste’s dissolved on confectioners glaze. Why? Confectioners glaze dries shiny, we want a shiny cake and once dry it won’t come off if you touch it or get water on it – as can happen if you use dusts/lustres with alcohol e.g. vodka or isopropyl alcohol (rejuvenator spirit).
- My tips, use sable (horse hair) paintbrushes if you can, they last longer and are nicer to paint with. Use your paintbrush for food use only (most important!). Keep a separate set of brushes for dusting as this tends to damage the bristles more quickly. Wash thoroughly after every use- washing up liquid is great for cleaning. If your paintbrush is not forming a nice point anymore, try giving it a wash with a tiny dab of conditioner and rinse thoroughly very, it should help to restore it (I don’t know if this works with synthetic brushes). My last tip is to line your paint palette with foil for painting with confectioners glaze as it is an absolute pain to remove once dry (it sets like a proper varnish, water tight and all) unless you soak it in isopropyl alcohol which is not cheap.
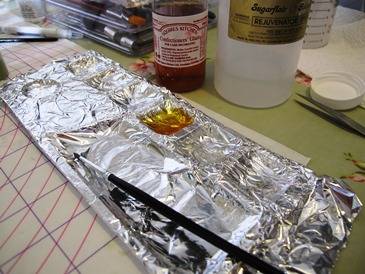
so here my palette lined with foil, I have poured some confectioners glaze into one well and isopropyl alcohol into the other. I used a no.1 pure sable AES brush (fine) for the flower petals, no. 0 for the stamens (very fine) and centre and a no 3 (medium) for the background (see pictures further on)
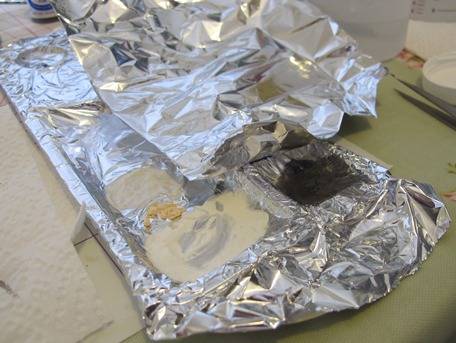
Here it is in action. Use a bit of foil to cover the wells with the solution in as these will evaporate quickly. To make a concentrated colour add a few drops of the confectioners glaze to some of the power/gel/paste in the palette (try to get hold of a dropper, it is a very handy tool) and to make a weaker wash colour add a touch of the colour to a well of confectioners glaze. You will need to re-dilute and /or re-make your colours regularly due to the speed in which they dry. Some pastes are water based and will not like dissolving in this solution which is why dusts are a safer option. Sugarflair pastes work well with this method, Wilton gels prefer alcohol or water to dissolve in so I won’t use them for this. Have a look at the label and it will tell you if there is water in it.
- I won’t be going into great detail into how to paint a cake because the lovely Erin from Three Little Blackbirds has done a fabulous and free to enrol in Craftsy video tutorial on it. She is an excellent tutor and explains everything really well. Here is the link; http://www.craftsy.com/class/the-hand-painted-cake/180 . I use the same principles for my work but dilute the colour in confectioners glaze and wet/rinse the brush in isopropyl alcohol (confectioners glaze does not mix with water, the end of your paintbrush will turn into a white solid mass!). Isopropyl alcohol does mix with water, so just remember to use it as the intermediate before you wash the brushes up in water and washing up liquid at the end of the day!
- So here is the list of colours which I used along with their concentrations;
Squires Black Dust – on its own, concentrated, as a wash and mixed with the white to form grey – flower centre and stamen
Sugarflair Super White Dust – petals base colour concentrated
Squires Antique white dust (pale cream) – mixed with a little white used concentrated to define petal veins/shape
Squires Fern Green Dust – diluted down to a weaker colour (not as weak as a wash), base colour for stem and calyx and a bit washed over the base of the young flower buds
Squires Leaf green Dust – diluted down to a weaker colour (not as weak as a wash), to define edges and veins for stem and calyx
Sugarflair Ice Blue paste (light bright blue)– weak wash colour at slightly different strengths for background
Squires Gentian (Ice Blue –darker blue, pretty much spot on primary colour) dust – weak wash colour at slightly different strengths for background - I started by painting the stalks and calyx’s. I could equally have don’t the flowers first, and probably would have if I wasn’t going to outline the whole lot in black.
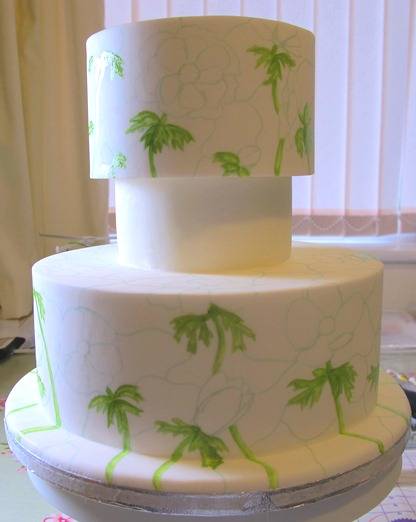
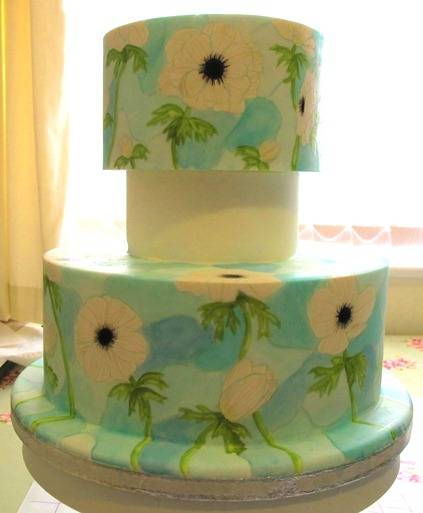
- Next the flowers where painted
- Lastly the background. To add interest, I used two shades of blue, both very weak washes. I alternated the colour and concentration slightly in different sections to add interest to the design (If you look at stained glass designs the backgrounds do the same sort of thing). You do not have to do this, you could wash the background with one colour, use your inspiration picture to help.
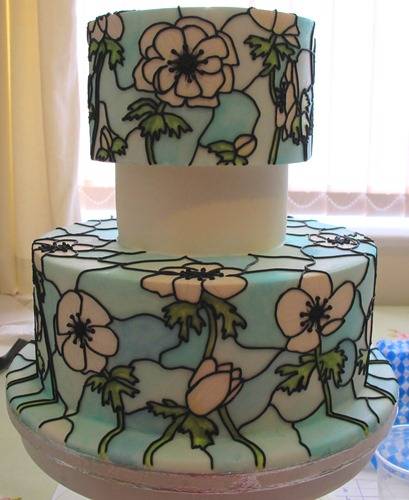
- Now its getting there! I used black royal icing and a number 1.5 PME nozzle to pipe the outline. To further define the flower centres I piped little dots of black for the centre and some stamen lines with heads (dots) as these help to identify the flower type from a distance. For the outline technique I did the top tier then the base tier. The flower centres first, then the petals working from the inside to outside. Next the stems and calyx and finally the background lines joining it all together. If you make a mistake don’t worry – scrape it off gently and run a wet paint brush over to remove the mark, all gone, no stain!, now you see the advantage of using confectioners glaze!
- Now if piping is not for you, don’t despair! If you want to get started in piping get yourself a copy of Eddie Spence MBE’s Book ‘The Art of Royal Icing’. Alternatively you can use a craft gun and extrude black gumpaste through the single 1.5mm diameter hole attachment, extrude and then stick it in sections to the cake with edible glue (paint the glue on the cake along the guide lines) and use modelling tools to poke it in the right direction once attached (if you are not used to piping this may be quicker for you ). Here a link so you know what in going on about and it tells you how to get it to work, Lindy Smith to the rescue http://www.lindyscakes.co.uk/2009/04/14/how-do-i-get-my-sugar-shaper-to-work/ I hated the craft gun until I found out how to get it to work properly, now it comes out quite regularly!
- To give it a bit more shine and sparkle, once the royal icing was dry I gave it a very light spray with PME pearl spray (to give a slight metallic quality to the black lines and shimmer to the rest) then went over the top of that with PME clear glaze spray to bring out the shine a bit more and seal the pearl in. Next the flowers where added and the cake is finished
- Now an alternative method to this would be to pipe the lines after you have the pattern on the cake then fill in the spaces with colour. I did not do this because I find it easier to keep my work neat and tidy by doing outlines last, and it gives me a bit more flexibility if I decide that part of a leaf petal does not need the black outline on it. If you are a vegetarian don’t use confectioners glaze and if you don’t consume alcohol for personal or religious reasons then you can pipe or extrude the lines and then paint on the cake using gel/paste colours mixed with piping jelly. This will give you the shine and it does crust over (the thicker it is applied the longer this will take)
- I will cover how I made the Anemone sugar flowers round the middle in another tutorial as this one is quite long enough! There is a video of this cake on You Tube if you want to see it all the way round: http://youtu.be/XPzoOabsizk
31 Comments
Wow!!! I wish i could save this somehow to my computer!! Thank you for sharing! That cake is amazing! ;))
Andrea S.
you should be able to highlight the whole thing then copy and paste it into word or similar-thanks for looking x

Love it. Thank you so much xxxx
Verusca Walker https://www.facebook.com/verusca.walker

Fantastic Tutorial…Thank you so much for posting :-)

oh wow, thank you very much for this great tutorial!
Natascha, Zurich, Switzerland - http://www.facebook.com/fleurdesucre - http://pinterest.com/fleurdesucrech/ - http://www.fleurdesucre.ch
Awesome tutorial, added to my favorites

Fabulous tutorial thank you!
Bliss Pastry, Deland, Florida https://www.facebook.com/pages/Bliss-Pastry/123883354373830

this is great! I really want to try this. Thank you for sharing!
Maria @ http://www.facebook.com/rooneygirlbakeshop or http://www.rooneygirlbakeshop.com
Tasha… what an amazing amount of thought went into this tutorial… thank you ever so much… its fabulous and so want to try this!! xxx
You must never limit your challenges, instead you must challenge your limits
you are all very welcome, it is nice to be able to give something back to the cake community : )