
Fondant Tips on Eliminating Air Bubbles and Bulges
A common problem that probably every cake decorator has had to deal with at one time or another is when a cake forms bulges after coating it with rolling fondant. This is an especially important issue when making wedding cakes because you really want to have your cakes smooth and straight.
I wanted to share some quick tips on how I overcome these issues. I am sure there are many other ways to take care of bulges on your cake but this is how I have tackled this problem for the last 10 years at Yeners Cakes. Air bubbles and bumps can have some pretty detrimental effect on your masterpiece, especially if its a wedding masterpiece. As the topic of this article is to deal with the air bubbles, I won’t go into any details on ’how to coat a cake with fondant.
Through out this entire process, what helps me a lot is that I only switch on lights on one side of my room at work, and the other side has no lights. The purpose of this is to cast shadows, so you can see the bulges a lot more easily. Ive taken two pictures to show you what a difference it can make. Of course I am speaking from my own experience, and it depends on your specific environment. This may not even be an issue for you, but in my work place, it is quite bright and when theres lights coming from all around you, theres no shadows, and when theres no shadows, it’s very easy to miss some air bubbles.

Left: A bulge shown with multiple light sources. Right: A bulge shown with one light source.
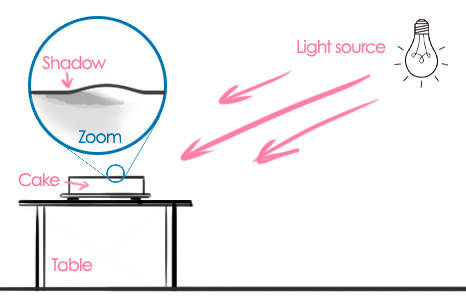
Diagram showing a single light source allowing it to cast shadows of the bulges on to the cake.
For this tutorial you may need…
- A pin
- Lighting on one side of the room
- Soft rubber scraper
- Icing smoother
- Chocolate
There are a few types of bulging that can occur. I will outline them and provide my solutions.
Type 1 – Air getting trapped WITHIN the fondant
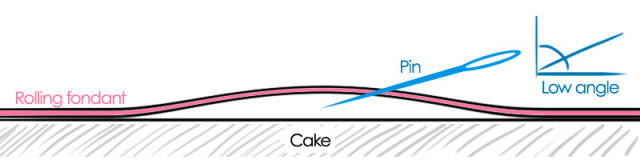
This can happen in a couple of ways. One way is while kneading the fondant air bubbles can get trapped inside the fondant. I get rid of these air bubbles before I place the rolled out fondant over the cake. So when I am rolling and flattening the fondant out, I remove these air bubbles with a pin/needle. The thinner the needle the better so it leaves less of a noticeable hole on the cake. A good way to avoid leaving a mark on the cake is by poking the hole from a low angle.

To remove air bubbles from within the fondant before placing it on the cake.
It’s a good idea to remove as many of these air bubbles before you cover the cake with the icing. If you cover the cake with the icing, and you start using a cake smoother and pushing on the icing, as the bubble tries to escape, it will cause the icing to stretch away form the air bubble. Then, later on, if you poke these air bubbles with the pin after coating the cake, because you pushed on it already, the icing in that area is thinner leaving you with indentations, like craters on the moon. Not good.
Type 2 – Air getting trapped UNDER the fondant
Another cause of bulging is air getting trapped between the fondant and the cake. Fixing this is pretty much the same as the first type above. What I do is unroll the fondant over the cake, then without touching the fondant around the sides, start with the top surface of the cake and use a cake smoother to flatten it down. Push outwards from the centre so you push the air bubbles out from the surface before you push the fondant down around the edges and sides of the cake. If theres any air bubbles that I can see, I will use a pin or just lift up the sides and push the air bubble out.
To remove air bubbles from under the fondant after placing it on the cake.
After the top is flat, I slowly work my way around the edge, pushing the fondant down around the sides of the cake. Using the cake smoother, I start from one side, and work my way around, pushing the air bubbles in the same direction and poking the pin to remove them as I go. I just do about 5cm’s at a time so I’m not trying to push air bubbles too far. After I’ve gone all the way around the cake, I use a rubber scraper and give it a few more laps around the cake making sure I didn’t miss any. This step is where the lighting is really going to matter. Having that one sided lighting is really going to make it easier to see the bubbles. Also, keep turning your cake around and looking at it from different angles.
If air bubbles are left under the fondant, they may expand as the cake slowly reaches room temperature and gets softer. Then you may end up with a big golf ball sized bump on your cake that can also be very difficult to fix if your rolling fondant has dried up. I always coat my cakes straight out of the fridge so they are nice and firm to push against while coating. Because of this, the cake makes its transition to room temperature while its coated with fondant. So that I have the freedom to eliminate any bubbles I may have missed that may expand later on, I always wrap my freshly coated cake with cling wrap and let it settle into room temperature for at least an hour or two. If there is an expansion of an air bubble, the cling wrap helps to keep the fondant soft so that I can just poke a hole into the bubble and push the air out with a cake smoother. What you don’t want to do is start decorating your cake immediately after coating it with icing. If you stick on any sugar items, a ribbon, do intricate piping etc, you will get very upset when all that hard work is on top of an expanding bulge.
If it so happens that you thought you removed all the air bubbles, left your cake to settle and come back to discover a massive extrusion on the side of your cake that is too dry to remove without cracking the icing, you may be able to cover it up with the use of decorations such as ribbons, piping, ornaments etc. Although, whether this is possible will of course depend on the design of the cake.
If you can’t cover it up with decorations, you can use a scraper to scrape some royal icing over the cracks. This isn’t the best way as you will probably still see a differentiation between the royal icing and the fondant, but its the next best thing after re-doing the whole lot from scratch.
Type 3 – Filling getting soft and pushing outwards forming a rim all around your cake
This one is much more difficult to fix because the bulge is not cause by air that you can just poke a hole at and remove. This problem will be more apparent with cakes with a softer and more liquid filling. It is mainly cause by gravity so this problem usually occurs because either the filling is really soft, or the cake is really high and too much weight is pushing down onto the filling…or both.
What I do do avoid this type of bulge is this. Before I mask the cake, I will scrape a layer of chocolate around the sides of the cake. This can be a tricky and messy task if you haven’t got any experience with it and it may take a bit of practice. Just make sure you keep the surface smooth so there aren’t any little bumps when we are masking the cake with ganache later on.
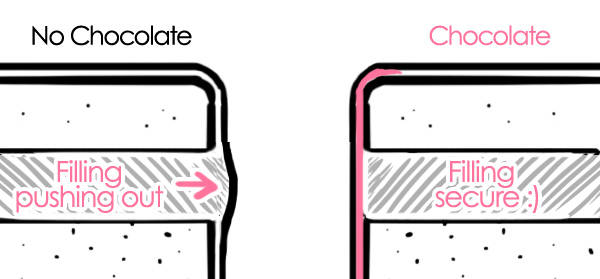
Left: No chocolate coating. Right: Chocolate coating prevents the bulge from pushing out.
So I will get some melted chocolate, then dip one side of a scraper in the chocolate, and scrape it on the cake. Again, just small sections at a time. Repeat this until the whole cake (or more importantly, just the sides) is covered with a few millimetres of chocolate. You can leave the top without chocolate but I like to do the whole cake so it is stronger, especially with tiered cakes as the extra strength comes in handy when handling and stacking the cakes. Be careful not to apply too much chocolate at one time. If you want to make the chocolate thicker, apply a little first, and wait till it dries, then apply more. As the chocolate dries, it contracts a little in size, and if its too thick, it will crack. Depending on the size of the crack, it wont be too big of an issue and the chocolate will still serve its purpose (stop the filling from pushing out). If cracks are too big, just fill them up with a bit more chocolate.
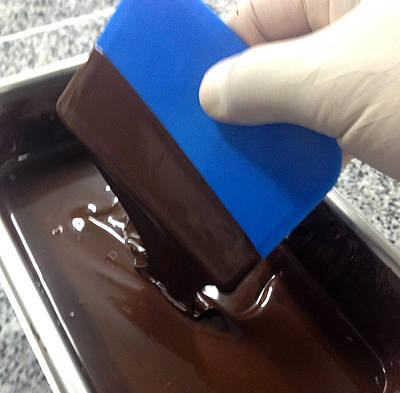
Use a straight scraper and dip one side of it in chocolate by holding it at an angle.
Spread the chocolate on the scraper onto the cake and only do a small section with each stroke.
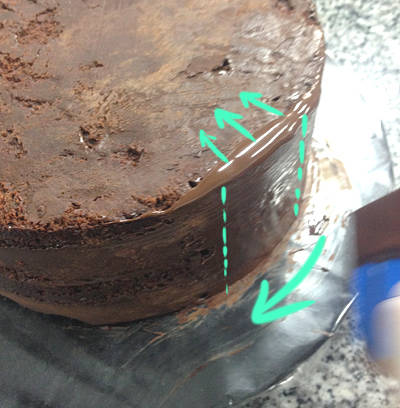
Normally I would use my left hand to smear the overhang onto the top of the cake but I had to hold the camera :)

Fix any cracks after the chocolate has set.
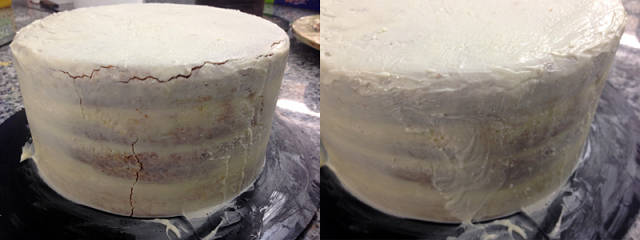
Fix any cracks after the chocolate has set.
Essentially we are creating a hard shell around the cake so that the soft butter cream, ganache or whatever filling you are using, is not going to soften up and get squeezed out the sides, causing the bulge. It will be stopped by this chocolate dam :) I do this with almost every wedding cake tier I make that is 75mm high or more. It depends on your filling though. If you have a really soft cake thats only 5cm high, maybe you still want to take this precaution. 95% of the time, I deal with mud cake and it is never a problem with cakes that are only 5cm high.
Another way to prevent this type of bulge around the cake is to pipe a circular dam near the edge of the cake (like this) and put the filling within that wall. I have seen some people discuss this on various tutorials online but personally I have never had to do this (other than when I was studying at TAFE) method because I mostly deal with mud cake and ganache as the filling.
If you coat a cake and have this problem, you may still be able to fix it, or reduce it at worst. When this rim bulge happened to us one day, we used a thick ribbon (higher then the cake) and wrapped the ribbon around the cake tightly and sticky taped it, kind of like a belt. Then waited till the icing was completely dry and the cake had reached room temperature. After removing the ribbon, the fondant was dry and strong enough to act as a dam and hold stop the bulging. It probably won’t be a 100% fix but it will surely make an improvement if you are facing this problem.
So thats it! Pretty simple ways that I have been using for years to eliminate this annoying problem. I hope this article was helpful to someone and if anyone knows any other ways to prevent air bubbles and bulging when coating cakes with fondant, please reply in this topic.
Thanks!
Tutorial by Serkan Yener
Yeners Way – Cake Art Tutorials
Learn cake decorating online at https://www.yenersway.com | Cakenote Cake Designing Software - https://www.cakenote.com | The perfect Pastillage...everytime! - https://www.yenerspastillage.com
6 Comments

Thanks for sharing some fantastic tips Serkan! I will try the chocolate coating xx
sugar and art - perfect combination! sugarmagic22@gmail.com
Wonderful tips, thank you so much for sharing
Selma S. ~ Little Apple Cakes
Thanks for sharing, liked the chocolate tip, will have to try it.
Kendari Gordon, Ken's Oven visit us at www.facebook.com/kensoven

Brilliant I will definitely be employing this method for my next wedding cake
Thank you so much for this tutorial! It will be of great help when I tackle my next cake! Thank you for sharing your knowledge and expertise. It is much appreciated!
Maggie Gagiano
I was so glad to see this tutorial because the last two cakes I covered had this issue and I didn’t really know what was going on. But, I had to make a cake last night and I made sure to press the fondant more firmly against the icing and I didn’t end up with any air bubbles on the sides. I did, however, start to see one forming on the top and I poked it with a pin and it took care of it instantly and stopped it from enlarging as my cake warned up. Thank you sooooooo much!