How to make a 2D Halloween cake topper and confetti cake (tutorial) by Caroline Barnes
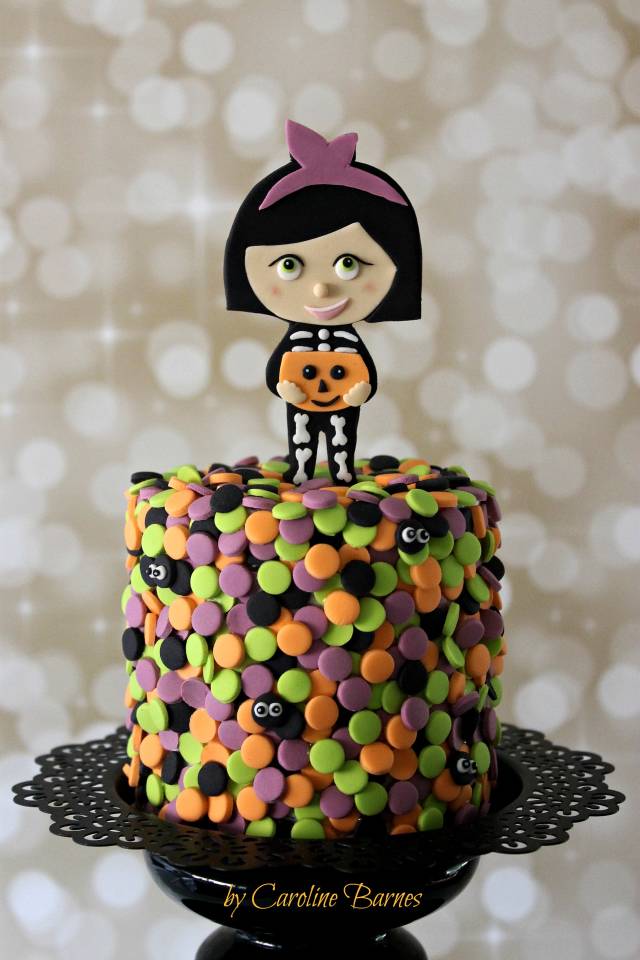
A great cake topper can really make a cake come to life. While 3D toppers have been popular for years, 2D toppers are just as fun and having them stand up-right on a cake can really make them ‘pop’.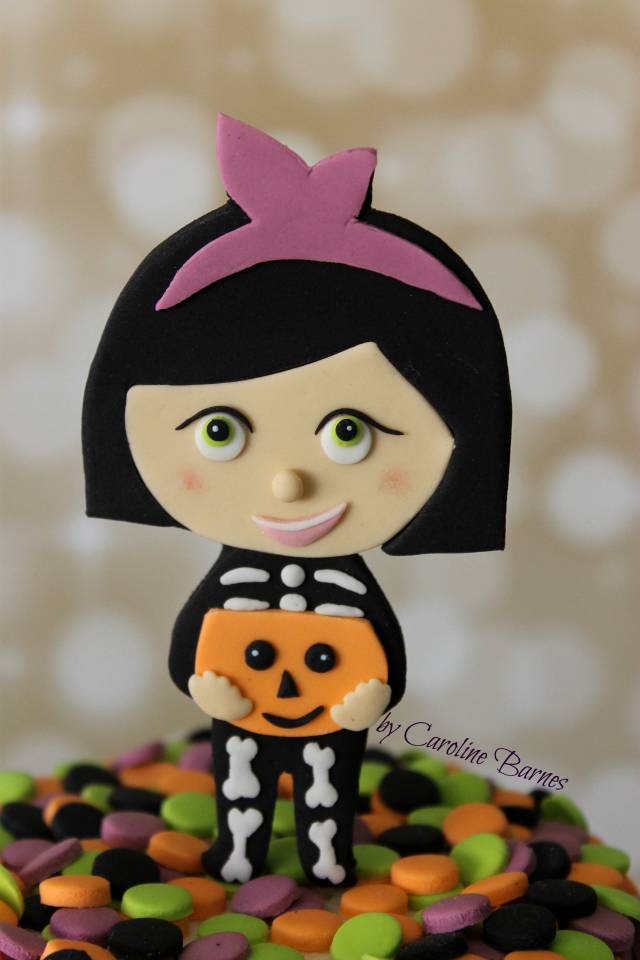
This Halloween topper was found by typing in Free Halloween Clipart in Google.
Supplies
•1 x 4″ round x 4″ high cake (this one is ganached and covered in a thin layer of fondant)
•Piping Gel
•9mm circle piping tip/cutter (for the confetti)
•Baking Paper
•Approx. 200g fondant in Americolor Electric Green, Electric Purple, Orange and Black (for the confetti and topper)
2D Topper Supplies
•Printed Halloween image (to fit the 4″ cake, this image is 11cm tall and 5.5cm at the widest part, her hair)
•Ivory fondant (face, nose and hands)
•Black fondant (image silhouette, body, hair, eyes, pumpkin face)
•Purple fondant (hair bow)
•Orange fondant (pumpkin)
•White fondant (eyes, teeth, skeleton)
•Green fondant (eyes)
•Pink fondant (mouth)
•Pink petal dust (for the cheeks)
•Americolor Bright white gel (white dot in the eyes)
•Wilton No. 7 piping tip (Green eyes)
•Wilton No. 9 piping tip (whites of eyes)
•Toothpick x 2
•Exacto knife/Scalpel
•Tylose
•Cardboard
•Baking paper
•Sugar glue
To make the confetti:
1.Roll out green fondant to approx. 1mm thickness.
2.Use the 9mm piping tip/cutter to cut lots (& lots!) of circles and spread them out on a piece of baking paper to dry for a few hours.
3.Repeat with the purple, orange and black fondant.
For the topper:
1.Using a piece of baking paper, trace the printed Halloween image and then transfer on to cardboard and cut out to create a template.
2.Mix tylose in to black fondant & roll out to approx. 2mm thickness. Place the cardboard template on top of the fondant and use the exacto knife/scalpel to cut around the template. This will create the image silhouette. Use your fingers to gently smooth the cut edges and remove any stray bits.
3.Gently insert a toothpick up one leg, approx. 2-3cm.
4.Lay the topper flat on the baking paper to dry (after a few hours turn it over to dry the reverse side also).
5.You will also need to make cardboard templates for the hair, bow, face, body, bones, pumpkin and hands. Use these templates to cut out the pieces in fondant. Essentially, it’s a jigsaw that you’re making so all the pieces need to fit together perfectly. It helps to make all the fondant parts quickly before they dry too much, so when you’re arranging them and putting them together you still have a little wiggle room to move them about.
6.Once the black silhouette with the toothpick has dried properly, start to arrange the parts on top. With this topper, the hair was stuck down first with sugar glue, then the purple bow, the face, body, pumpkin, skeleton, hands and then the facial features (they’re the hardest to get right). Smooth over each piece with your finger ensuring that the pieces fit and join together nicely (eg. smooth your finger over the ivory face so it joins up exactly with the black of the hairline).
Face:
1.Eyes – Use the Wilton No. 9 piping tip to cut two white circles. Use Wilton No. 7 piping tip to cut two green circles. For the black pupils, roll two tiny black balls and flatten slightly. Use sugar glue to stick them all together. Dip a toothpick in white gel and place a dot in the outside corner of the pupil. To line the eyes, roll a piece of black fondant into a tiny sausage. Taper the ends so they come to a fine point. For the correct placement of the eyes, refer to your printed Halloween image. Glue down the eyes and then line with the tiny black sausage.
2.Mouth – Roll out pink fondant and use the exacto knife/scalpel to cut a mouth shape. Roll a tiny white sausage for the teeth, then flatten slightly. Use sugar glue to stick the teeth on the mouth, then glue to mouth to the face.
3.Nose – Roll a tiny ball of ivory fondant, flatten slightly & glue down.
4.Use a small brush to dab the pink petal dust to the cheeks (remove excess dust off the brush in a tissue first).
5.Body: Glue the body piece, pumpkin and pumpkin face on to the body with sugar glue. Glue on the hands and skeleton.
Confetti:
Add a layer of piping gel to small sections of the cake and stick confetti to the sides and top of the cake. When adding confetti to the top of the cake, leave a small section so you can insert the 2D topper toothpick, then once in place, arrange more confetti around the base of the topper with piping gel. Roll little white and black circles to create eyes for some of the confetti. Use a toothpick to dot pupils with Bright White gel.
And that’s it! Now you have a creative cake and topper that is sure to make people smile. By making your own confetti you can customise the cake to any theme or colour scheme. The 2D topper is eye catching and fun and would be a hit at any party.
Find the tutorial and pictures at Angel Foods: http://angelfoods.net/how-to-make-2d-halloween-cake-topper-tutorial/
Thanks for stopping by,
Caroline Barnes
Find me at https://www.lovecakecreate.com.au/ , https://www.facebook.com/lovecakecreate/ or https://www.instagram.com/love.cake.create/
4 Comments

Love this! Just adorable! Thanks for sharing!
Teri, Ontario, Canada http://www.TeriLovesCake.ca
She’s gorgeous
Sarah x
Thank you so much! I had a lot of fun designing and creating this cake :)
Find me at https://www.lovecakecreate.com.au/ , https://www.facebook.com/lovecakecreate/ or https://www.instagram.com/love.cake.create/

so cute