Christmas poinsettia tutorial
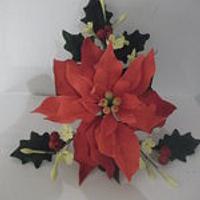
to get in the christmas spirit i thought i would put together a little tutorial on making a christmas poinsetti
you will need
flower paste, vein rolling pin, corn flour, ball tool, 28g wire, foam pad, green rolling board, dust colours ..red, burgundy and forest green, paste colours….christmas red, mellon and spruce green, oasis block, poinsettia cutter.
colour up 3 amounts of flower paste in red, green and yellow.
i start by making the centres of the pointsettia, take a small ball of yellow paste and form a cone shape, take a 28g wire with a tiny hook in the end, dip in water and inset into the cone until the hook is no longer visible. using small scissors snip around the top of the cone. you need to make 5 or 6 of these
next we move onto the petals of the poinsettia, i cut 3 of each size. take your red paste and using the vein rolling pin and roll the paste out as thin as possible and cut out as many petals as you can work with with out them drying out. take a 28g wire and dip in water, carefully insert it into the vein and push it in aprox 2/3’s of the length of the petal


the next stage is to mark some veins, i have used a basic leaf veiner but you could also use a knife and then use the ball tool to go around the edge of each petal to thin the edge and give a slight frill

repeat this process until you have 3 of each size cutter and also make 3 green petals/leaves using the largest cutter.
leave them to dry for 24hrs and then you are ready to dust some colour on.
i start the with yellow centres, dust a little green colour to the base of the cone and a little red to the very top but leave some yellow showing in the middle
next dust each red petal with red dust to give more depth to the colour and on the larger petals add a little burgundy to the tip as well. dust the green petals with green dust and a little burgundy on the tip also.
once they have been dusted pass them through the steam of a boiling kettle to set the colour and give a slight shine to them.
once the petals are totally dry you can tape them together using florist tape.
i start by putting the centres together in a tight bunch.
i then add the petals in 3’s working the petals so they sit between each other and with a slight gap between each layer


i hope this is of some help and i hope you all like it
Sarah Cox, http://www.facebook.com/SarahCoxSugarCreations?ref=hl
17 Comments
Like it
Mari's cake
This is wonderful Sarah! Thanks for sharing :) xx
Raewyn, Sydney, Australia https://www.facebook.com/cakesbyraewyn
What a fabulous and clear tutorial and so wonderful of you to share it with us. I like your snazzy rolling pin with notches in! x
'It Always Seems Impossible Until It is Done' Nelson Mandela http://www.facebook.com/CakesByFifi
i couldnt live with out my ‘snazzy rolling pin’ i do all my leaves and petals with it, saves so ,much time on other methods i have seen!
Sarah Cox, http://www.facebook.com/SarahCoxSugarCreations?ref=hl
def going on my Christmas List!! xx
'It Always Seems Impossible Until It is Done' Nelson Mandela http://www.facebook.com/CakesByFifi
Sarah, thank you so much for sharing this fabulous tutorial!! So beautifully done, showing so clearly how to go about making these amazing florals!! love your work!! xx
You must never limit your challenges, instead you must challenge your limits
wow really chuffed this made it to the top three when there are so many wonderful cakes out there.
Sarah Cox, http://www.facebook.com/SarahCoxSugarCreations?ref=hl
Wonderful! Thanks for sharing
awesome tutorial …. I love that rolling pin … got to get me one of those … thanks so much for sharing J:~D


