
Party Hat Tutorial
![]()
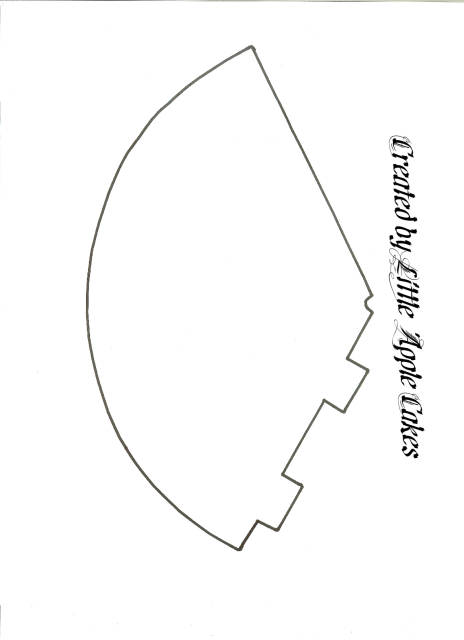
Before you start making the party hat you need to print out the template on card stock and cut it out. Save it on your computer and with the printer settings or just pasting it in a program, you can make it bigger or smaller depending on the size of your cake or the object you want to put the hat on.
![]()
To make the hat you will need:
Paintbrush,
Xacto knife,
Gum glue,
Rolling pin,
A tall glass,
Gumpaste of your choice,
Shortening and corn starch,
Hat template
Tape
![]()
Making the hat:
Picture 1.
Roll out your gumpaste (you can roll it out pretty thin), put just a little bit of shortening on top ( this will prevent the template from moving while you are cutting) and cut out the hat.
![]()
Picture 2.
Put together your card stock template (tabs on the outside) and tape it. Take a brush and brush some corn starch or conf. sugar on the inside of the card stock hat.
![]()
Picture 3.
Use gum glue on the tabs and along the edge, put the hat together and put it inside of your card stock template.
![]()
Picture 4.
Place the template in a tall glass without card stock touching the bottom. You can always push the sides together, that will help the hat look good on the outside.
![]()
Picture 5.
Leave to dry first 10 minutes and then try to take it out, just to make sure it doesn’t glue itself to the paper. Leave to dry overnight or at least couple of hours.
![]()
Making the Pinwheel:
Picture 1:
Cut out a square (that will be the back of the pinwheel) and then cut out some stripes in two different colors. While not using them keep your pieces under a plastic file (you want the gumpaste to be as soft as possible, otherwise the pinwheel will break when you try to bend in the sides). Start and end with the same color.
![]()
Picture 2.
Trim off the access gumpaste and make four cuts from each corner. Fold in each corner, glue with gum glue and use a back of a painting brush to press in the middle. Use a small decoration of your choice and put it in the middle.
![]()
Making the ruffles:
Picture 1.
Roll out a thin piece of gumpaste and make random stripes, they don’t have to be perfect, you will trim of the back later.
Ruffle them “up and down” as you would while making one of those paper fans, start and end always at the bottom, that way it will be easier to hide the joint. Trim off the back, stretch it out (to make ruffles look more natural and not sticky and glued together). Put some gum glue on the edge of the hat and glue a piece of the ruffle to the hat. Use your fingers and a scriber tool or a toothpick to fix the ruffles.
When you are done with the first row, do the same with the second row, this time you want the ruffles to be much smaller and shorter.
![]()
Making the banner:
This time we will use a transfer method, there is not a chance I can write beautiful cursive letters free hand.
Print out your text on a piece of paper and tape it to the window. Don’t forget you want the image to be turned (mirror image) otherwise you will get a mirror image on the banner.
With a help of a pencil (don’t worry pencils are made from graphite which is non-toxic and can be used for tracing) trace your text on a piece of parchment paper.
Roll out the gumpaste and put a generous amount of shortening on top (shortening will help you transfer the image on the gumpaste). Place the parchment paper on top of the gumpaste and slowly and very lightly rub on top of it. Try lifting one side to check if the image transferred. If not, usually that means you need more shortening or you don’t have enough of graphite on the paper.
Cut out the banner and use stitching tool on the edges.
![]()
Roll out a piece of gumpaste and glue the white banner on top of it. Cut out the colored banner and use stitching tool on the edges.
Use an edible pen and slowly (almost not even touching the gumpaste) write the text. If you press hard you will melt the gumpaste and smudge out the text… And that means… Starting all over.
![]()
Put all the decoration with the help of gumglue, pinwheel should be a bit stiff but not too dry when attached to the hat. Same with the banner.
Thank you so much for following my tutorial, please if you try it share your photos with me, I would love to see them.
Best regards,
Selma Stanley ~ Little Apple Cakes
www.facebook.com/LittleAppleCakes
Selma S. ~ Little Apple Cakes
30 Comments

Fantastic tutorial! thanks!
The Cake Nook
You’re so welcome Zoe :)
Selma S. ~ Little Apple Cakes
Fabulous! thank you Selma!! :) xx
'It Always Seems Impossible Until It is Done' Nelson Mandela http://www.facebook.com/CakesByFifi

Awesome! Thanks for sharing =D
Violet - The Violet Cake Shop™ - http://www.facebook.com/TheVioletCakeShop

Awesome! The green one…my favorite. Thank you : )
Fabulous, thanks!! Love that glass you have :-)
Dina @ miettes, http://www.facebook.com/pages/miettes/257790597632317

Wow, this is an awesome tutorial!!! Thank you so much for sharing it!!
Toni, Pennsylvania, https://www.facebook.com/WhiteCraftyCakes

Super!!! I love it;) thank you for shareing;)
https://www.facebook.com/pages/Handmade-with-Love-by-Aga/306351252851898
Awesome, love these, thank you! :-)
Kath's Cakes https://www.facebook.com/pages/Kaths-Cakes/369485736483786
WOW, what a great response, thank you all. I’m glad you like it!!!
Selma S. ~ Little Apple Cakes