How I made my 50 Shades of Grey Torso cake #1: 50 Shades of Greay Torso cake :)
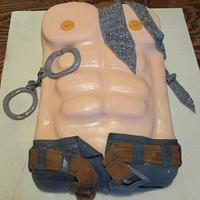
This is my first Torso cake. I was a wreck before starting it. I scoured the web for how to due tutorials. In the end, I ended up combining several of them to make this cake. 1st-I printed out the image of the cake my client wanted as a reference. 2nd. I used my copier to enlarge the image to fit my sheet cake pan size. 3rd I ended up drawing a template. This came in very useful when cutting the ribs and breast. :) Plus it gave me a guide to determine where the outline for the ribs and groin should be. 4th I used the template to cut out the cake shape :) Than I cut out the breast from my hand drawn template. I placed it on the cake to etch in an outline on the cake and to make sure where to place them. I did the same thing with the ribs. I eyeballed where the side groin lines should go based on the location of the ribs. After the etching was all done. 5th I used the cutout template sections to cutout the breast and ribs. :) 6th Lastly, I crumb coated the cake and added cake cutouts. Finally added fondant :) I used a color wheel to help make demin color for jeans, and salmon color for breast nipples. Silver fondant glaze was painted on the hand cuffs, tie and belt buckle :) P.S. A textured rolling pin was used for the design on the tie :) Hope this helps someone :)
Party Cakes
3 Comments

Cool thnx for sharing :)

Wow …thank u for sharing x
you are both welcome :)
Party Cakes