Gumpaste Carnations - no special cutters required (with lots of pictures!)
Hi all,
By request :) I took photos of every step so I hope this should be clear and detailed enough for beginners like myself to follow (I’ve discovered it’s rather hard to balance a camera in one hand lol). These are some carnations I made for a wedding cake I have coming up – hope you find this useful! I haven’t done this before so I don’t know how clear the pictures will be. If you want to see or download these images in high resolution please visit my Facebook page www.facebook.com/FFEAbySawsen where I will be uploading them shortly :)
(I’ve also written a few tips at the bottom to explain the pictures better – sorry if it’s too detailed, feel free to ignore it if you don’t need it)
Thanks for looking
Sawsen xx


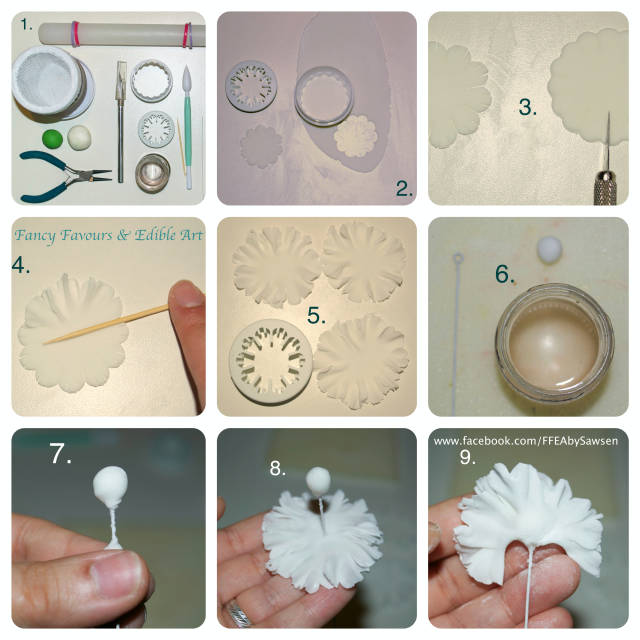
1. what you will need:
a rolling pin,
white & green gumpaste (NOT fondant/ tylose),
cutter(s) (a carnation one or just a fluted disc – you don’t actually need both the cutters I’ve shown, I’m just illustrating that if you don’t have a carnation cutter you can use a regular fluted one (plus this gives you the option to make bigger flowers))
a craft knife,
gum glue,
needle nosed pliers,
powdered sugar for dusting,
24GA wire,
a toothpick.
In addition, if you wish to dust them as I have here, you need Poppy red, Lime Zest and Holly Green powders (I used the Rainbow Dust ones), and 4 small brushes – one short, with a flat tip (important – see later)
Method :)
2. roll out your white gumpaste to about 1.5mm thick and cut 3 rounds for each carnation, using a single sized cutter
3. If using the generic fluted cutter, use a craft knife to slit the petals as shown – mimicking the carnation cutter
4. use a toothpick to frill the petals – it’s important to keep the end extended over midpoint of the gumpaste disc, and roll placing pressure on the other pointed toothpick end – this tilts the toothpick and creates a nice taper towards the endges without punctures or tears. Frill them beyond all bounds of common sense – dust well with powdered sugar & only stop if you think the petal will tear – you can see I’ve frilled each little segment to about 4 times its original width. This is what gives it that gathered look.
5. do this 3 times. Note how much bigger they get when frilled. Cover them to prevent drying out.
6. make a loop at the end of the wire, and dip it into your gum glue then wipe off the excess. Prepare a pea sized ball of gumpaste.
7. push the ball onto the wire loop, forming it around the base of the wire. Twist off the excess at the base.
8. dab a little gum glue on to the centre of one disc, then thread the wire through as shown
9. fold over the petal disc gently, and press on to the gumpaste ball.
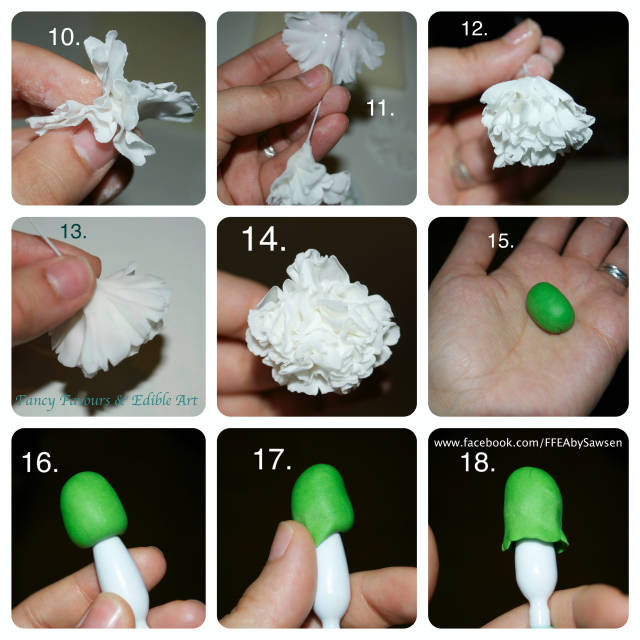
10. Pinch together as shown to seal the petal disc over the gumpaste ball, being sure to use enough glue to secure it to the ball but not so much you glue the ends of the flower together! HANG AND LEAVE TO DRY FOR AT LEAST HALF AN HOUR! (I didn’t do this at first and the flower head fell off under its own weight)
11. When the first set of petals is firm to the touch (doesn’t have to be completely hard, just stable), thread on the second disc and secure with some gum glue
12. pinch at the base of the flower to shape. Allow to dry another 10 minutes.
13. add the third layer of petals. Hang upside down and allow to dry completely – overnight
14. The dry carnation should now look like this!
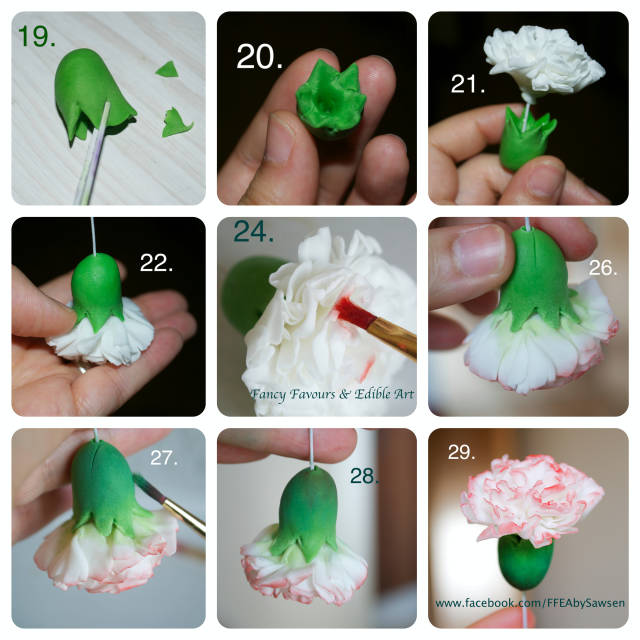
15. To make the calyx: roll the green gumpaste into an oblong as shown
16. Use the bulbous cone/ frill tool to poke a hole in one end
17. Use your thumb to taper the bottom against the cone, to get a thin edge
18. Repeat around the entire base to get this
19. Use your craft knife (or scissors as I did here) to cut about 6 points as shown
20. This is what you should get. Apply edible glue over the inside of it.
21. Thread it on to the dry carnation base
22. Use your thumb to gently press the calyx on to the flower and shape it
23. Allow to dry for at least 30 minutes (no image for this one! haha :))
24. To dust: prepare a flat tipped brush by dipping it lightly in the Poppy red powder, then stippling it on your work surface a little to remove the excess (important – to avoid spillage on to the white petals). Hold your flower upside down (also important, otherwise the loose dust falls in to the flower and tints the whole thing pink- ask me how I know) and splice the brush tip with the edge of the petals as you colour (see picture). This gives a thin ribbon of colour just on the petal ends. Use an air duster if you like to blow off the excess red dust as necessary. Do this for all the petal tips (don’t worry if some break off, you can’t tell once the edges are all dusted)
25. err… I’ve missed another number out… oops XD It was originally showing the same thing as 26 so I deleted it
26. use a clean brush and the lime zest powder to dust the petals between the calyx prongs
27. use a different brush (trust me lol it’s important not to mix colours) dipped in the holly green to dust the upper 2/3 of the calyx (as shown, i.e. its base to just over mid point)
28. Use another brush dipped in a touch of poppy red to dust the very base of the calyx (where my fingers are :)). This needs a clean brush again as the holly green mixes with the red and gives it a dark blackish green tinge. Steam if you like, I didn’t find it made much difference.
29. The finished flower! hurrah!
30 Comments
So beautiful tutorial!!!! Thank you
Vanilla cake boutique
Thank you Mariagrazia :) I’m glad you liked it
Wow! What a fantastically detailed tutorial. The flowers are beautiful. Thank you for sharing :)
Cups-N-Cakes https://www.facebook.com/cupsncakeswnc
Thanks for sharing
Haha you’re welcome April & Goreti… Yeah I realised it was on the comprehensive side when I was typing it up (don’t know if I’d have the patience to read all that myself xD) but at the same time I fell into a few pitfalls as a beginner and thought it would be useful to go detailed for those who haven’t made any before. I’ll probably find a happy medium in my coming tutorials :)
What a gorgeous tutorial… Thanks so much! I do my carnations very similar. Love how you have laid it out, time consuming and very grateful for your tips and advise
You must never limit your challenges, instead you must challenge your limits
Wow thank you Calli and everyone for the glowing praise :") <3
Great and easy to follow tutorial … Thanks for taking the time to do it and share ! :D xx
Lou, S.Yorks UK https://www.facebook.com/SugarandSpiceGourmandise
Thanks for sharing! :)
Kendari Gordon, Ken's Oven visit us at www.facebook.com/kensoven
Very nice, thanks for sharing


