Dene (First Nations) Wedding, Cake
Dene (First Nations) Wedding, Cake
 expand all pictures
Two weeks ahead of the wedding, the platform this cake sits on was made from 1/4" foam core that I cut “free form” into a basic shape. I used the cuttings to build height, gluing them in with hot glue, then reshaped the form until I had something that resembled the basic mound I wanted. I then covered the mound in what I call “spackle” (basically a concoction of shortening, icing sugar and water, similar to American buttercream, mixed to a stiff, but spreadable consistency), and set it aside until it just started to crust over. I then rolled out fondant mixed with a little Tylose to cover the mound, smoothing and making sure no air bubbles, and then trimmed. Using shell and veining tools, I went over the entire surface to create a texture to give the impression of grass that had been trampled on. I then sponge painted, using a combination of air brush paints and gel colours thinned with vodka and pieces of natural sea sponge that I sanitize regularly and keep strictly for cake work, layers of yellow, brown, different greens, and pearl sheen. Once dried, the centre point was calculated and marked for a dowel, but not bored.
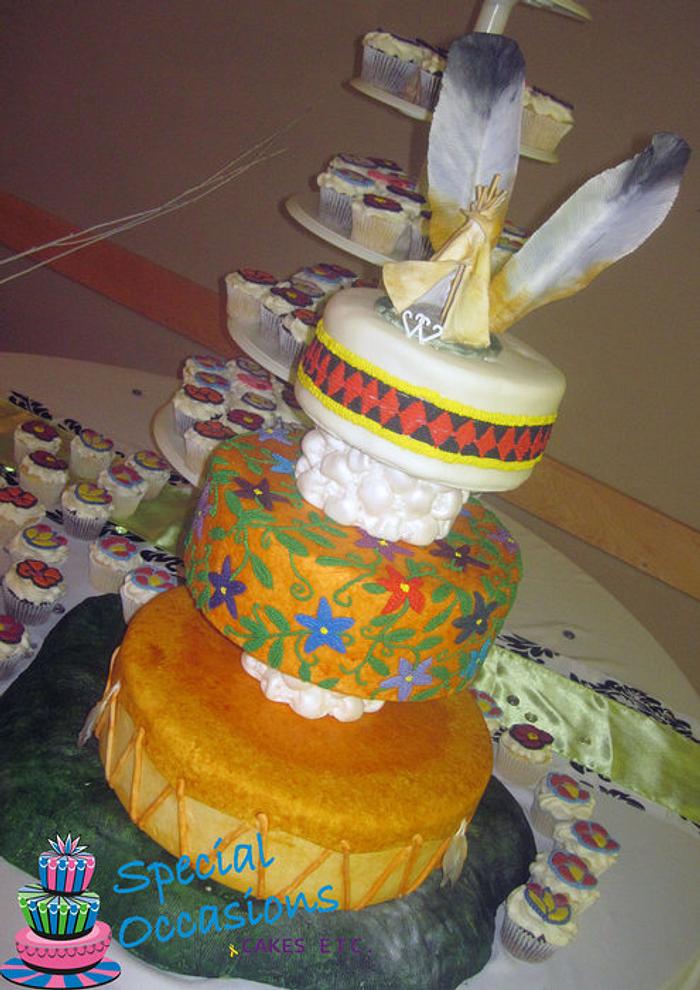
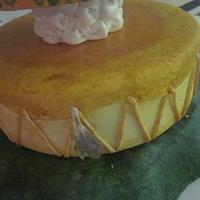
The Dene Hand Drum is a 14″ × 4″ dummy that has been crumb coated with spackle and covered in fondant. This was then sponge painted using a blend of copper and yellow gel colours thinned with vodka, using natural sea sponge. The drum skin is another layer of fondant that was petal cut before being place on top. The petals were then slightly stretched to give the look of hide being stretched over the side of the drum. Using a #8 piping tip, holes were cut in the petals for the lacings to go through. The drum hide was then sponge painted with more copper and brown, a little heavier with the brown, and getting darker into the centre where the actual drumming would be heaviest. Next come the rawhide lacings, which are gumpaste strips, which I cut with my ribbon cutter. I attached them to the drum, cutting them with a sharp knife just at the edge of the skin to look like it is going under and into the hole. The next one is placed into the hole and angled down. These are brush painted with copper gel colour thinned with vodka. The feathers are made of gumpaste. I used a small leaf cutter, pinched one end to make the barb, then used a veining tool to make the rachus. I used a shell tool to create the veining. Once dried, I dry brushed with slate, cinnamon and black petal dusts until I achieved the look of eagle feathers. These were not attached until assembly at the venue. Once completely dry, this dummy was measured and bored for a dowel.
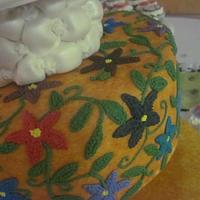
The second cake is also a dummy, this one 11″ × 4″, and is made to represent the groom’s hand beaded buckskin jacket. The dummy is again crumb coated in spackle and covered in fondant, then sponge painted with a colour blend of copper and brown gel colours mixed with vodka. I then used a poinsettia gumpaste cutter to mark where I wanted the flowers to be, as well as where the separator was going to be placed. I t piped the green vines and leaves first, using the blankness of the canvas as inspiration for scrolling, etc. When I did the flowers, I piped all the centres first, then did the different coloured petals. All the piping was in royal icing tinted with gel colours. Once completely dried, this dummy was measured and bored for a dowel.
The separators are 3″ × 3″ dummies crumb coated with spackle, then fondant. The fondant billows were applied to the fondant surface with plain water. Royal icing rosettes made up the buttons in the blanks. Once completely dried, these dummies were measured and bored for a dowel.
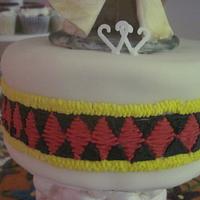
The top tier was a 3 layer vanilla cake, tinted lavender in ombre fashion, with milk chocolate fudge filling. Vanilla buttercream cased the cake before being covered in MMF. Before any further decoration occurred, the centre point was found, and a dowel the same dimension as the final dowel was put through both cake and board. A food grade plastic tube, wide enough for the dowel, but too big to go through the hole in the board, was put into the space in the cake. This was then piped with royal icing tinted with gel coulours, with a traditional Dene quilling design in medicine wheel colours (the white fondant representing the white of the medicine wheel). I reset the edges of the cake and back into the fridge it went.
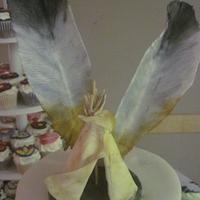
The cake topper was done in two parts, both created from gumpaste. The two eagle feathers were made a week before the wedding. I cut a basic leaf freehand out of gumpaste, then wired it with 18 gauge white paper wrapped wire that I had “twiddled” with gumpaste to a length 2" longer than the leaf shape. I then placed the wire down the centre of the leaf, leaving about 1 1/2" at the top of the leaf unwired, and attached with gum glue. I then placed the wired leaf on a firm foam pad and, using a fondant smoother, rubbed the wire into the leaf to create as smooth a join as I could. Using a shell tool, I then began creating the veins on the wired side, using firm pressure. I then flipped the (now) feather, and continued on the front side. When I was satisfied with the overall texture, I placed the feather lengthwise into accordion folded heavy duty foil, shaped it a little to give it a natural look, then left it to dry. This is repeated for another feather (or in my case, a few more because I like to be prepared for breakage). Once dried they were dry dusted with slate, cinnamon and black petal dusts to look like eagle feathers. The gumpaste covered wires were trimmed to a length of 3", then slipped into narrow drinking straws, which were trimmed to a length of 4". Overall length of these feathers:14".
The Teepee was constructed last minute (got the call from the bride at about 10 pm the night before that her mail order cake topper never arrived) upon a 6" fondant covered cake board. Using a metal skewer I punched 7 holes (6 evenly around the outside, one in the centre), then went to work on a cooling rack so I would have clearance underneath. Into these holes I inserted 6" bamboo skewers, making sure the points hit the mat under the cooling rack (these would the the “anchors” into the cake). Using a piece of artificial sinew (I am a Scouter, what can I say, it’s something I have on hand), I lashed the teepee poles together at the base, then at the top, just as a real teepee would be. Then I rolled out thin, animal hide shaped pieces of gumpaste and arranged them on the frame. I shaped the gumpaste and supported my movement pieces with pieces of cotton to let it dry overnight. I then grabbed my large heart lace stencil from Geraldine’s Creative Cutters, added some gum arabic to some white royal icing, and stenciled a (acetate) sheet of hearts to dry overnight. In the morning I dry dusted the base with shades of green, brown and grey (in hindsight I should have done this first), and the teepee with yellows, tans, and some lighter browns. Carefully remove as many hearts as possible from the acetate sheet and put into a container lined with paper towel (to avoid breakage).
Your take along kit for assembly should include: coupled pastry bags with royal icing in white and each of the colours used, a variety of tips, gum glue, a pre-measured and sharpened dowel, a mallet/hammer, a damp cloth (in a ziplock bag), neoprene gloves, a couple small offset spatulas, a couple clean small brushes, a small container of piping gel, fondant smoothers (I forgot mine on this delivery), as well as each of the cake components.
The set up was insane! My assistant for this delivery was new and almost destroyed the cutting cake. I always carry a surgical kit with me, but I did not bring smoothers, so was unable to repair the “squashed” look very well. That aside, construction was as follows:
Lay out the pieces in order, ensuring the base is where the cake is going to be in it’s final position. Using a pre-sharpened and measured wooden dowel, insert into the straw inserted into the top cake. Lift carefully over one of the separators and insert dowel into the bored opening. Lift carefully to the embroidered dummy, lining up the dowel with the bored opening. Rest the upper levels and push dowel through gently until you meet the table. Lift and have your assistant place the next separator underneath to line up the dowel and bored hole; push dowel through gently til it meets resistance. Lift and align dowel with opening on the drum layer. Rest the layers on the drum while pushing the down through. Lift and push the dowel further through, then align dowel with centre mark on platform. Place entire structure on centre point. Using a mallet (I have a wooden one in my kit just for this purpose), drive the dowel into the foam core platform. Remember to bring an extra piece of dowel the same diameter as the one being used so that you can add length to what you are hammering instead of hammering your cake. Now the cake structure is secured, place the teepee on top, making sure to avoid the centre pole of the teepee hitting the dowel about to be covered up. Place the feathers behind the teepee, pushing all the way into the cake until the down feathers come in contact with the fondant. Using royal icing, stand two of the stenciled hearts side-by-side in front of the opening of the teepee. The small feathers, made for the drum, are attached in pairs at the four points of the compass. Most folks won’t notice whether or not the actual compass points are met or not. As I said earlier, I am a Scouter, and I checked my marks before I even got to the hall (thank you Google Maps!!), so I knew where my placements were going to be when I got there. Royal icing was not working for these, but the piping gel worked like a charm.
Finished up with touching up where royal icing broke off, set up the cupcake tower, which I will post separately, and we were out of there. Once I have the pictures downloaded off my camera, I will post individual component pictures. Enjoy!
3 Comments
That´s what I call hard work…and lot´s of time to do it. Great job!! xx
CUPCAKES & DREAMS My facebook: https://www.facebook.com/pages/CUPCAKES-DREAMS/115882865103239?ref=hl
Wonderful! :) x
Raewyn, Sydney, Australia https://www.facebook.com/cakesbyraewyn
Very nice!
-- Michal, http://cakesdecor.com | My Facebook: http://www.facebook.com/michal.bulla
