Beats by Dr. Dre Headphones Cake
Beats by Dr. Dre Headphones Cake
 expand all pictures
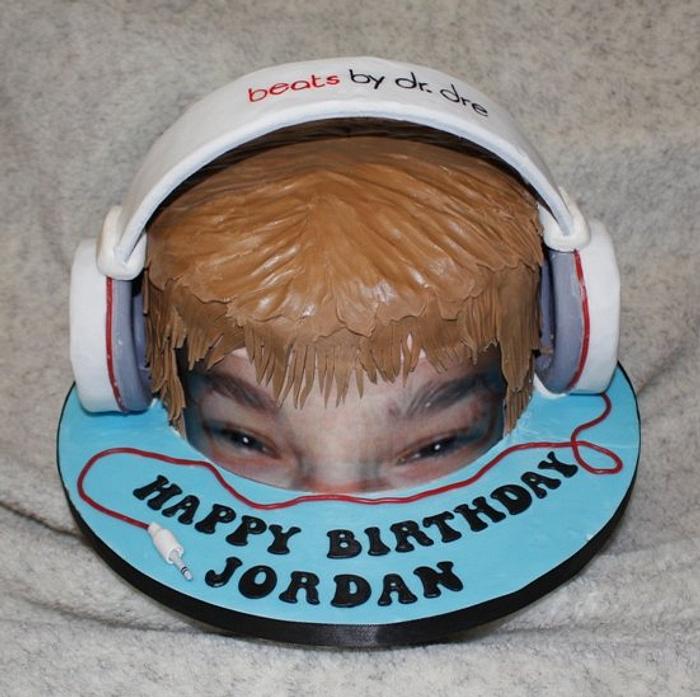
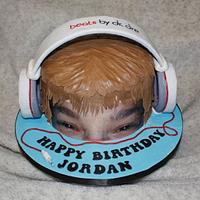
The brief: I’m getting the Birthday Boy a set of headphones for his birthday but he’s not getting them until later on on his birthday. Can you make a cake to look like the headphones and if possible somehow do it so it looks like he’s wearing them. I want him to think he’s only getting the headphones in cake form and then we’ll present the real thing once he’s had the cake.
Criminy! Headphones? That’s two fat round things with a thin bridge inbetween – how will that work as a cake (let alone enough to feed several people even if full size)? His face???? That is somewhat beyond my artistic capabilities.
I sat and thought about it for a while, googled some images and found several people’s cakes for Dr Dre headphones and another cake for half a head with headphones draped over it. An idea started to form in my mind…
I liked the idea of the head wearing headphones as that covered the brief, the face though – that’s the tricky bit. If I had an edible image printer, I could have done something with that. But, I don’t, so that was that. After an afternoon at work laminating notices, I had a lightbulb moment. Print his face on paper, laminate it so it won’t run or affect the taste of the cake and attach that to the cake somehow. The ‘somehow’ hadn’t come to me at that point but I thought I’d just wing it later.
I raided his Mum’s stash of Facebook photos for any of him showing a full-face and printed them at a size to fit the cake. Using the tin I would be baking the cake in, I measured that to have his eyes where I wanted them, they’d need to be 7? apart from outer-eye to outer-eye. I had to have a few attempts with the scaling to get there but in the end I ended up with several slightly different sized panels of creepy eyes staring at me. I could only get the eyes in in the height available so the nose had to go, I was intending using icing for hair to cover the top of the printed panel once affixed to the cake.
Cake was due for Monday and I was out all day Saturday so the plan was to bake Friday, model headphones Friday, cover cake Sunday, handover cake Monday morning on my way to work. I like a plan. If I stuck to my plans, I wouldn’t have so much stress in my life but hey-ho. I baked Friday. I also formed the headband from pastillage using the side of the cake tin to shape it. But, that was it. Bone idle!
Sunday, I took my sweet time getting started. In my head I didn’t envisage the rest taking too long. I never do. I’m always suprised by how everything takes 3 times longer than how I imagined it would EVEN when I know it to be fact based on the last attempt!
First job, split the cake into three layers, jam and buttercream them back together and cover the lot in buttercream. One of the layers had the biggest crater in the middle that I have ever seen – it almost went right out through the other side. I hadn’t got time to bake again, what do I do, what do I do? I thought about making a deliberate whole right through the middle of the cake and filling it with some kind of candy to spill out when cutting but couldn’t decide what might be suitable that wouldn’t go sticky before the event. I was even thinking about baking another layer even though I didn’t have the time for it. In the end, I just gritted my teeth in defiance, used the holey layer for the buttercream filling and filled the massive hole with that as well.
The headphones were to be made from Rice Krispie Treats, never made them in my life but seemed so simple that it would have been a quick and easy 10 minute job right? Wrong! Firstly trying to get a recipe that made sense – not easy. Americans, they like to mix volume with weight (and not metric weight either), use ‘sticks’ for butter and all sorts of other madness. I like consistency. Everything by weight. Simple. Less margin for error. For instance, the marshmallows; if using big ones, I needed a full 10oz bag; small ones involved measuring them in ‘cups’. Why? If I need 10oz of bigguns, surely I need 10oz of dinky ones? As it was I had to google the conversion from oz to g while in Sainsbury’s because of course we gave up the Imperial measurements a while ago.
Anyhoo, eventually I got what I hoped was everything together in the right quantities. Followed the directions, stirred everything in. Then I tried to mould it with my hands. Ha-de-blinkin’-ha! Picked up a lump of Krispie gunk, put my hands together to try and ball it, pulled my hands apart, two hands covered in an unholy sticky goo and no ball. Scraped off as much as I could, washed my hands and started again, this time covering my hands in butter first. Same result. Panic, panic, panic, panic…. Sunday night, cake due tomorrow, no idea what I’m doing… Eventually I decided to line a couple of cake tins in cling-film, throw in the Krispie mixture and leave to hopefully set and carve headphones out of later.
Later, trying to remove said mixture from tins, the gunge was well and truly stuck to the cling-film. I could’ve kicked myself for not greasing it first and am nearly suicidal with panic about disappointing my friend next day. In a last-ditch attempt to salvage them, I put the tins in the freezer for an hour. When I brought them out and popped them from the trays, the cling-film peeled straight off and the relief was so much, that I actually shed a tear… get a grip woman!
While they were freezing, I set about covering the cake in flesh coloured fondant. Usually I would give a buttercream covered cake a light brushing of water before laying the fondant over it to help it stick. This time I didn’t. I’d read somewhere that the warmth of my hands while smoothing the findant would encourage it to stick to the butter. This seemed quite genius and it also meant I’d get a second go at laying the fondant if I misplaced it the first time as it hopefully wouldn’t adhere as soon as it touched the cake.
I WON’T be trying that again! I ended up chasing air bubbles all over it, I’m guessing because it wasn’t stuck down in places. They weren’t little ones either and they just kept coming. Once I was satisfied that they were all gone, I trimmed the edges and sat myself down with a nice cup of tea. On returning to the kitchen, there were more of the flaming things! I did the best I could knowing that at the very least most of it would be covered by ‘hair’ or the eye panel. Speaking of the eye panel, when I held it up against the side of the cake, I decided the cake wasn’t tall enough for it. Once I’d got the eyes to the right width for the cake, the height to just past the eyebrows would’ve meant a very flat head. I decided to make him a ‘brain’ from the Krispie treats which was really just a domed mound of the stuff made to fit the base of the cake tin. This was going to go on top of the fondant to aid easy removal if Krispie and cake was not a good taste combination and to ensure that the butter icing didn’t just turn it into a soggy mess.
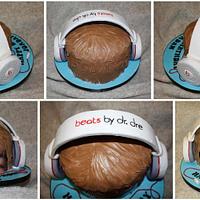
Right, cake covered in fondant, brain balanced on top, eye panel attached with royal icing. Onto the hair. If I did this again, I’d do it differently. I rolled out coloured icing into strips, cut into it along one edge and attached it to the cake in layers. VERY time consuming, not all that attractive. By the time I’d got to the top, I decided to put the remaining fondant on top and smear it out with my fingers which actually gave a very good texture to it. Now, if only I’d done the whole head that way, I may have got to bed before 2am that night!
I now had an eerie effigy that followed me round the kitchen – very creepy looking cake-with-eyes but it made me giggle everytime I looked at it.
Onto the headphones. I cut two discs of Krispie treats with a sharp knife and covered them in fondant. I used strawberry laces for the red accents. A big, fat sausage of fondant was used for the padding. I covered the top of the headband in a layer of fresh white fondant as the pastillage was not as white as I’d have liked. I painted the logo on freehand, I wanted to trace it using pencil transfer but the icing was too soft still and wouldn’t take the transfer so freehand (and wonky freehand at that) it was.
I very crudely attached the headphones to the cake – this is my lack of planning, I should really have put a dowel through them to attach them safely to the board but then on the plus side, I wouldn’t have been able to receive the fantastic photo at the bottom of this post as the headphones wouldn’t have come away easily. When I say crudely, I panicked and used lumps of modelling paste/pastillage to support the ‘cans’ attaching them to the board and headphones with royal icing and more or less the same technique to attach the headband to the ‘cans’. The wire was another length of strawberry lace (I bought two bags to be sure I’d have enough, only used three pieces and ate the rest as I made the cake – result!) with a headphone jack moulded from fondant at the end.
The inscription was cut using Klikstix in ‘Groovy’.
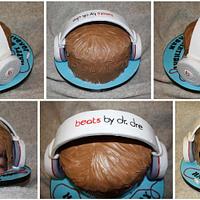
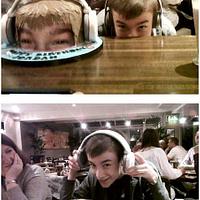
At the time of the birthday party, the recipient was still under the impression his Mum was a bit ‘crap’ for only getting him a razor for his 16th. Then the cake came out. Then the real gift. The photos below show a very happy Birthday Boy and I’m pleased with how it came out in the end having had everything try to thwart me along the way!
Carol, Maidenhead UK, http://offtherailscakes.co.uk
6 Comments
Well done!
-- Michal, http://cakesdecor.com | My Facebook: http://www.facebook.com/michal.bulla
Nice job! Just so you know next time when working with RKT, use shortening on your hands to stop them from sticking and you’ll be able to mold quite well.
Tiff - MA www.facebook.com/sweetbeecakery
Thank you both. Thanks for the tip Tiffany, I buttered myself up before having a go at it but I’ll give shortening a try if I ever have to do it again as I guess that is more likely to stick to your hands unlike the butter which just slid off with the heat.
I had no idea it was supposed to be quite so sticky. Ingredients, hot melted marshmallow and I had no idea??? I can be a bit dim sometimes! :)
Carol, Maidenhead UK, http://offtherailscakes.co.uk
Hi, gr8 job!! I love the laminated picture idea! How did you type the Dr. Dee on top?
Hello Ranazandi, I tried first of all to transfer by tracing a printed logo on the back with a pencil and rubbing over the back but my icing was still too soft to take the impression. I just gritted my teeth and wrote it freehand with a short fine brush in thinned down Sugarflair gel paste colours.
Carol, Maidenhead UK, http://offtherailscakes.co.uk
thanks for ur reply!! nice handwritting!

