Cookie Monster Tutorial
I have made a tutorial on how to make the lovable Cookie monster – great one for kiddies and hobby bakers to get involved with as no special tools are used to give a really professional effect.
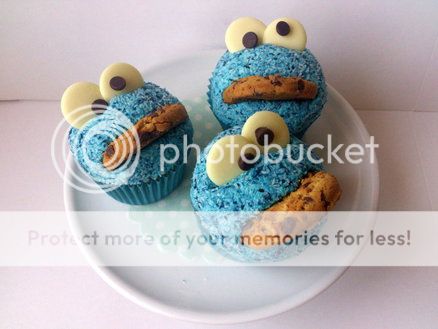

Things you will need:
Dessicated coconut 75g
Butterfrosting – You can find a suitable recipe here for 12 cupcakes Or use shop bought buttercream http://www.bbc.co.uk/food/recipes/basicbuttericing_73263
Chocolate chip cookies – 1 per cookie monster
Giant Milkybar buttons
Chocolate chips
Blue food colouring – I have used Wilton Royal Blue – But any blue food colouring / gel or paste will be suitable.
A cupcake
A sandwich bag – not shown

First we are going to make cookie monsters eyes:
Take 2 giant buttons and 2 chocolate chips, use a tiny amount of buttercream on the back of the chocolate chips to act as a glue and stick them onto the buttons.

You want your eyes to look something like this.

Then take the remaining buttercream and add the blue colour. I’ve used Wilton Royal Blue. You can use any blue colouring available.
If you are using liquid colouring, add it slowly, you may need to add a little extra icing sugar if your buttercream becomes too wet.

Take your sandwich bag and add the coconut to it. Add a small amount of colour to the bag.

Rub the bag between your hands to get the coconut blue.

You want your coconut to look like this…

Pop the coconut into a bowl

Add a generous helping of buttercream to your cupcake, like this.

Then take your cupcake and roll it in the coconut.

Then with the palm of your hand start to gently pat the buttercream into shape. You want it to cover the top of you cupcake.

Once the top is covered, I place mine down and use the palm of my hands to tidy the sides.

You want your cupcake to look like this. Slightly domed.

Now take your cookie and cut a slither off like shown….. Eat this bit for quality purposes ;)

Take cookie monsters eyes and poke them gently into the butterfrosting.

They should stand proud like this. The butterfrosting will hold the eyes in place.

Take your cookie rounded edge out and slowly push it into the buttercream dome, where his mouth would be.

Once in place I pat my buttercream gently around the cookie to ensure its in place.
Thats it folks….. Hope you like the tutorial, feel free to share the album, if you use the tutorial, please credit me if you post pics….. ♥
The link is here … https://www.facebook.com/media/set/?set=a.375763162511318.93460.264419980312304&type=3
7 Comments
Looks great, thanks for sharing ;)
-- Michal, http://cakesdecor.com | My Facebook: http://www.facebook.com/michal.bulla
This is simply adorable!! Thank you so much for sharing!!
Toni, Pennsylvania, https://www.facebook.com/WhiteCraftyCakes
You are most welcome…. apologies for the large pics…. new to the whole tutorial scene xx
This is so cute, thank you!
KatriensCakes- https://www.facebook.com/www.katrienscakes.co.za/
Very cute!!
So cute. Thanks.
looks like alot of fun my son son would have fun with this!
