
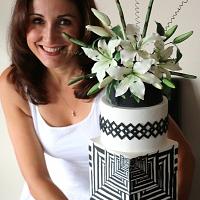
Picture Frame Board #1: Sweet Art - Picture Frame Board and Hanging Cake
I saw a cake posted earlier this year by “The Sweet Life by Julie”. It caught my attention immediately because it was a white picture frame with a hanging cake covered in red poppies. You know how sometimes you see something and you instantly know, “Ohhh, I love that! I have GOT to make something like that…soon!!” At least, that’s how I feel when I see something that I love, and my mind thinks of cake. So, for the NCACS (National Capitol Area Cake Show) in Virginia this past weekend, that’s exactly what I did. I set out to replicate the idea of a cake hanging inside of a picture frame. I ran to Michaels Craft store as fast as my minivan could take me, with my weekly coupons in-hand. I found a beautiful picture frame back in the clearance section for $8. SOLD!! Then, I went to Lowes and Ace to get the necessary wood and hardware. I used a 1/2" thick wooden board since I wanted to ensure that my frame was attached securely onto the board. I also needed the picture frame to stand up at a 90 degree angle, so I decided to use “L” brackets for the back of each side of the picture frame. Mine were 3" on each angle and I found them at my local hardware store for $2 each. Your brackets and your frame need to be sturdy enough to hold the weight of a cake hanging on the frame. I screwed the “L” brackets into both the back of the frame as well as into the wooded cake board. I also decided to use a small 1/2″ × 1.5″ “L” bracket on the bottom, center of the frame just to ensure that it was sturdy. After attaching the frame, I covered the hardware with black felt by using a glue stick. I only needed it to hold for the weekend, so hot glue seemed like overkill.
Now that the frame was attached, I just had to cover the board. I first covered my wooden board with red foil, then used red fondant to cover the foil. I let it drape loosely on the board and attached it with piping gel.
The hardware for the cake itself was simple. I needed an eye hook, a coupler, a threaded rod, some bolts and a washer. I washed all of my parts in soapy water and dried them. I measured the cake once it was stacked and covered. I figured out how tall I needed the threaded rod and cut it to size. Be sure to take into consideration the length of the eye bolt plus the coupler in addition to your threaded rod. To keep the hardware food safe, be sure to cover it with aluminum foil. I also covered mine in white chocolate to ensure that the customer would feel safe with the hardware inside of their cake. Measure the center of your cake. This is important to ensure that your cake hangs straight down and does not lean to one side or the other. If your cake leans, eventually it will fall apart and you’ll have a big pile of cake at the bottom of your picture frame. Not cool at all!! Once you can cleanly insert your covered rod through your cake, use the washer at the base of the cake board and put a nut on it to keep it from slipping off. I did not want my bolt to show, so I used a boring drill to bore out a hole the size of my washer. I only bored through 3/4 of the cake board. I then covered the bottom of the cake board with fondant so that it appeared to be fondant all the way around the cake. I printed out an edible image onto icing sheets from Icing Images and adhered them to the cake.
Lastly, I went to the hardware store and purchased some pretty white chain to hang the cake in the frame. It cost me a whopping $.27. However, I will tell you that I had points deducted at the National Capitol Area Cake Show this past March 2015, because my chain was not covered. Even though it did not touch the cake, and it was decorative, the judges thought it best to cover the chain next time. So, to ensure that your chain is food safe, it would be best to cover it with fondant. You never know if the chain might touch the cake when taking it off of the hook. It’s better to be safe than sorry.
There are so many ways that you can use this idea. I’d love to see how you alter it using your creative cake imagination.
3 Comments

Nice idea!
All my cakes are made to make you and me smile!
Fantastic, thank you for sharing! x
Absolutely brilliant tutorial! Thank you for sharing it! Love the idea!
Gulnaz Mitchell, New Zealand, https://www.facebook.com/pages/Heavenlycakes4you-by-Gulnaz-Mitchell/113619242162187