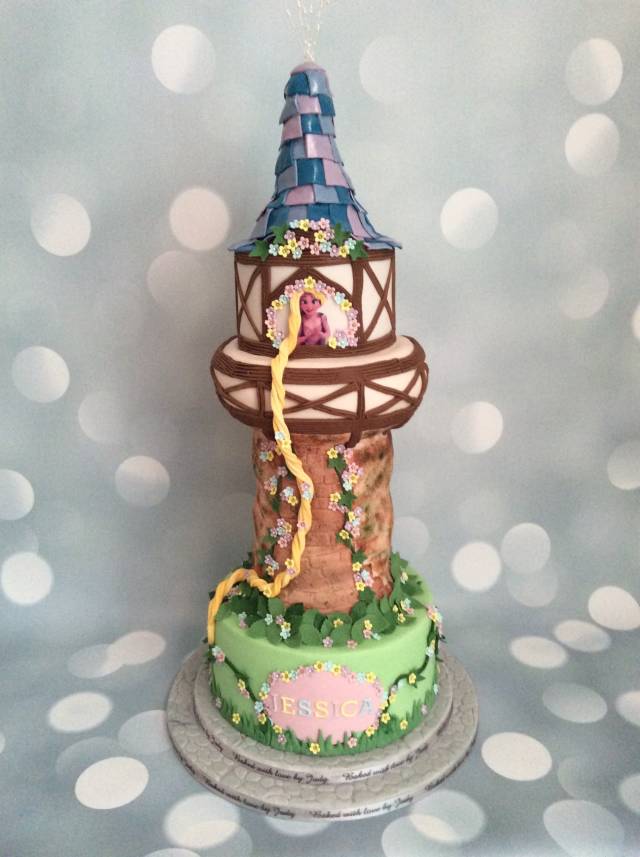
Rapunzel in her Tower tutorial (updated with pictures and stuff I forgot the first time!)
This was my first ever cake a) involving a degree of construction and b) using Dawn Butler’s new Cake Frame product (I bought a starter kit at Cake International, Birmingham)
It may be a bit basic for some of you – but hopefully may be of interest if anyone, like me, is thinking of a Rapunzel/Tangled cake and not sure how to start. This is my first attempt at a tutorial so please bear with me!!
I took shots as I was making it so that I could learn from it for the future and have added some notes along the way which I hope make sense!
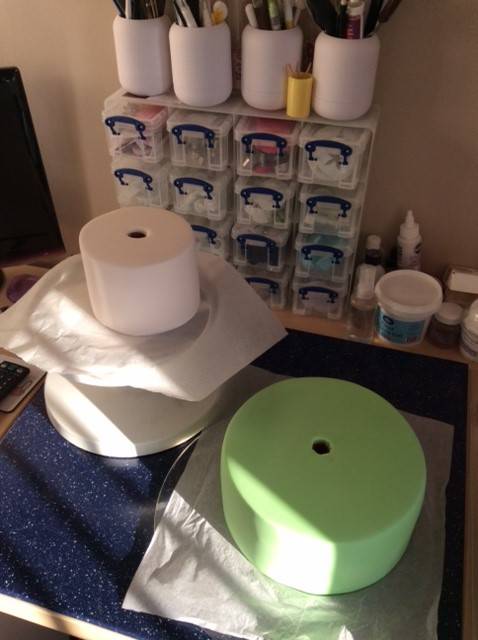
These cakes have been ganached and covered in sugarpaste. Slightly odd process as I needed to have a hole down the centre so that they would go over the rods in the kit. I made holes in the cakes pre ganaching, then removed the ganache layer over the hole when set. I did the same with the sugarpaste.
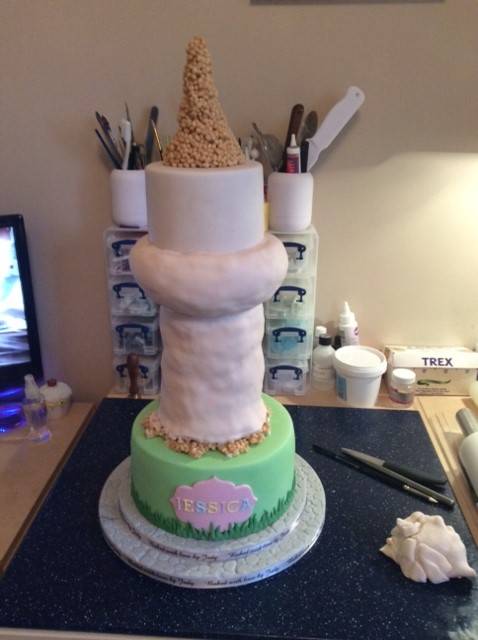
The green cake is an 8" three layer vanilla madeira filled with vanilla buttercream – about 4" high in total.
The beige cake is a 5" three layer chocolate madeira filled with vanilla buttercream – again about 4" high.
Each is on a cake card – again I had to cut a hole in the middle.
Having assembled the cake frame by screwing the rods I wanted into the 10" round base board I put a little royal icing on it before sliding the green cake down the rods.
I put 4 straws in the cake for support before adding the 4" round platform from the kit – although this was actually supported by a collar which fits into the platform and sits firmly on the rod joint.
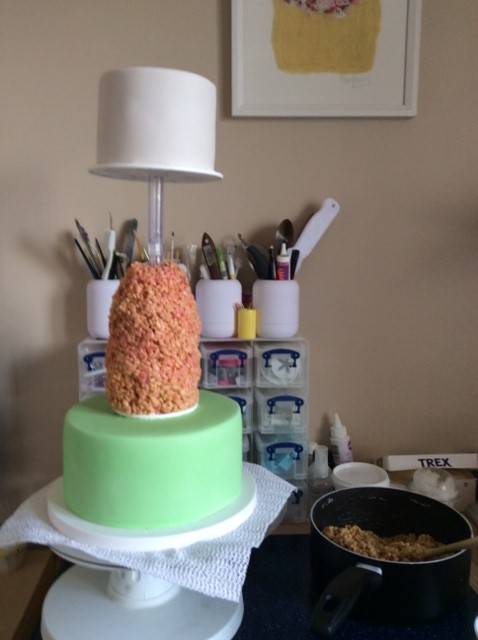
I started building my tower from RKT up to the height I wanted the second cake to sit – I decided that this was a bit too high and removed a rod and replaced with a half rod at this stage. (sorry forgot to count how many rods I used!) Also ignore the strange mix of colours of RKT – I used 3 batches in all and one was a mix of pink and white marshmallows!
I decided to make it quite a sturdy tower rather than the very thin one in the film as it needed to support quite a heavy cake……and my engineer husband got very interested in the process and advised that this was necessary in between bringing me cups of tea :)
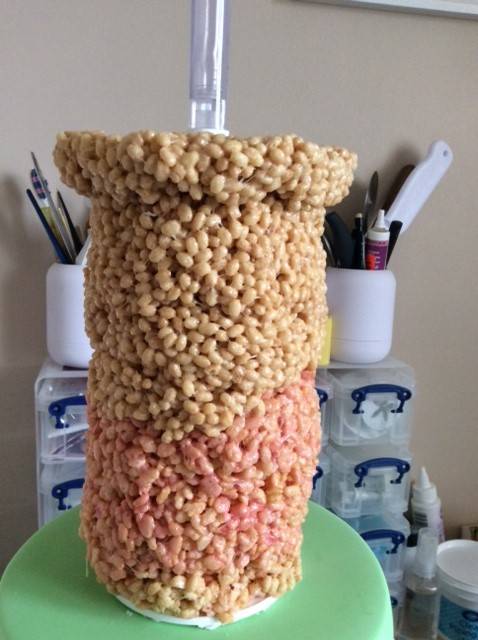
When I was at the height of the next cake I started thickening it to build the platform for the house at the top of the tower.

At this stage I slid the 5" cake onto the rods – this was on the 6" platform from the kit so there was a half inch edge all round. I rolled the RKT over the ledge to meet the cake and cover the edge of the platform – which also secured it.
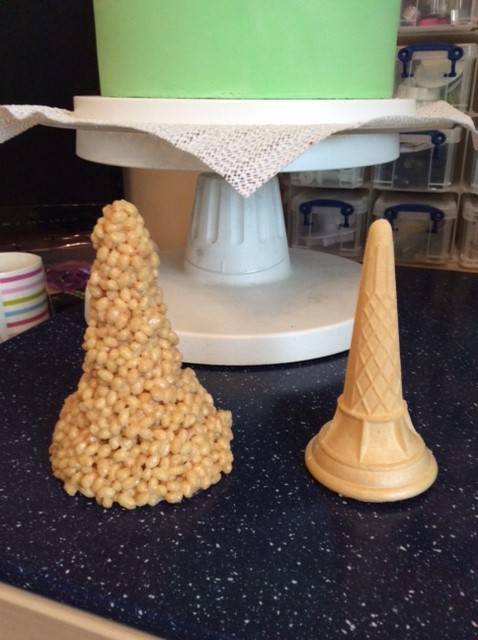
While I was wallowing in RKT I covered an ice cream cone with it for the roof of the house – until it was approximately 4-4.5" in diameter at the base. in hindsight I would have made it even wider as I wasn’t as happy as I could have been with how the roof looked – i would have liked more overhang of the bottom tiles.
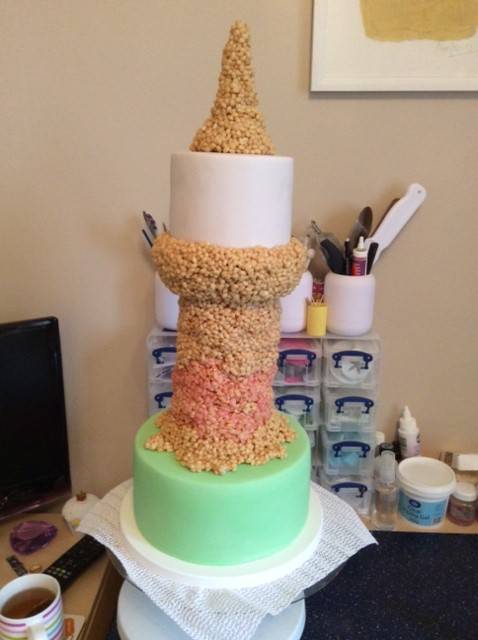
This is the assembled structure for the cake – the rods went up into the ice cream cone. I also had a bit of RKT left so built out the bottom of the tower in a random design for definition when I came to decorate.
I had a slight problem with the RKT pulling away slightly where it overlapped the top platform. Some royal icing spread over this area made all the difference.
The 10" platform wasn’t wide enough for the height of the cake – observation of the tea maker! When I tried lifting it he was right! So I attached the platform with royal icing to a larger cake drum.
Ribbon on, then decorated the boards with grey marbled stone effect – using an impression mat and cutting and attaching pieces to the two rims.
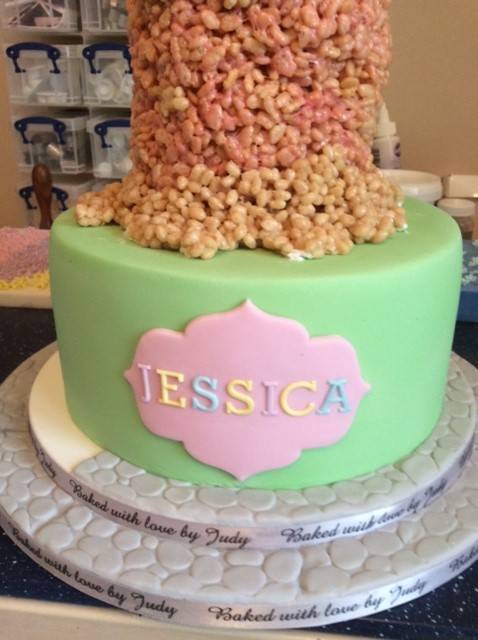
Name plaque went on at this stage as you can see – just because I was itching to do something pretty :)
Once the RKT had dried and set – overnight – I covered it with a beige sugar paste. I would usually have covered the RKT with a first layer of sugarpaste or melted chocolate, but I actually wanted a lumpy, bumpy look as it is a stone tower, so just one layer of about 3mm sugarpaste did the trick.
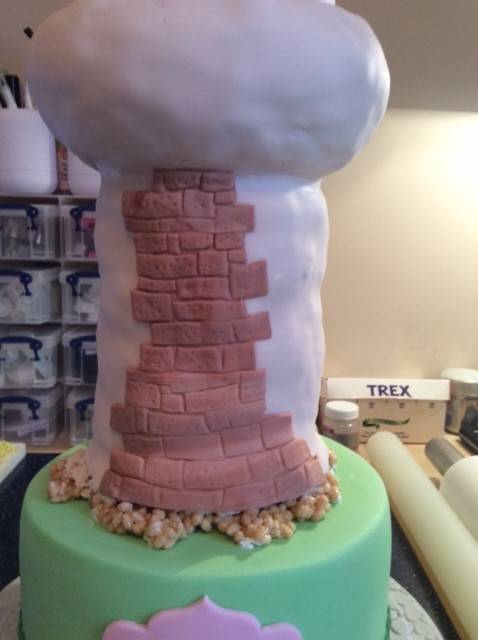
The Disney tower has patches of brick work so I put a patch up the centre of the tower – again used an impression mat and cut pieces to form this.
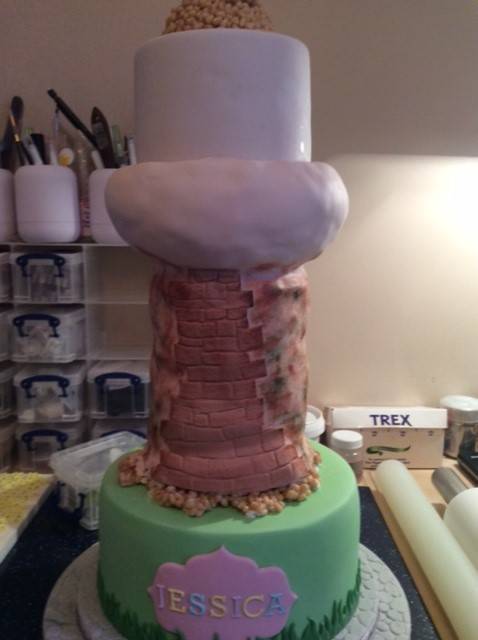
I used a sponge and stippled the rest of the tower with layers of brown and green paste colouring mixed with vodka until I was happy with the effect. At the end I did a little over the brick work as well so that it aged it a little.
You can also see a bit of grass round the base of the green cake as I was getting bored again! I have a lovely mould I use for this.
I spent the evening making tiny flowers and leaves while this all set, again over night.
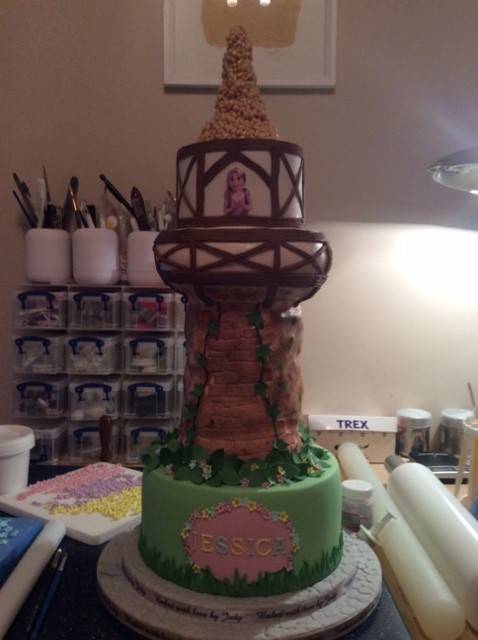
It was then a case of starting to decorate it – ivy up the sides of the brickwork and wooden look beams around the house to replicate the tower look.
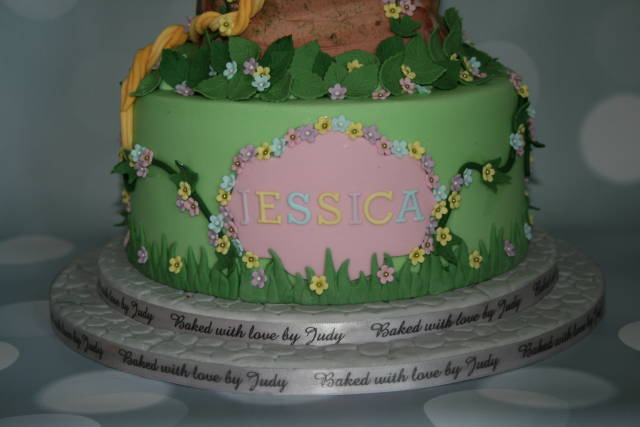
Lots of leaves and flowers at the base of the tower, and ivy and flowers on the green base cake.
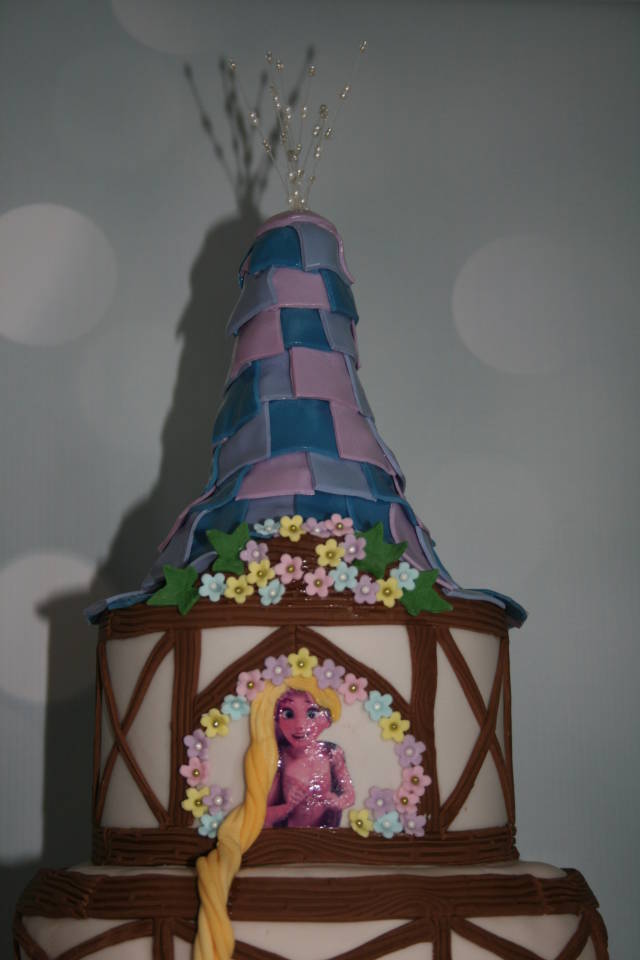
I covered the roof with random tiles of purple and blue shades as per the film.
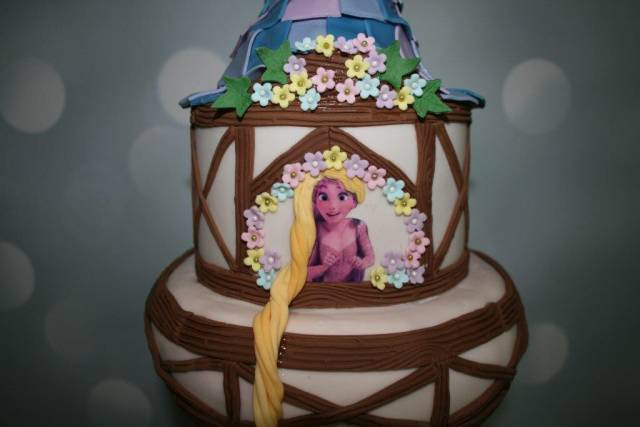
I was running out of time, so I used an edible image picture of Rapunzel rather than make a model – actually quite pleased I did as I think it probably works better.
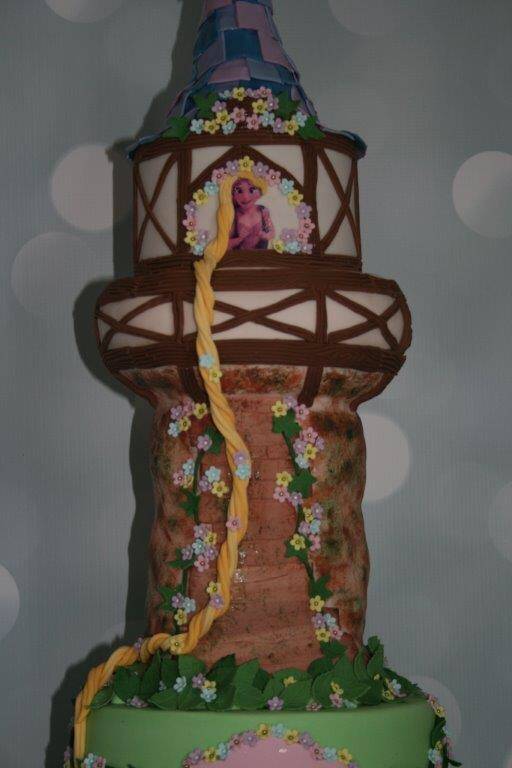
And of course added the long hair! Two lengths of the right hand extruder insert in the picture below twisted round each other – I used two slightly different shades of yellow.

Stuff I used
This was for my friend’s little girl’s 5th birthday – fingers crossed she gets the cake there in one piece!
Hope you’ve found this helpful if you are thinking of making one – or it at least gives you some ideas.
I really loved using Cake Frame – not sure how I would have managed without it without a load of construction work.
thanks for looking :)
Judy
28 Comments

This is so awesome! I’m going to have to try this now! Thanks for the tutorial Judy!!!
Oh that’s lovely Karen – hope you do and have as much fun as I did!
Judy

Wow amazing thank you for sharing xxx
Cake my day...

Wow, this is fabulous! Thanks for sharing the little tutorial as well!
Toni, Pennsylvania, https://www.facebook.com/WhiteCraftyCakes

Very good tutorial Judy, I really appreciated it!
Clara
Fantastic!! Thanks so much for doing such a fab tutorial :-D
Amazing! Great insight into your method, thanks for sharing xx
Brilliant Judy!
Great tutorial too, I expect your friends daughter was over the moon
Angela.
Thanks everyone x
Judy
Fab cake, and great tutorial xx