The Mysterious Game of the Throne
The Mysterious Game of the Throne
 expand all pictures
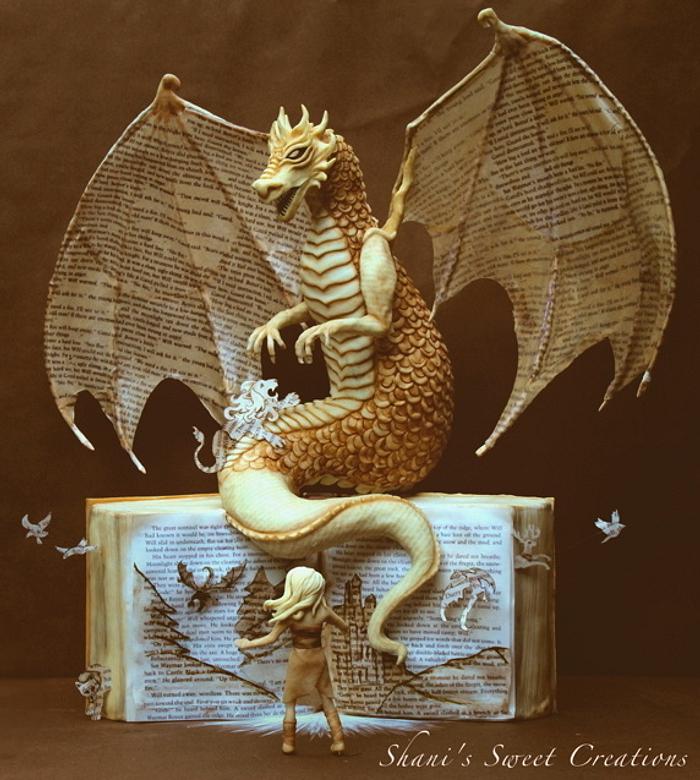
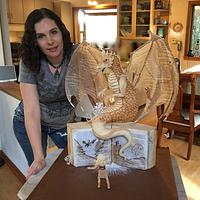
This is my entry for the Threadcakes contest this year. There is so much I loved about this design. Being an avid reader of fantasy books I just couldn’t resist creating it in cake. You can see lots more close up and creation photos over on www.threadcakes.com. Here is my submission comments about how I made this cake.
Hello cake lovers! This description is going to be a bit lengthy, this cake took me on a wonderful journey and I want to tell you about it. My name is Shani and I am a self taught professional cake decorator living in Northern California. I’ve been making cakes professionally for almost 4 years. I am very fortunate that Threadcakes takes place right at the perfect time for my son’s birthday. He is turning 16 this year and I knew I wanted to make him an EPIC cake for his birthday. I have always wanted to make him a dragon cake, ever since he was born we have collected Dragon art for his room. Paintings, sculptures, figurines etc. He is my dragon boy. The giant, roaring, fire breathing type of dragon. Seriously, not kidding here.
There were several criteria I was looking for when I was choosing from the Threadless designs. I knew I wanted to do a dragon and I wanted to do a structural gravity defying cake. I wanted to be able to incorporate as many different techniques and decorating methods as possible as well. In my every day cake decorating business I don’t get orders for these types of cakes so I wanted to take this opportunity to learn something new and further my skill set as a cake artist. So when I saw this “The Mysterious Game of Thrones” design I knew it was the one (especially since I am a huge Game of Thrones fan!). This design tells a story, and I wanted my cake to capture that story. Side note: I listened to the series on audio book (for the second time) the whole time I was making this cake, you know for inspiration sake.
The first thing I got to do was go to the hardware store and go tool shopping! Fun! Especially when you get to tell the clerk that you are buying all these power tools and hardware to make a cake! OK, tools acquired, check! Now build the support structure…. Ummm… So seeing all the amazing, mind blowing, epic gravity defying cakes people do doesn’t at all help you figure out how to actually do one. Nope. No one ever told me you needed an engineering degree to make a cake. Geez! Ok well, after lots of scribbling and measuring, several erasers and a few more trips to the hardware store I came up with a plan. Now build it. Ok so that wasn’t too hard since I had figured out all the measurements and stuff and I am actually somewhat adept at using power tools luckily. Only had to make a few minor changes as I started building the cake. Whew! So I got the internal structure built first. Off to a good start. Then I started working on all the little decorations and details. Over the next few weeks I spent any free time I had creating details. I ended up experimenting and inventing some new and super exciting techniques to be able to pull off the ideas I had in my head. And they worked!! So freakin cool!! But wait, I’m getting ahead of myself because I’m so excited about that part, more about that later. First, I wanted the little creatures coming out of the book to look like they were pieces from the pages of the book so with an edible ink printer I printed out pages from “A Song of Ice & Fire” onto edible wafer paper. Figured that text would be appropriate for this design, ya know, gotta keep the theme cohesive, right? The critters were made by cutting out the shapes and layering them so they were still flat but had some shading & dimension. I used an edible ink pen and petal dusts(edible food coloring) for shading and outline. The next thing I did was sculpt the girl figure. She has an internal wire structure and is sculpted from white modeling chocolate, dusted with petal dusts for color. Next was to make a wire frame work for the wings. I covered it in gum paste to look like bones and let it dry hard. Then came the part I had racked my brain about for weeks until I thought of something that I was really hoping would work. To make the wing membrane semi translucent and have book text printed on it… my crazy idea… reverse image edible ink transfer onto rice spring roll wrappers. Boom!! It WORKED!!! I reverse printed the text onto wax paper then transferred it onto the softened rice wrappers while it was still wet, then formed and pieced those together over the bone wing structure. When it dried it held it’s shape and I dusted it with petal and luster dust. Ok so I THINK I invented something new here because I’ve never seen anything like it out there. Am I right? I hope so, it’s Super cool!
Then it was time to do some serious sculpting. White modeling chocolate all the way baby! Well with a little help from our friend armature wire. Dragon head, dragon tail, arms and claws. I had an epiphany when it came time to do the teeth. I was planning on making them out of gum paste a few days before so they would be dry and hard when it was time to put them in. But of course I forgot. A little thing called wedding season was kind of distracting me. So I was sitting there trying to figure out what to do and I looked over at a bowl of uncooked rice I had used to help dry the wings in the proper shape. And I thought, hmmm…rice looks like little teeth… bingo!! And they are just the right size! But when I tried to insert them into the cold white chocolate jaw it just wanted to crack the poor, thin little thing. Ok well if it was warm rice it would melt it’s own hole right? So I held a grain of rice in a pair of tweezers over a candle flame for a second and yep, it worked. Sweet! Only 20 more to go… sheesh, thank goodness for reading glasses. Next I sculpted the tail, it is white modeling chocolate with an internal wire for support and shape. Pretty straight forward, no epiphanies required.
It was cake time, finally! I Baked 2 1/2 sheet cakes. My son’s favorite lemon zest cake. But then I had a little dilemma. He hates buttercream. WHAT? Who hates luscious, creamy smooth, delicious Swiss buttercream My dragon boy, that’s who. So I tried something new again. I did a hybrid lemon Swiss buttercream white chocolate ganache mix hoping that would please the silly child. His verdict, meh. His words exactly, when I made him taste it… shrug “meh”. Ugghh teenagers! Too bad, I was using it anyway. So I stacked the dragon body and carved the shape and covered in dark chocolate ganache (hoping the chocolate would please the boy at least). While that chilled in the fridge I stacked the book cake. Using a template I made by tracing a thick book standing open on end for the shape. Cut out 6 layers and stacked them with the hybrid frosting in-between each layer. Coated it with a layer of the frosting then a layer of the dark chocolate ganache for firmness. While that was chilling I fitted the head and tail onto the cake dragon body and covered the body in white modeling chocolate and blended the seams. Then I sculpted his cool belly scales armor breast plate thingy (don’t know what that part should be called). Cutting out individual, graduating plates from sheets of white modeling chocolate and layering them on. Sooooo there I had a naked white dragon… All fierce and growly and… naked. Guess what I had to do next. Scales…hundreds and hundreds of tiny, fondant scales…. sigh OK, on ward and up ward. I can do this! But I couldn’t bring my self to cut out one scale at a time. Nope… not gonna happen. Epiphany time again! Use a five petal rose cutter, cut out the center with a round cutter and voila, five scales at once! My brain was being nice to me again. Thank you brain. Still had to place one at a time on the dragon, but hey, still an improvement on my time management skills. Right? Arms went on next and now a tricky thing I still hadn’t figured out. The arms and the tail in the design are both printed with the book text. How in the world to get that on to my dragon? First I tried the reverse print edible ink transfer thing like I did on the wings. No Go. To curvy, bumpy, boo! Needed to put the print on something that was flat then adhere that to the surface of the arms and tail. But what would take the print and still mold to the shape I had created and blend with everything? Thought about the rice wrappers but they have a different look and texture altogether and they dry hard. Not the look I needed. Then… yep, you guessed it! Epiphany #3! I made paper thin sheets of my white modeling chocolate using my pasta machine, then reverse image printed onto THAT! Absolutely perfect to then wrap around the arms and tail and easily blend in the edges. It was so thin it still showed all of the texture and muscle lines I had sculpted into the arms, yay! But WOA!! It was so thin that if I touched it for more than a few seconds it melted completely and disappeared! So all I can say if you try this at home is be quick! Time to color my white dragon. For the first time I tried a edible paint wash I had seen several people post about online. Worked a dream! Thin enough to wash over the surface like water colors and settle into the cracks for darker shading in the background. After it dried I went back with copper luster dust for a metallic sheen on the scales. Perfecto! Time to get that book covered in fondant. No problem, lots of practice in that department. Made the book cover with sheets of modeling chocolate, imprinted with a scale texture to look like the book cover was made out of dragon hide. Edible image on wafer paper for the front and spine, Game of Thrones of course. The front of the book is several sheets of the printed wafer paper (Game of Thrones text) and cutouts of the details shaded with petal dusts and edible ink pen. All the little critters were placed coming out of the book and the girl took he place of honor.
And DONE!!! I am a little embarrassed to say that when I tallied my hours it was almost cough cough 100. I didn’t plan on spending that much time on a cake. It kind of just carried me away. I was having so much fun learning and inventing and creating that it didn’t really occur to me that a cake was taking me 100 hours to make. Of course a lot of that was the learning and growing part with some try and try again kind of things happening here and there.
My ultimate goal for this was to make an epic birthday cake for my son and learn something new in the process. So 100 hours and 10 pounds of chocolate later, Mission accomplished I say.
~ But in the end, it’s all about the CAKE ~ We sang happy birthday and ate that delicious book. No photos of cutting into the dragon body because we are taking it in to my son’s school tomorrow to share with his class (and I’m far too impatient to wait for photos of that!)
Thank you for the opportunity to create Threadcakes . It’s been quite a journey.
28 Comments
This is brilliant!!!
'It Always Seems Impossible Until It is Done' Nelson Mandela http://www.facebook.com/CakesByFifi
Fabulous job, Shani!! Your son is one lucky 16 year old! Bet he was over the moon for this one!
Sugar Sugar by SSmiley
WOW! AMAZING!!!
Teté . https://www.facebook.com/pages/Tet%C3%A9-Cakes-Design/128768727315216?ref=tn_tnmn
Thank you!!
Excellent!
Wow spectacular!!
Sweet-E
Amazing!!!
Magda Pietkiewicz
Are u kidding me ! This is so out of the books …. Amazing
Fantastic piece..
Creativity is God's gift to us. Using our creativity is our gift back to God. Clarky's Cakes 😎
Wow! Looks awesome!
Teri, Ontario, Canada http://www.TeriLovesCake.ca
