
1st communion cake
1st communion cake


 expand all pictures
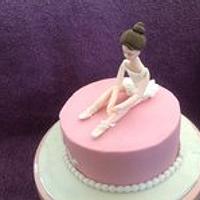
I had a awesome customer who knew pretty much the type of cake she wanted so I went over all the pictures she had sent me and picked out the things I thought she would like and came up with this design which she loved straight away. I decided to go with non edible silver beaded draping however would do edible dragees if to do again. I did use dragees on the quilting. Gril and cross are gunpaste, I made the girls by cutting each piece out seperately then placing them on a cut out of her I had already made from gumpaste…it turned out simply perfect and looked exactly like the picture on the invitations.
Tampa, Florida facebook.com/pages/curiaussiety-custom-cakes
6 Comments
this cake is so sweet J:~D
Love this! Please do a tutorial on how you did the girl! R
Radhika, Singapore, http://sinsationscakes.wordpress.com/

so lovely
I am going to use this same technique I did on the girl in an upcoming cake so I will gladly do a tutorial on it then. For now all you do is get the picture you are going to use, for me it was the little girl and I show a picture of it in my album. Copy it out on paper twice, cut one out of the full body you are going to use then with the other I cut out every piece of each different color …so basically I just made templates or patterns like you would if you were sewing a dress from scratch, hope that makes sense. I made the first piece the one full template of very thin gumpaste then when I cut out my individual pieces I then positioned and stuck them on that so just like putting a jigsaw pieces together, you know the baby style ones that come with a board and you place the pieces on top. It is really quite super easy and really did a good job getting me the exact replica of the invitation. Once it was pretty dry I turned it over and attached a scewer on the back with another piece of gumpaste. I hope this helped a little and if you have any more questions Raika I would be happy to answer them.
Tampa, Florida facebook.com/pages/curiaussiety-custom-cakes
Thank you for such a detailed explanation. Do you handcut your gumpaste pieces? My eyesight is no longer what it used to be, so I find that very difficult :) When I asked someone that question (on some beautiful silhouettes) they said they’d used cricut (?). Not sure what that is though.
Radhika, Singapore, http://sinsationscakes.wordpress.com/
Yes I hand cut this one and it was quite easy especially seeing as it was not very small so that made it easier. Yes I have seen them done on the cricut which is a machine here in the states used for scrapbooking and they have a cricut cake just for fondant and gumpaste, however I am not clever enough yet to figure out how to do that. If you have never heard of a cricut it probably means you do not have one and they may not be available in your country. Good luck and I hope all this helped.
Tampa, Florida facebook.com/pages/curiaussiety-custom-cakes