
Gum Paste Flowers #2: Gum Paste Roses on Floral Wire
As with most wired gum paste flowers, the bases need to be made well in advance so they will be completely dry when you’re ready to start making the roses. For the bases you’ll need: 22 gauge (food safe) floral wire, needle nose pliers, gum glue (dissolve a pinch of gum paste in a small amount of water), a small food safe brush, and gum paste.
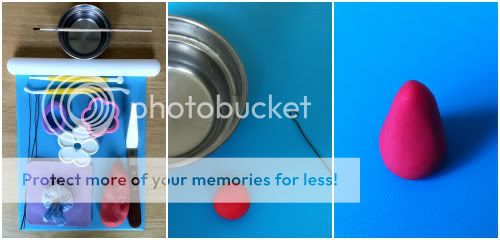
Use the pliers to make a small hook on one end of the wires. For each rose base, pinch off a marble-sized amount of gum paste and roll it into a ball. Then form the ball into a cone shape.
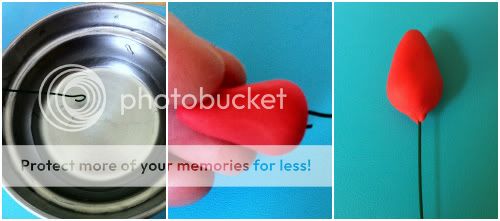
Dip the hooked end of the wire into the gum glue and push it into the wide base of the cone. Slide the wire far enough into the base so that it’s secure, but don’t push it too far or it will poke out the top. I usually stick the wires into a piece of styrofoam to let dry.
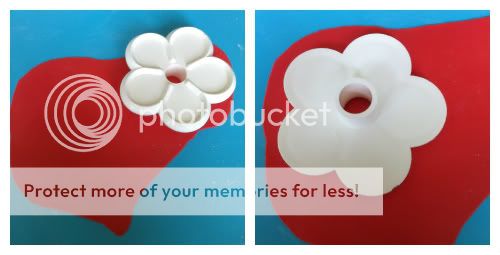
To make the roses, you’ll need: the rose bases, gum paste, rolling pin, cutters, shaping foam, dusting pouch, a ball tool, gum glue, a small food-safe brush, and an angled offset spatula. You can make roses by cutting out each individual petal with a rose petal cutter, or a quicker way is to use a blossom cutter.
Using a Blossom Cutter

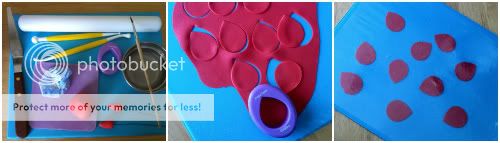
Lightly dust work surfaces with dusting pouch to prevent gum paste from sticking (I have a mixture of half powered sugar and half cornstarch in mine, but I live in a humid climate). Roll out the gum paste very thinly, cut the blossom shapes, and keep them all covered, except for the one you’re currently working with. Some blossom cutters don’t cut the petals very deep, and if you use one like that you’ll need to cut about 1/4" towards the center next to each scallop to separate the petals. The pink cutter pictured above is an example.
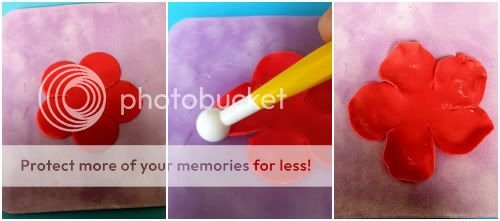
Place the blossom on shaping foam, and using a ball tool, thin and cup the center of each petal, then thin and slightly ruffle the petal edges.
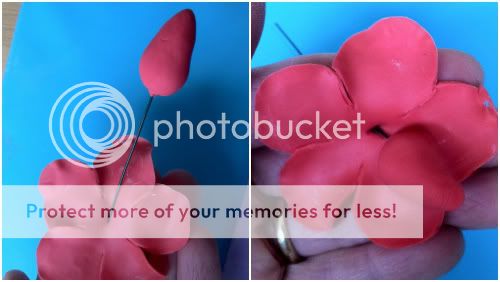
Lightly brush the rose base with gum glue, and thread the wire through the blossom center.
Push the petals up to the bottom of the base, and wrap one petal all the way around the top, forming a very small opening. Continue wrapping petals around the base to form a rosebud. You may need to add a little more gum glue to each petal as you work, and after you position each petal, hold it in place a few seconds to make sure it’s going to stay put.
I actually prefer to use a different blossom cutter, one that’s designed to cut deep petals for making roses so you don’t have the extra step of separating them. The method is still the same.
Roll out gum paste thinly, and cut the shapes, keeping extras covered. Three blossoms will make a nice, full rose with 15 petals.

As above, use a ball tool to shape, thin, and ruffle the petals on shaping foam.
Thread the wire through the center, and position each petal around the rosebud however you want it, adding gum glue sparingly as necessary and holding each petal in place briefly to make sure it’s attached.
I like to allow the rose to dry before adding more petals.
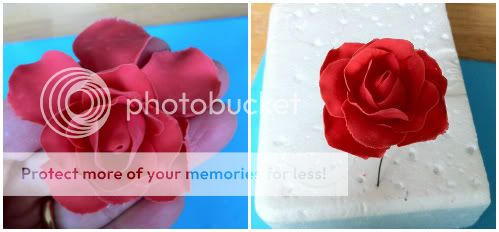
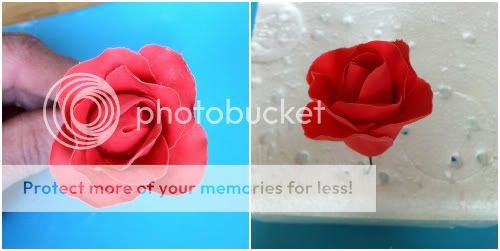
Here’s the full rose with all 3 blossoms added.
Using a Single Rose Petal Cutter
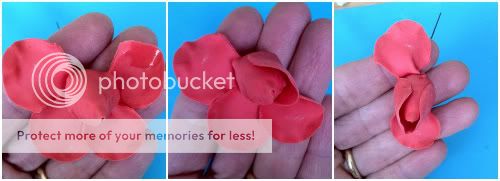
To make a rose using a rose petal cutter, roll the gum paste out thinly, cut out as many petals as you can and place all but the one you’re working with under plastic until you need them. This method is more time consuming because you’ll be adding the petals one at a time, but this gives you more flexibility in the way your rose petals are positioned and how the finished rose looks.
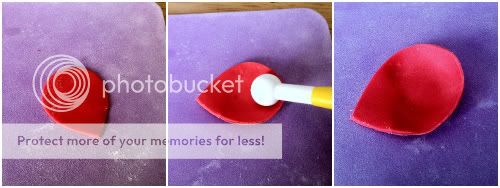
Place the petal you’re working with on shaping foam, and use a ball tool to thin and cup the center.
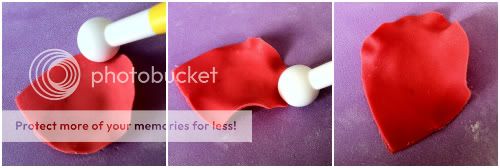
Then, thin and ruffle the top half (rounded end) of the rose petal by sliding your ball tool along the very edge of the petal. To do this, position the ball tool half way on the foam when ruffling the edge.

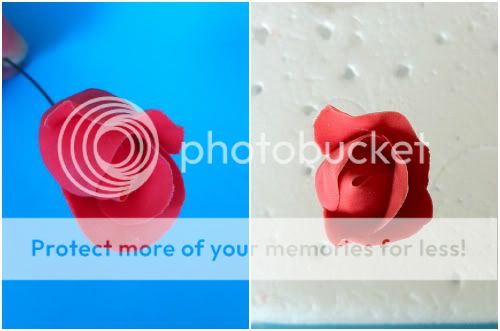
Lightly brush the rose base with gum glue and wrap the petal all the way around the center, forming a very small opening in the top. Trim any excess gum paste away from the bottom of the base, if necessary.

If you want the petal to have a more defined point to its shape, use a dog bone tool to thin the sides towards the center.
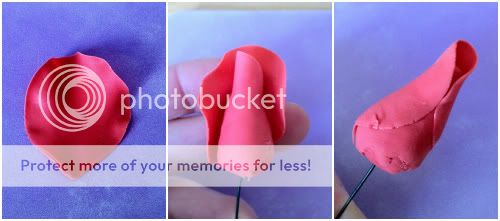
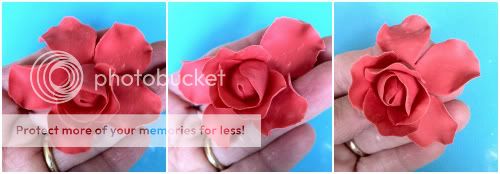
Continue to thin, ruffle, and add petals individually until the rose is as full as you want. Ideally, give each petal a little time to dry before attaching the next.
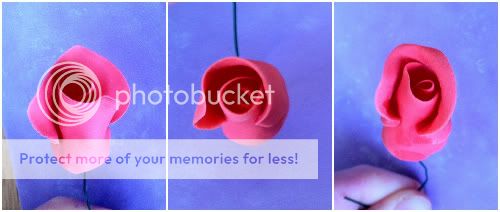
You can alter the way the petals look by how you place them on the base and form them once they’re attached.
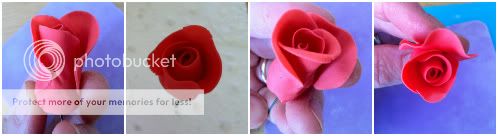
For example, compared to the one I left as a rosebud, the full rose has petals that are more curled back. I did this by gently using my fingers to furl the petals after adding them to the rose.
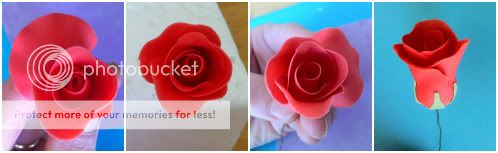
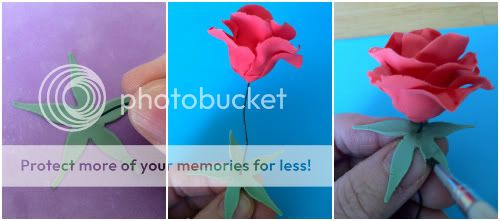
Place finished roses in styrofoam block to dry before adding calyxes.
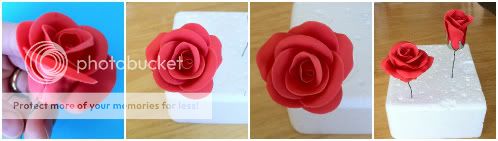
Adding Calyxes
To make rose calyxes, you’ll need green gum paste (add a pinch of whatever color you used for your roses so the green matches), ball or dog bone tool, rolling pin, dusting pouch, calyx cutter, angled offset spatula, gum glue, food safe brush, and your (hopefully dry) gum paste roses.
Roll out the gum paste thinly and cut the calyxes, keeping them covered apart from the one you’re working with.
Place calyx on shaping foam and using a ball tool or dog bone tool, thin and lengthen each petal of the calyx.
Thread the wire through the center, and push the calyx up to the rose base.
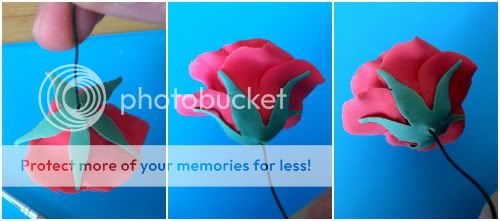
Sometimes positioning the calyx is easier if I turn the rose upside-down, which is why I prefer to work with completely dry flowers. I try to position the calyx so that it covers up the seams between petals.

To finish off the rose, take a tiny ball of green gum paste and push it all the way up to the bottom of the base.
I also have videos posted on YouTube demonstrating these techniques.
Making the bases: http://www.youtube.com/watch?v=nYtYjUs6y38
Blossom Cutter Roses: http://www.youtube.com/watch?v=j6FYsc6oND8
Rose Petal Cutter Roses: http://www.youtube.com/watch?v=oVF6zVVMFj8
Adding the Rose Calyx: http://www.youtube.com/watch?v=Ds49aiCgwgg
5 Comments

Thank you so much, this is a wonderful tutorial!
Toni, Pennsylvania, https://www.facebook.com/WhiteCraftyCakes

thanks for the wonderful tutorial _
10g's cupcakes, Philippines
I love and thanks for share.
Glais,S for Sugar
Thank you so much for sha

this is a great idea… so much easier..
Kimkizzies "For All Your Diaper Cakes, Baby Shower, Wedding, Party Favors & Needs" www.kimkizzies.com