
Graffiti Text Tutorial
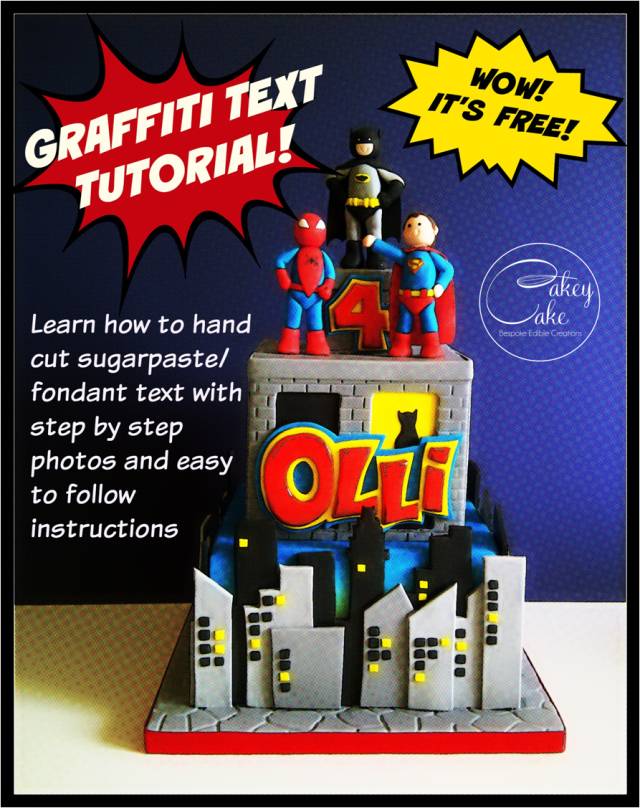
It will probably seem very obvious to some, but every time I make a superhero cake I am asked what cutters I use for the text, so I thought this mini tutorial on hand cutting sugarpaste text might be helpful. Feedback always welcomed!
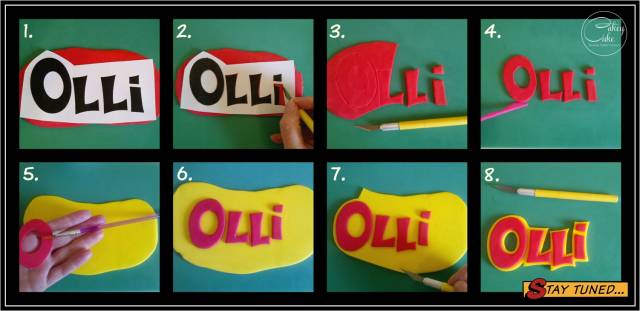
1. Choose your font and print it out in the size you need for your cake. Add a little CMC powder to your sugarpaste and roll it out to a 2mm thickness. Place your printed font over the top.
2. Take a sharp craft knife or scalpel and CAREFULLY cut around the letters, cutting through the paper and sugarpaste simultaneously (I find this reduces drag).
3. Remove the paper and cut away the unwanted sugarpaste in sections.
4. The remaining letters may need neatening up a bit – I use a plastic blade.
5. Add some CMC powder to your second colour sugarpaste and roll it out to a depth of about 2mm. Moisten the back of each letter using a little water and a paint brush.
6. Stick the letters down, applying a little pressure to each one.
7. Using your craft knife CAREFULLY cut around the letters, leaving a border of about 2mm all the way around.
8. Remove the unwanted sugarpaste in sections.
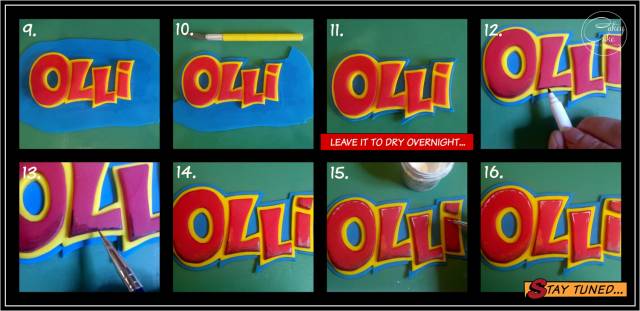
9. Add some CMC powder to your third sugarpaste colour and roll out to a depth of about 2mm. Moisten the back of the letters and stick them down, applying a little even pressure.
10. Use your craft knife to CAREFULLY cut around the letters, again leaving a border of about 2mm all the way around.
11. Remove the unwanted sugarpaste in sections and leave to dry overnight .
12. Use an edible pen to create some shaded areas around the bottom of each letter – use an actual graffiti text image as a guide if you are unsure how to do this .
13. Take a small paintbrush and a tiny bit of water to gently smudge and graduate the shading.
14. Leave it to dry.
15. Using a tiny paint brush paint some edible white paint sparingly around the top of the letters to create ‘highlights’. Again, refer to a graffiti image for guidance if you are unsure.
16. Leave it to dry overnight.
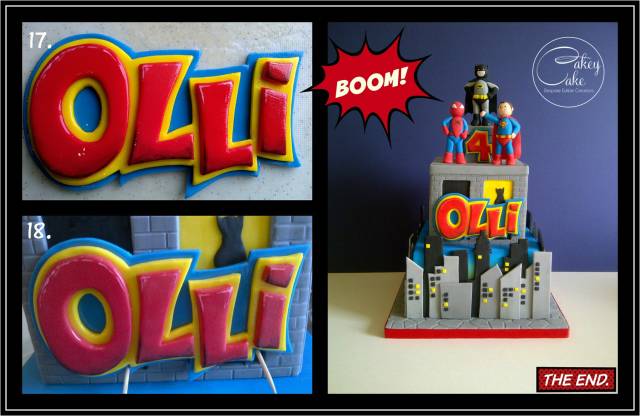
17. Your text should be pretty robust by now, but some edible lacquer will help to strengthen it further, and will really make it ‘pop’ out from your cake. I applied 3 coats of Dinky Doodles ‘Shell & Shine’, making sure each coat was completely dry before applying the next. Ooooh shiny!
18. Make a really stiff royal icing and pop ample blobs on the back of your text and press it firmly on to the side of your cake. Use a brush to wipe away any royal icing seepage(!) and support with cocktail sticks until it has dried.
And you’re done! It’s a great way of adding colour to your cakes, and of course opens up limitless fonts and text sizes, so go have some fun!
Thank you for looking :) x
https://www.facebook.com/media/set/?set=a.813752602012549.1073741964.376930285694785&type=1
CakeyCake, http://www.facebook.com/ChildsCakeyCake
31 Comments

Thank you CakeyCake ❤️❤️
Marias-cakes

Cool!!! Thanks a million that’s very useful x
Sassy Cakes and Cupcakes
thank you
Thank you soooo much….love it!!

Thanks!! Really helpful!!!
Sweet Rocket Queen - https://www.facebook.com/sweetrocketqueen

Thank you Harriet x
Love Life, Eat Cake! @ https://www.facebook.com/eatcakelovelife
Brilliant :):):)

thank you thats amazing
lilchick
Loving the comic strip theme H! ;)
Mel, Yorkshire, http://www.facebook.com/doncastercustomcakery