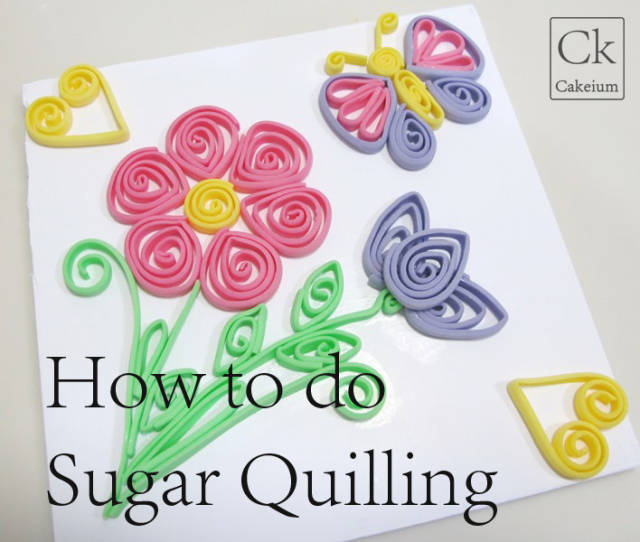
How to do Sugar Quilling-Beginners Guide
This is a wonderful paper craft technique that can also be replicated using modelling paste.
You Will Need:
Modelling paste approx. 100g each of green, yellow and two other floral colours (modelling paste is 50:50 flower paste/gumpaste:sugarpaste/fondant or 1/2 tsp CMC to 250g sugarpaste/fondant)
5mm strip cutter of some sort e.g Gem (otherwise ruler and craft knife will do for cutting strips)
Ruler and craft knife
Non stick rolling board, rolling pin and dusting bag to stop the sugar sticking (filled with icing sugar or cornflour/cornstarch, whichever is your preference)
Edible glue and paintbrush to apply it
Small cake board/card or suitable alternative to stick project to
Half a piece of 24g floral wire, wire cutter and some floral tape (to make a quilling tool)
Small nail scissors
Scribe/needle tool or cocktail stick if you don’t have one
Small palette knife
CelCakes and CelCrafts Sugar facts Size Guide or set of circle cutters (starting small) or print different sized circles onto thin card and cut the circles out. FYI circle diameter’s for this project: size 9 ~1.7cm, size 10~1.8cm size 12~2.4cm
To do this technique you need to be able to curl strips of modelling paste into tight coils. You can do this two ways; by manually winding the paste round a scribe tool or cocktail stick or use a small prong which acts like a fork spiralling the paste for you. I much prefer the latter method. You can buy a quilling tool but I the ones for paper will be too narrow and the commercial sugar version available is a bit too wide for me.
Make a Prong Tool
It is however very easy to make your own prong tool.
-take the floral wire and cut it in half
-stretch the floral tape to activate
-take one of the pieces of wire and wrap the tape round firmly about 8 times about ½” or 1cm up from one end of the wire so it sticks to itself
-place the other piece of wire next to this one so that they sit level with one another forming a prong at the shorter section
-continue to wrap the floral tape around both wires and up the longer section of the wire to form a handle

-the prong needs to have a gap of about 1/16th” or 2mm between the two wires otherwise the paste will not fit inside it. If your gap is too small adjust the width by gently bending the wires out.
Now it’s time to start making some shapes! I use a gem strip cutter which gives you several strips at a time about 7” long. Use what you have though. It will depend on the temperature and humidity where you live but when you handle the paste and cut it into strips it should be pliable but not sticky or dry and crumbly to the touch. Modelling paste is the perfect medium as it will firm but you will have a lot more working time in the air than using flowerpaste/gumpaste. If you have some experience with working in sugar you will find it easier to work on your strips in the sweet spot. If it is a dry day, put strips of paste you are not ready to work on yet into a zip lock bag or under some cling film/saran wrap. If it is a hot and humid day you will need to use your dusting bag to dry the surface of the paste so you can handle it.
Making Closed Shapes
Every closed shape you make for quilling starts with a tight spiral/coil.
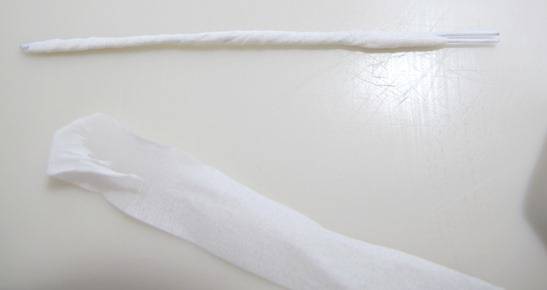
-roll out some modelling paste to a thickness of about 1/32” or 1mm thick and cut into several strips 5mm wide and about 7” long

-insert one end of the strip into the fork of the prong tool
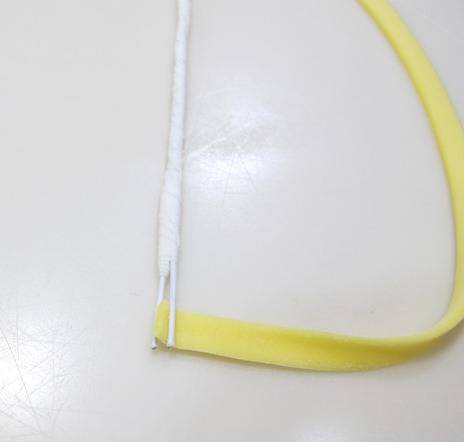
-stand the prong upright and twist the prong around to coil the strip of paste up on itself; just like twirling spaghetti round a fork!
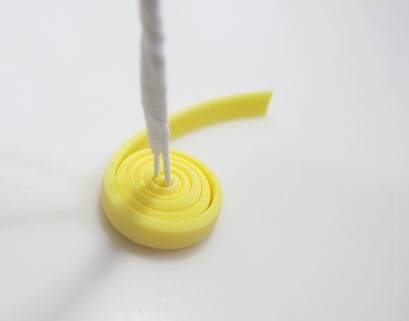
-remove the prong from the middle of the coil (you can put a finger either side of the prong when you pull to stop the tight coil lifting off your table). This is your tight coil.
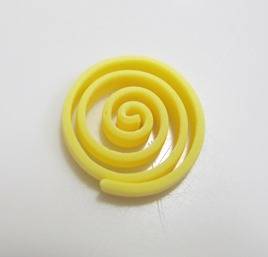
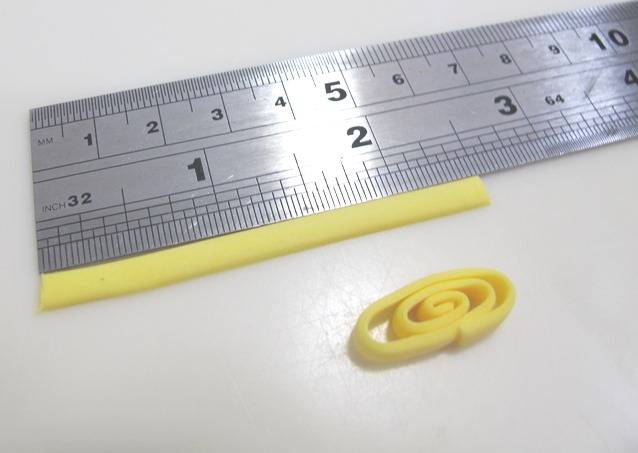
The next basic shape is the loose coil. The secret to producing the same size closed shape is to use set the coil inside a circle of fixed size which is where the Size Guide or alternative comes into play. The coil will be more open the bigger the circle you place it in and vice versa.
-place the size 12 circle over the tight coil or lift it onto it using a mini palette knife
-use a scribe tool or cocktail stick to gently unwind the coil aiming to unwind from the outside in until the coil fills the larger circle it is inside
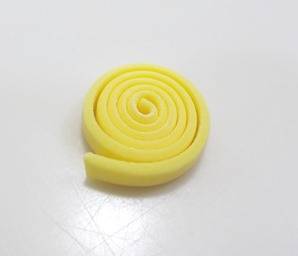
-use a small paintbrush to apply a dot of edible glue to the inside end of the coil.
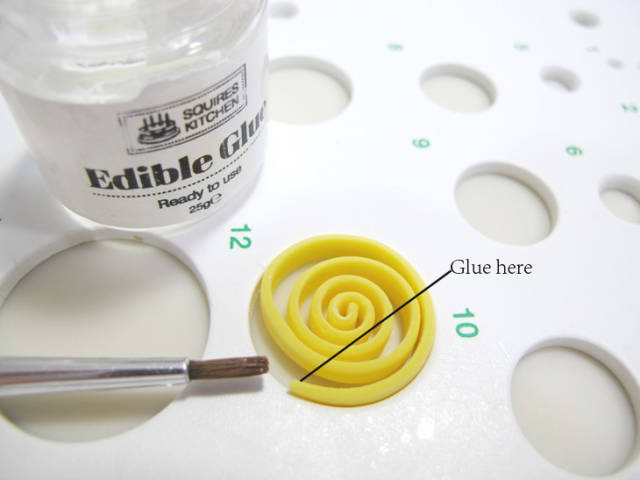
-use the end of the prong handle, scribe tool or paintbrush end to stick the coil together into a loose coil.
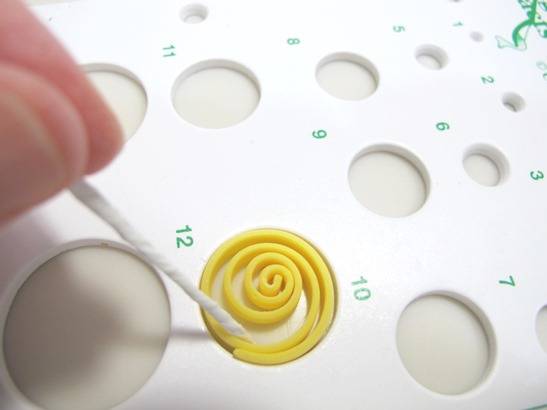
-lift the size guide away. It’s best to let the shape firm a little before applying it to anything else. This will both set the shape up and make it easier to handle. If you need to move the shape to one side to set-up and it distorts use the scribe tool or cocktail stick to correct the shape.
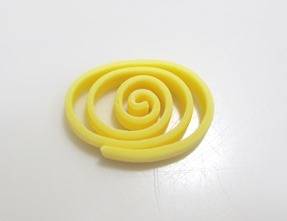
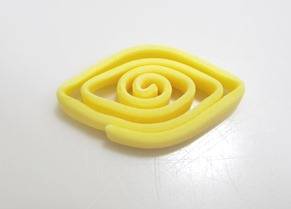
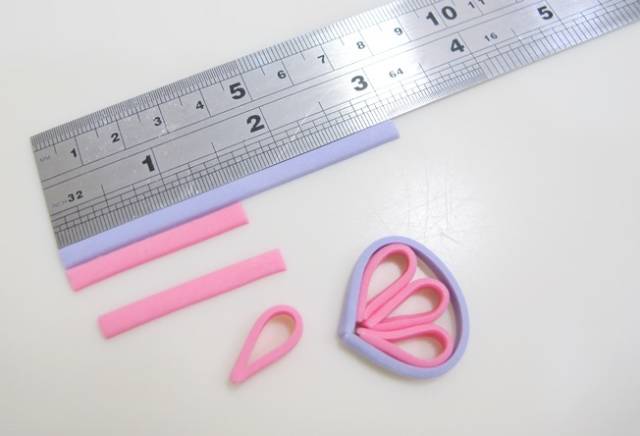
From a loose coil here are some of the shapes you can now make
-flatten at the top and bottom to form an oval
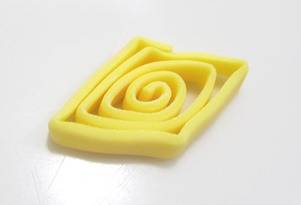
-from the oval pinch the sides to form a pointed oval/eye/marquise (pinch one side only to form a teardrop/leaf)
-twist the points of the marquise in opposite directions to form a double curved marquise
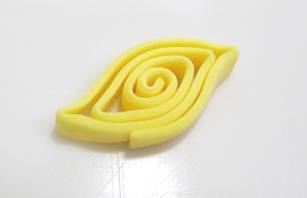
-from the teardrop or marquise push the centre of the spiral away from the middle and towards one side of the shape. This adds more interest.

-from the marquise pinch the opposite sides to form a square
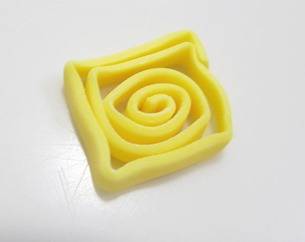
-from the square flatten opposite sides to form a diamond
Making Open Shapes
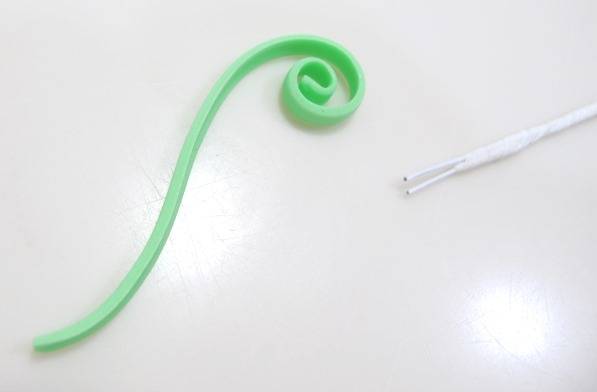
These can be a little more difficult to handle than the closed shapes but again, letting the shape firm after making will make it easier to move. Here are a couple to try:
-take a 7” strip of paste and fold/pinch it in the middle
-curl the paste up to near the centre using prong on one side and then the other making a heart scroll
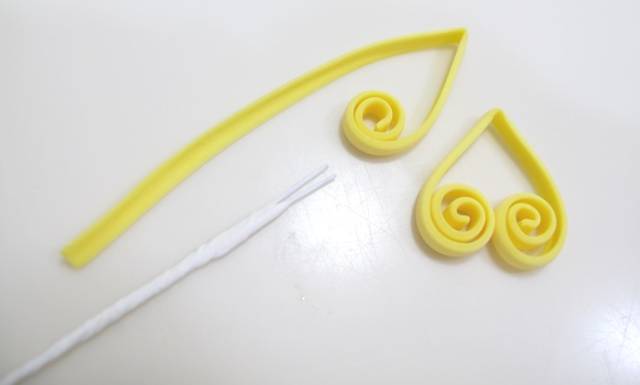
-cut a 7” strip in half and curl one end to form a loose scroll
Other Ideas
Put two different colours of paste on top of one another (two different colours or different shades of the same colour), roll together out to 1mm thick and then cut your strips out from this. This creates a more dimensional look to your quilling without having to roll the paste super thin.
Make a small loop and stick loops of increasing size round it in the same or different colours. This will make a shape like a closed teardrop without having to coil the strip of paste first. You can also pinch the rounded end to make a marquise and curve it
Making the Project
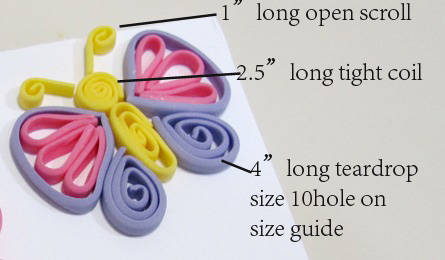
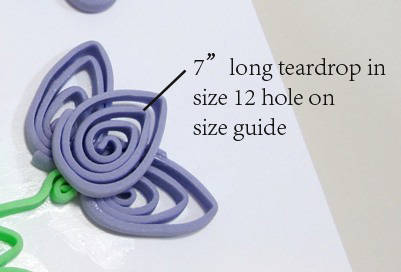
Butterfly Wing (you will need two of these)
-the wings are made from a set of loops, one colour 1 × 3” long and another colour 3 × 1.5” long.
-turn each of the shorter strips on their side and glue the ends together
-place the 3 small loops together and glue the outer loops to the middle loop
-wrap the longer strip around the other three and glue at the base. The aim is to form a petal/wing shape
Butterfly Body
-take a 2.5” piece of paste and from an oval using the size 10 hole on the size guide
Butterfly antennae, head and bottom of wing
-use the annotated picture to make the shapes (you will need two of each)
Once all the shapes have been made and have firmed a little you can assemble the butterfly on whatever you have chosen e.g. a cake card, cake etc.
You can put quilled shapes on the side of a cake, it’s just a little more fiddly and you have to make sure the shapes are firmed up before applying.
Apply edible glue on your chosen surface to cover the required for the antennae, head and body. Stick on the head, followed by body then antennae (use mini palette knife if needed to aid transfer). Make any fine adjustments to the shape if required using a scribe tool or cocktail stick. Next apply enough edible glue to cover the area for the wings and add these as shown in the picture above
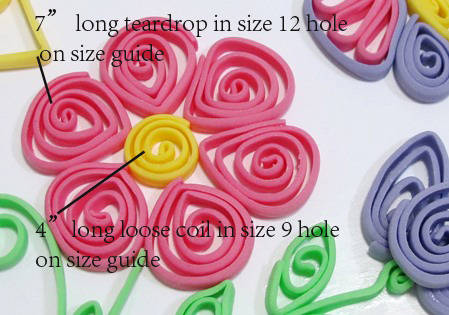
6 Petal Flower
- use the annotated picture to make the shapes (you will need 6 teardrops and one loose coil)
-you can have the point of the teardrop facing in or out, each gives a different look
-apply to your chosen surface using the same method as the butterfly, add the flower centre first then the petals
Tulip
-use the annotated picture to make the shapes (you will need 3 teardrops)
-apply to your chosen surface using the same method as the butterfly, add the two lower petals first, then apply glue to the top of these petals in the area where the third petal will sit and apply.
Leaves and stems
-use the annotated picture to make the shapes (make as many of each as you like)
-apply to your chosen surface using the same method as the butterfly, add the flower centre first then the petals

Heart Scroll
-make 2 as described earlier and apply to your chosen surface
I hope you enjoyed this tutorial.
If you want to know more about paper quilling and find out about other shapes that can be made do a google search. Now you have the basics down anything is possible!
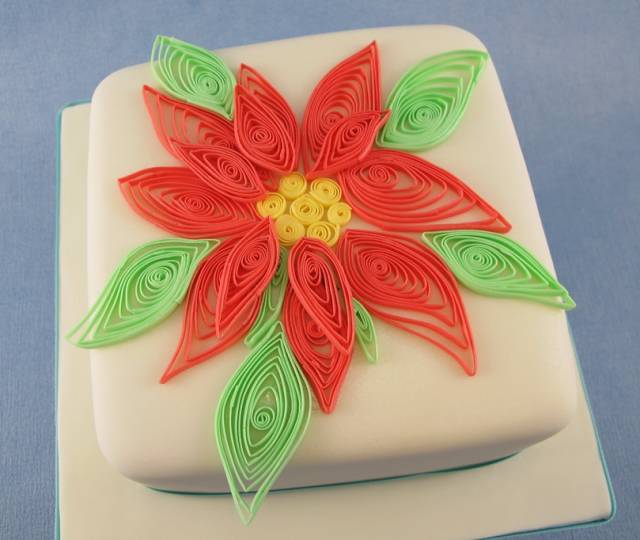
Once you get confident roll your paste thinner (as thin as you are happy to handle) and cut your strips into 3mm widths. Once you can roll the paste thinner you can also use longer strips of paste e.g. 14” (if using the Gem strip cutter stick two 7” pieces together). This will allow you to create larger and more intricate shapes.
The cake below has a quilled poinsettia on it and you can see how delicate the quilling looks when you can get confident with rolling the paste thinner.
12 Comments
This is a superb tutorial – thank you!
Judy
Natasha you are so talented and really appreciate this fabulous detailed tutorial. Thanks for sharing your knowledge
You must never limit your challenges, instead you must challenge your limits

Wonderful! Thank you so much. Will have to give it a go now x
Sassy Cakes and Cupcakes

Super!
Anka
you are welcome xx

I love this tutorial! Thank you so much for sharing it!
Toni, Pennsylvania, https://www.facebook.com/WhiteCraftyCakes

Great tutorial!
Teri, Ontario, Canada http://www.TeriLovesCake.ca
Fantastic!!

I am going to try this soon! Thanks for sharing!
Been wanting to learn to do this. Thank you.
Pam