
Cake with owls tutorial
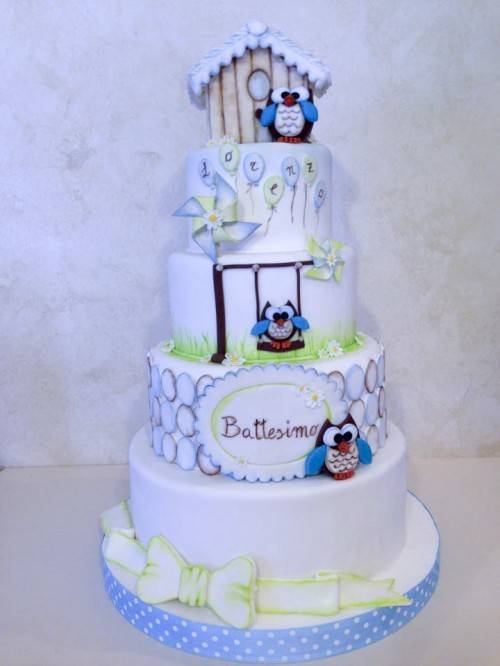
I made this tutorial at the request of “Cake Courier” a blog of the newspaper “Corriere della Sera”, of course for me it was a great honor and it is with pleasure that I share it with you!
I sincerely hope that you enjoy it!
thanks :)
Link for the tutorial:
http://cake.corriere.it/2014/10/13/alla-scoperta-del-mondo-dei-rapaci-notturni-con-la-torta-con-i-gufetti/#more-19442
NEWS:
I proceeded to the English translation of the tutorial, I apologize for not having done it sooner.
Below you will find the translation, hoping that it is understandable, having used an automatic Translate on the web :P
For any questions please contact me :)
Of course, to view the images, go back to Link.
needed:
- 4 Cakes – diameter cm 30 – 25 – 20 – 15
- 1 tray diameter 38 cm
- 1 house in 8 × 8 cm polystyrene h9,5 the highest point
- white sugar paste to cover
- gum paste white
- modeling dough brown, black, orange and blue
- color powder blue, light green, brown, yellow, orange
- edible gelatin
- edible glue
- cutter oval, teardrop and round
- stencils daisy expulsion (2 sizes)
- ruler
- rolling pin
- extruder (sugar gun)
- modeling tools
- brushes
- mat to shape the petals
- wooden toothpick (big skewer)
procedure:
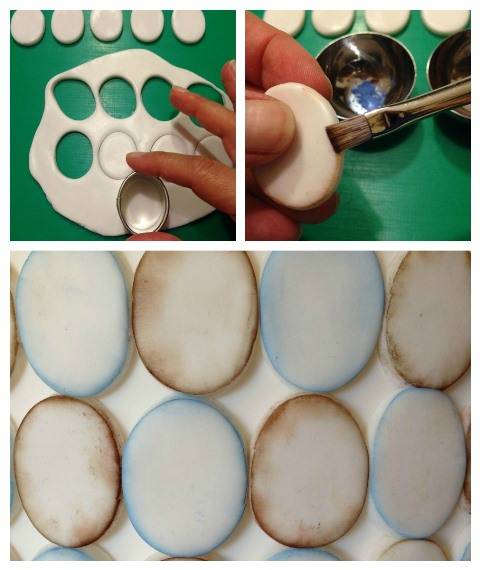
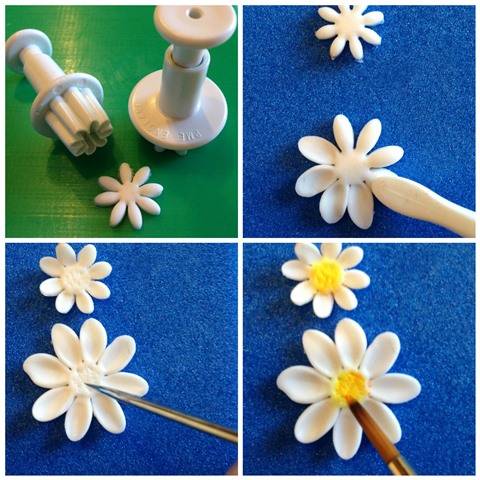
Cover the tray and cover all the cakes with white sugar paste. Made cake decoration diameter of 25 cm (second floor). Roll out the white sugar paste to cover, trying to have a layer of about 3 mm (not too fine), with the cutter large oval carved about 90 pieces. After having obtained the oval, with the flat brush, paint the edge of each oval, use the color powder. Realizzatene one part blue and part brown. Attach it to the base covered with edible gelatin, starting from the bottom and moving around the entire circumference, you will see that it will remain an area of about 1 cm which will be hidden from the rosette with the word baptism. Continue with the next two layers, making sure to alternate colors. Roll out thinly the dough and cover with white daisies stencils cut about 15 pieces for each size. With the leaf shaping tool worked the petals one by one, then with a pointed instrument to work the center of the daisies. With a brush tip, round, colored with the color yellow dust in the center of each daisy and then dust with a little orange dirtied ‘the color of yellow, just to give a little’ of three-dimensionality.
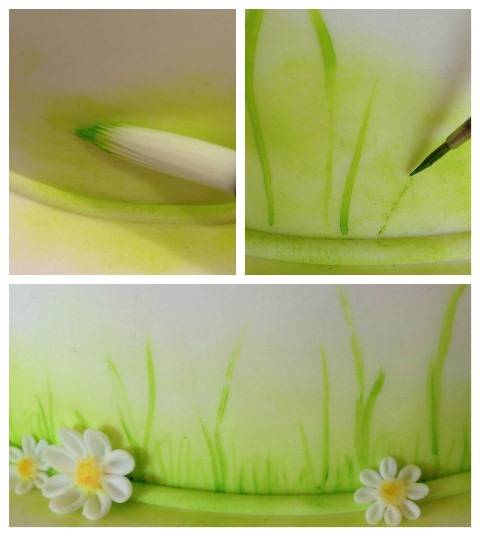
Now go to the decoration of the cake with a diameter of 20 cm (third floor). With a large brush to paint the tip round the bottom of the cake up to a maximum height of 3 cm. For staining with faded green color powder by not loading the brush too. Made from the stems of grass with a fine brush tip round, softening the color green powder with very little food alcohol or possibly vodka. Pull the lines in an irregular manner from the base of the cake up to a maximum height of 3 cm, do not make too many not to weigh the design. Continue around the whole circumference. With edible gelatin, daisies attached to your liking, lasciatene paste from some close to the lodge and 2 for the pinwheels. Made from the owls. It must be made 3, one near the cottage has the body and wings of a greater thickness than the other, but the process is the same for everyone.
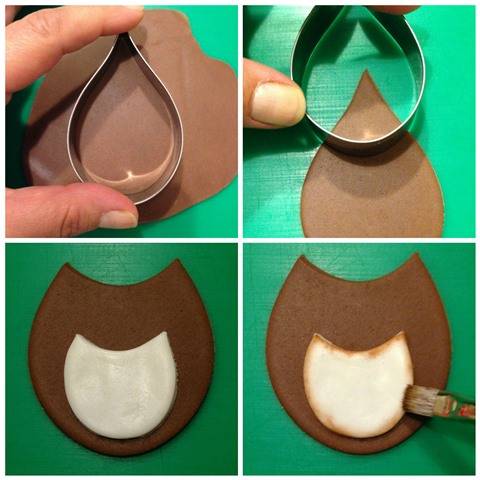
Roll out the dough by modeling brown, a layer of about 3 mm (for those more often, roll the dough to degrade so as to give an effect triangular when viewed from the side, starting from a thickness of about 1.5 cm in the lower decrease up to 0.5 cm in the upper part). Cut the dough with a cutter and drip with the same cutter to remove the tip in order to highlight the ears of the owl. The same procedure carried waistcoat owl, spread thinly the dough from white cover and use the cutter to drop smaller.
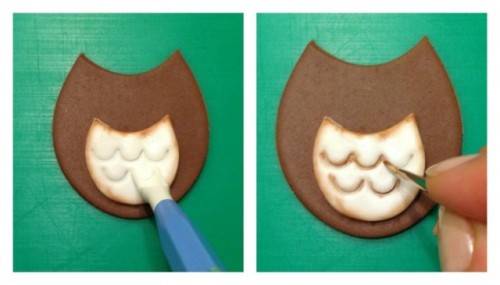
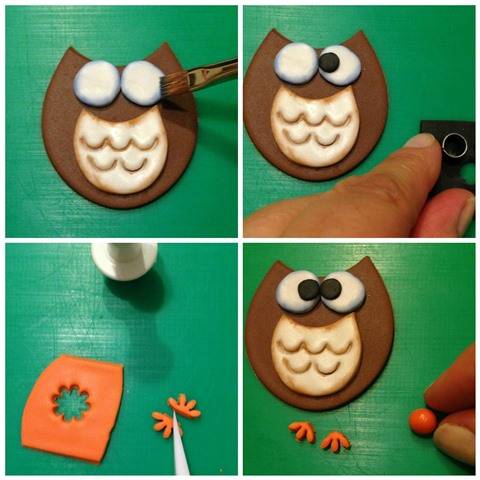
With gelatin glue the vest to the body of the owl. With the flat brush colored with brown dust the edge of the vest. With a straw or with the serrated tool (the one with the “C” to make mouths) made of the grooves on the waistcoat. With a fine brush round toe rub with brown powder grooves just done. With the largest round cutter extracted from white pasta, 2 circles for eyes (3 mm thick) and then with the flat brush, color the edge with the powder blue.
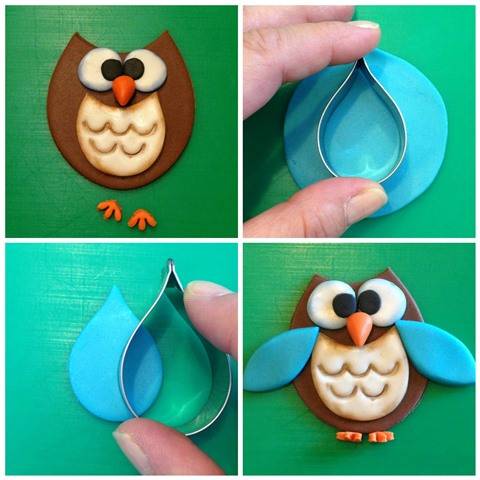
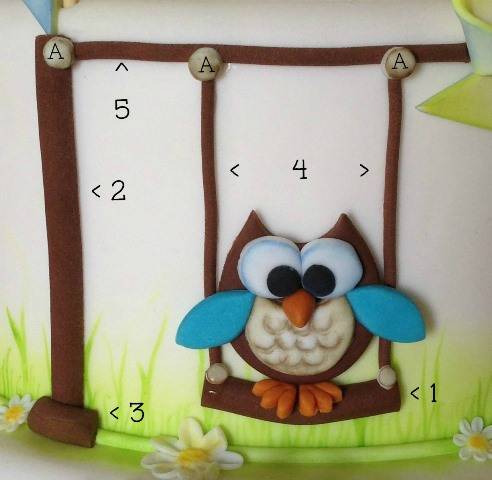
With the small round cutter, draw 3 circles with the dough modeling black (thick pasta very fine) and glue over the white circles, then glue them on the owl. To make the legs of the owl, roll out the dough modeling orange (a thickness of about 2 mm) and with the small daisy cutter carved a flower. Cut it in half and remove from each half of a petal, stick to the owl. For the beak, make a ball of about 6.7 mm in diameter with the pasta and orange pizzicatela one side until you get the shape as shown, glue the beak under his eyes. To make the wings, roll out the dough modeling blue with a thickness of about 3 mm (5 mm for the owl’s house) and the cutter drop small cut pasta, let’s proceed. Glue the wings to the owl jelly. Made of the swing. Place the dough in the extruder modeling brown and pull the dough before the die with “D” and then with the die round.
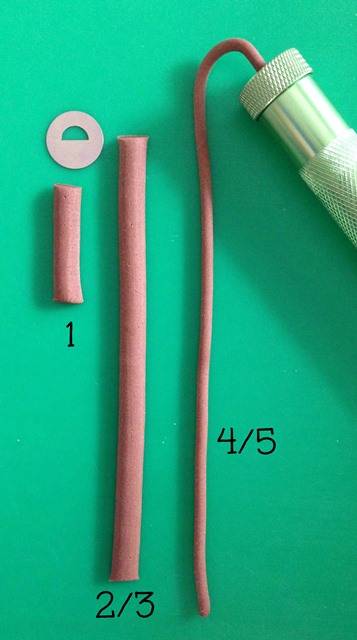
needed:
drawn to the “D” 3 pieces:
- 1 piece of 5 cm for the seat (1)
- 1 piece of 9 cm (2)
- 1 piece of 2.5 cm (3)
For the drawn round:
- 1 piece of 10 cm (5)
- 2 pieces of 7 cm (4)
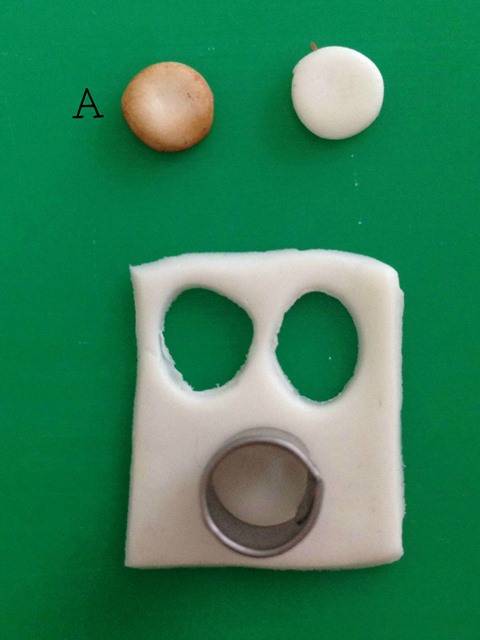
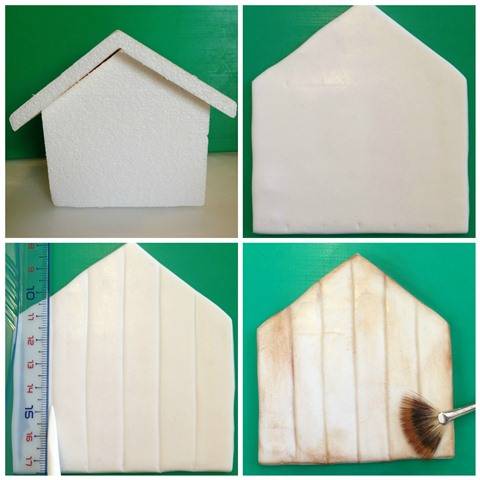
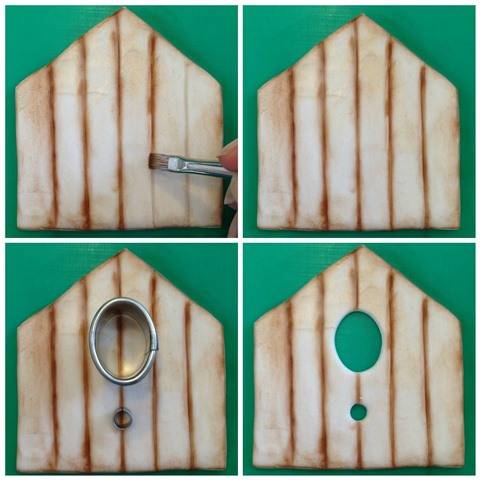
Glue them to the cake with a diameter of 20 cm and glued on the seat a little owl. To cover all the joints, glued the circles (A). For the circles, roll out the white sugar paste and the small round cutter realizzatene 5 pieces (2 for the seat), and then paste them rifiniteli coloring the edge with the dye in brown powder. Made the house. Roll out the white sugar paste with a thickness of 2.3 mm, and cut out the 4 parts that are going to cover the sides of the house, 2 rectangular sides and 2 pentagonal. With the tip of the leaf shaping tool, pull of the vertical lines at a distance of about 1.5 cm apart. With a flat brush off, “stained” with the dye powder brown the entire surface. With a flat brush review all the joints obtained with the dye in brown powder.
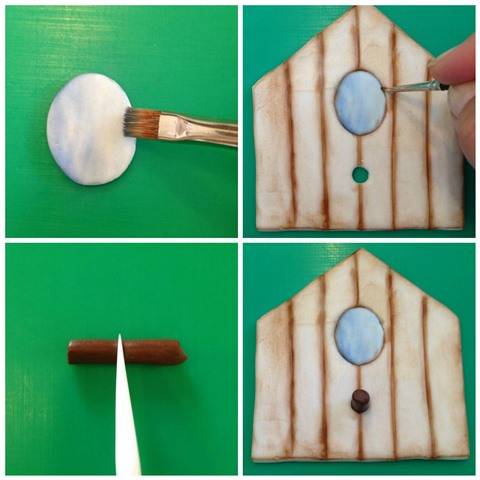
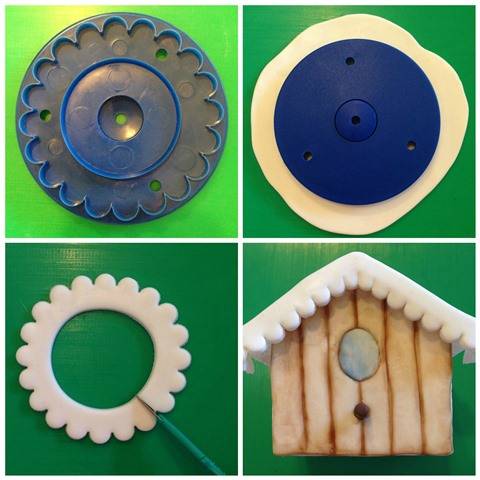
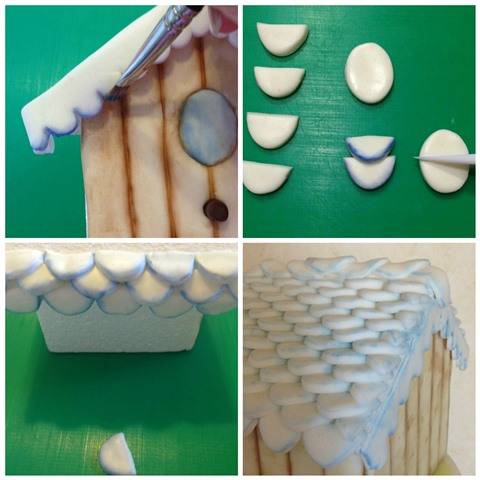
All the walls, except the front can now be glued to the lodge. To the front wall instead make two holes in one in the middle with the small oval cutter and immediately below, one with the round cutter piccolo.Incollate the wall on the house, taking care not to deform the oval hole. Cut an oval of white dough with the small cutter and “dirty” with the dye powder blue, stick house. With the dough modeling brown, make a “stick” diameter hole at the same applied to the front and with a length of 1.5 cm, paste it on the house. To cover the roof of the house, roll out the dough to a white cap with a thickness of 3 mm, using the round cutter for lace, carve 2 pieces, one for the front of the house and one for the back. Cut the lace in order to obtain a strip and glue it to the roof, cutting off the excess.
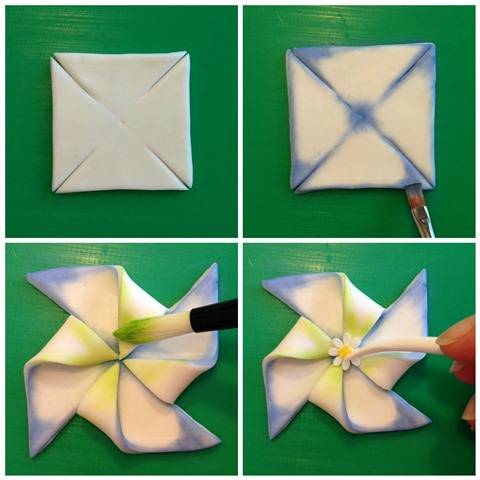
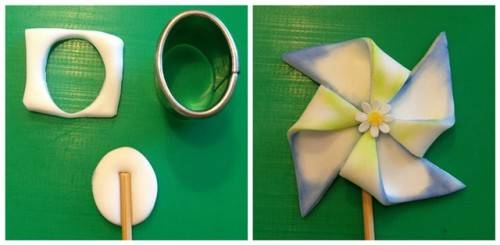
With a flat brush, paint the lace edge with the dye in powder blue. To make the roof shingles, roll out the dough to a white cap with a thickness of 3 mm and cut into 50 pieces initially with small oval cutter and cut them in half, before gluing the roof, stained with the flat brush and the blue dye, the round part of each tile. Glued in an alternating manner starting from the lower part of each side of the roof. Cover the central part (where to combine the 2 sides of the roof) with ovals integers. Made pinwheels. Roll the gum paste with a thickness of about 2 mm and cut out 2 square, one 9 × 9:01 6 × 6. Now you’ll use the square 6 × 6 (the other will have the same processing but will use the colors in reverse order). Marked the diagonals and the center of the square in a light as a reference point, starting from every corner cut diagonally for a length of about half that of the measurement is from the center of the square to the corner.
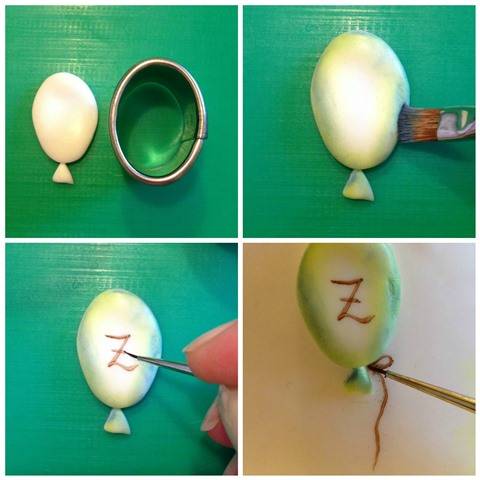
Colored with the color powder blue all corners marked with “1”, fold the corners marked with “2” towards the center and glue, color them with green dye. Glue the center of a daisy. For the big swirl (9 × 9) is made a stand, then roll out the gum paste with a thickness of about 4/5 cm and cut the base with the large oval cutter, insert a toothpick in wood base and let it dry well, subsequently glued with glue or with edible ices of the base to the pinwheel great. When they are dry, apply them to the cake. To realize the balloons to the name, spread the paste of sugar by covering with a thickness of 3 mm. With the small oval cutter, made the pieces that we need, one for every letter of the name. To the bottom of the balloon bow made many triangles. With the flat brush, paint the outline of balloons with the powder dyes blue or soft green alternately. With the brown dye, diluted with alcohol or vodka food, write letters to the center of the balloon. After pasting the balloons on the cake (cake with diameter 15 cm), always designed with the brown color used for letters, the thread of the balloon).
I Make Your Cake - http://www.facebook.com/Sosi.PArts
14 Comments

Thanks for sharing.
lovely
Anka
So pretty
You must never limit your challenges, instead you must challenge your limits
Beautiful and so sweet

Very pretty. I love the colors.
gorgeous!
'It Always Seems Impossible Until It is Done' Nelson Mandela http://www.facebook.com/CakesByFifi
Very cute!
*** Baked with Love ***
Such a cute cake, I love it!
Kate Plumcake, Lake Como, Italy - http://kateplumcake.blogspot.it/