
My first blog! Bake it UP!!
Baking, easy yeah? Hmmmmm not so much.
Most people with an interest in baking, will be totally fine when it comes to whipping up that victoria sponge for after sunday lunch. Of course, theres not much height needed really….you just mix a basic sponge mixture up and pop it in a couple of tins right?
But what about when your friend asks you to make her a wedding cake, because you’ve made a couple of super yummy cakes, and she wants you to make her one for her big day? Yeah it shouldnt be a problem right? So you start about the project….. You’ve done lots of reasearch, shes told you she wants 3 tiers and all of them to be that yummy vanilla sponge. Your planning, planning PLANNING withing an inch of plannings life! Everything is going perfect. Then it comes to THE WEEK. youve done your shop, purchased all your supplies…. you have stacks of free range eggs and a million organic bits and bobs. This will be the most amazing cake ever.
You begin following the recipe in the book, youve pre heated your oven….the right temp, the right timings, everything.
Tick tock tick tock……its done! you’ve not opened that oven door for the time stated and….! your cake got a crust, its sunk in the middle, its burned around the edges, its not done properly in the centre, its not risen very well. sound familiar? well it does to me.
So many times when i started out, many failed sponges ended up right in the bin for some, or all of the reasons above. That’s why I’ve decided my first blog will be, to share with you my methods, hints and tips for getting the rise in those cakes.
Before i begin, ill let you know that I know that I plan to make the majority of my recipes available for you all. For now though, ill start you off here with my basic vanilla sponge recipe and the method for baking an 8" round cake
Ingredients:
- 400g self raising flour – literally supermarkets own does the job fine! I always get a fantastic cake with great taste and high rise with any basic white flour. There’s no need to have organic this that and the other in my opinion, unless you prefer to use it or it’s been requested.
- 400g unsalted butter or baking spread at room temp (whichever you prefer but I personally use Stork as I find it gives the best results and still tastes amazing at the end)
- 400g caster sugar – I use Tate and Lyle
- 8 eggs at room temp, mine are always stated as medium…. Also, I don’t by free range. It’s my opinion that free range eggs taste too eggy. I know…it sounds weird but they do. A cake should taste of cake, not egg.
- 1 1/2 tbsp good quality vanilla extract – I use Nielsen and Massey liquid. I’ve used there vanilla bean paste too but I find liquid is best.
Method:
Pre heat your oven to
Electric – 160 degrees celsius
Gas – gas mark 3
I use a tabletop, electric mixer. If you don’t have one then try use a handheld mixer. Massive respect for those who do everything by hand, but I really don’t have time, and think in this day and age it’s rather unnecessary.
Weigh out your sugar, butter and vanilla extract.
Try to use an electric scale. The trick is in the mixing and weight of ingredients with a high risen sponge, and electric or digital scales will provide you with a more accurate measure
With the beater or paddle attachment, beat the butter, sugar and vanilla on high. I usually leave mine to do the job for between 5-10 minutes. Occasionally, scrape down the sides with a spatula to make sure all the mixture is being incorporated.
While that is doing the work, get a large jug and electric handheld mixer (if you have one free).
Break all the eggs into the jug and beat on high until it goes all frothy on the top.
By now your butter and sugar mixture should be looking pale/light and fluffy. The sugar should look like it’s been mixed in and not looking grainy. You can’t over mix this, it’s under mixing that’s the problem…. If in doubt, mix for 2 mins more.
When you feel it’s ready, begin pouring the egg mixture in. I usually pour it in, in ‘batches’ of 3 so pour mix, pour mix, pour mix.
I know every recipe book in the land says not to let your mix curdle, seriously, mine does every time! I used to spend forever trying to get it not to, until I realised in the end it made no difference to the final product! So if it curdles, don’t panic. Just get all the egg mix in there, and mixed up.
Leave the beater set on high for a minute or 2. The more air that’s incorporated into the mix, the better at this point (which is why I always pre mix my eggs instead of breaking them in 1 by 1).
Get your flour sieved into a second bowl. Add the flour in 2 parts. Add the first part to the mixer and mix on slow for a minute or 2, set the mixer to fast for a minute until the batter isn’t looking like there’s any lumps of flour. Repeat for the rest of the flour.
Some people don’t mix their flour in on high. They ‘gently fold’ it in. I used to do this, until… Again… I realised it didn’t make much difference to the taste or texture of my sponges!
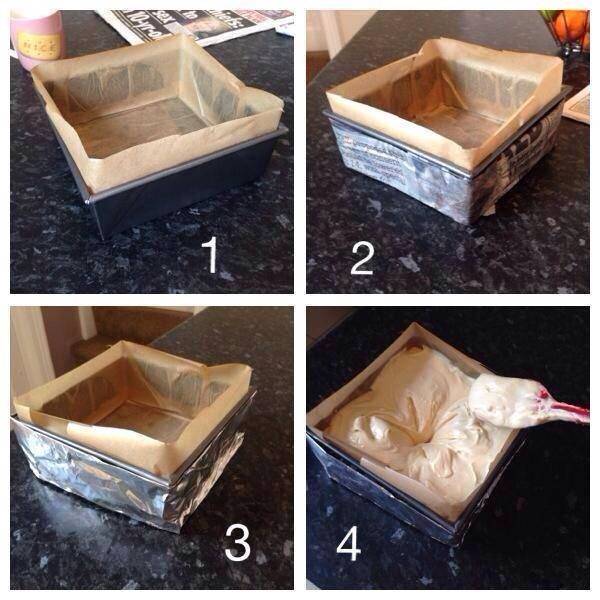
When you have a nice, lump free cake batter, your good to go. Leave it to one side for a few minutes while you line your tin…. YES, LINE IT! Lining tins is essential! I line mine inside and out. If I don’t line the outside, I never get the same height on my sponges so don’t be tempted to skip it.
Get your 8" round tin (all mine are 3" deep and solid, I don’t like using springform ones so get the good old fashioned type), line the inside of the tin using grease proof/baking paper. Be sure to be neat here now, when cutting the paper to line the sides, your going to need it to be about 1 1/2" higher than the actual tin.. So 4 1/2" (this will keep your mix from spilling over the sides of the tin when it’s bakes/rises). Rub your butter or spread around the tin and place the paper inside it.
To line the outside of the tin, get a couple of sheeted of newspaper and fold them lengthways so you have a thick, 2/3" length. Run it under the tap so it’s damp, squeeze out excess water… It doesn’t need to be dripping. The newspaper should just stick to the outside of the tin with out tape. Next, get some tin foil and fold this again like the newspaper. It’s going to be like a second layer. Put it over the newspaper, around the tin and scrunch it together either end so it is secure. Voila! Your tin is now lined Cupcakelicious style :-) (picture uploaded demonstrating this below)
the purpose of double lining a tin, is to ensure your cake cooks evenly through the centre without burning on the outsides. A deep cake requires a long cooking time, and it’s easy to find you’ve acquired a crust on your cake if it’s not outer lined. I never have to trim my cakes edges after baking, only for fitting on the board purposes.. BONUS!
Pour your mixture into the tin. Pour in enough to fill around 2/3 of the tin. You’ll probably have about 1/2-1" inch gap between the top of your batter and the top of the cake tin (not the tin lining). Make a hole in the centre by pushing all the cake mix to the outside of the tin with your spatula. Don’t be shy, if you can see the bottom of the tin, great! The mix will start moving back toward the middle but it’s fine. Put the tin in the oven in the centre. Set a timer to 1 hr 15 mins. My electric oven used to take around 1hr 30 to bake this size cake… But my mother in laws gas oven (which I’m currently using) takes around 2 hours. You’ll get to ‘know’ your oven after you’ve baked a few sponges. Soon enough you’ll squire a bakers nose! You can smell when a cake is actually ready for taking out… Seriously!
After 1hr 15 mins, open up the oven and push knife through the centre of the cake. It’s likely it won’t come out clean, i.e. have no bits of uncooked mix on it, so put the timer on for another 10-15 mins. Check after this time again. Just keep an eye on it now until that centre is clean when tested with a knife. The cake does it’s rising in the first and middle parts of baking, afterwards it’s just ‘firming up’ I find.
When your happy that the bake is baked through, bring it out of the oven and turn it out onto a wire rack to cool. Remove the baking paper from the outsides straight away. We don’t want a soggy cake or any shrinkage. Some people leave them to cool in the tin. Personally I find taking them out to be the better option.
Don’t attempt to cut/carve your sponge while it’s not cool. It will need
A good hour in the side to cool down. Leave it uncovered.
I always bake my cakes the day before I want to fill them. The next day, carving it or cutting the layers will be easier, the sponge will be nice and stable, and you shouldn’t get as many crumbs when crumb coating. I don’t really get any (my sponges never come out dry)
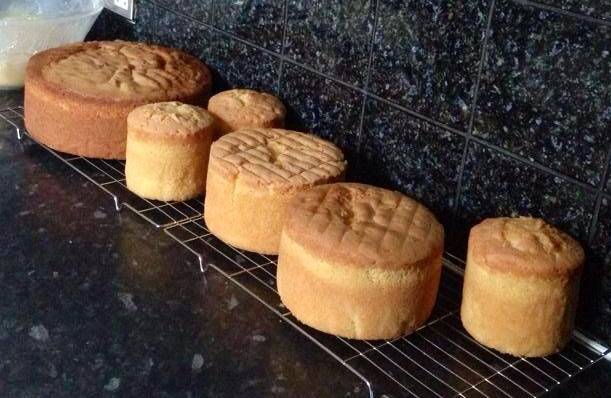
You should be left with a cake risen to around 3/4" deep. Fabulous! All my finished cakes, filled and covered, measure up to between 4 and 5".
Your now free to fill, and cover the cake a you would normally. I’m favouring swiss meringue buttercream at the moment for filling, but that’s a whole other post!
So there you go, that’s how I make my sponges, and how they end up being so deep/high. This is the most asked question I get on my Facebook page, so I thought I’d start you off with this.
I really hope you’ve found this helpful. If you have any questions, feel free to contact me or leave a comment. I try to respond as quickly as I can.
Have fun baking it up!
I hope you liked my first blog. Feel free to give me any feedback. You can head over to my blog page at www.cupcakeliciousmanchester.com
Ashleigh x
Ashleigh
12 Comments

Hey Ashleigh! This is great! The cakes look amazing, I use almost the same recipe. But, sometimes ive had problems with mine sinking in the middle. I thought it was because I over-beat them, but I think ive been filling my tins to full. I’m going to try your way and yes I agree with the ‘eggy’ eggs! Lol!! ;-)
Great tip about lining the outside, thanks.
Im in manchester too, in middleton, where abouts are you? :-)
sugar and art - perfect combination! sugarmagic22@gmail.com

Thanks so much for the comprehensive blog with loads of interesting and useful tips, love the pics… I’m an hour away from Manchester, near Sandbach . :)
You must never limit your challenges, instead you must challenge your limits
Love the diy bake-easy strips, I have some wilton ones – the new purple ones – which are both too shallow and too fiddly to get on (don’t know why they changed the design from the silver ones)… Might give this newspaper thing a try.
About the egg, I use free range carton egg whites instead of whole eggs, pre-pasteurised, not eggy at all I feel happier than buying eggs from caged hens. I get mine from my local sainsbury’s, and I replace whole eggs with them for all my recipes without an issue x
Great idea about the eggs Sawsen ;-)
Hey Ashleigh, ive just noticed in your cake pics, I have the same nice biscuit mug as you! (Tesco?) Lol ;-)
sugar and art - perfect combination! sugarmagic22@gmail.com

I have that mug too – it really is ‘nice’!! :-D
I use exactly the same recipe as you do except for the amount of vanilla – do you really use 1 – 1 1/2 tablespoons? and I split the recipe between two tins. Perhaps I should just use one…….. :-) I wish you hadn’t said that about the eggs though – now I am torn between wanting yummy cakes and wanting happy hens….. :-/
Julia Hardy
Aw I’m sorry about the egg situation lol! Well, I use free range eggs for other stuff like when I’m just eating omlette or something but it’s just in cake. Really eggs taste to them!
Haha Christine! Good spotting in the mug! Yep it’s totes from tesco!
Hey we have gooood taste :-D
Julia- yes Hun that’s how much I’d use. I use 1 1/2 tbsp per 300g mix. So I’d use 3tbsp for 600g etc. Although I can only just fit a 700g mix in my mixer!
Every one always comments on the yummyness of the vanilla. X
Ashleigh
Ooh – well I am seriously under-vanilla-ing and need to change that. You must get through a lot.
(I also have the Bourbon one :-D) x
Julia Hardy
Yes I buy the large litre bottle of Nielsen Massey from www.purplecupcakes.com
The bottle is £50 but sometimes they have it on offer. I always have a quick check there. Tbh that bottle has lasted me I bought It in April and still have over 1/4 left. Vanilla is my most popular flavour and I average on 3/4 vanilla sponges a week :-) x
Ashleigh
Thanks for that – I will check it out. No other brand compares does it :-) x
Julia Hardy
That link didn’t seem to work properly but I went to purplecupcakes.co.uk and it is £30 and really good value! Fantastic! :-D x
Julia Hardy